• About
    • About Blue i Style
    • Tour Our Home
    • Free Organizing eBook
    • Blogging Resources
  • Work With Me
    • Interior Decor & Organizing Services
    • Partnerships & Collaborations
    • Blogging Resources
  • Features & Press
  • Policies & Disclosures
  • Contact

Blue i Style

Creating an Organized & Pretty, Happy Home

  • Decor
    • Tour Our Home
    • Room Makeovers & Design Plans
    • Decorating Tips & Tutorials
    • Outdoor Decor
    • One Room Challenge
  • Organizing and Cleaning
    • Organizing Tips & Tutorials
    • Organizing By Room
    • Organizing on the Go
    • Cleaning
  • DIY
    • DIY Tips & Tutorials
    • Smart Home & Safety
    • Paint Tips & Projects
    • Crafts
    • Cricut Projects
  • Kids
    • Decor & DIY for Kids
    • Organizing Kids
    • Life With Kids
  • Five Minute Projects
  • Holidays & Entertaining
    • Seasonal & Holiday Decor
    • Entertaining
    • DIY Gifts & Gift Guides
    • Facebook
    • Instagram
    • Pinterest
    • Twitter
    • YouTube

Outdoor Decor

Modern Patio Construction With Square Pavers

  • Facebook
  • Twitter
Last week, I kicked off a new series of posts that I’m calling “Backyard Evolution,” where I’m going back in time to show you how, over the course of the past six years, we’ve slowly been changing our small, urban backyard work for us – from our young couple status when we bought the house, to our current status as a family of four with two young boys who need more room to play.
Last week, I shared some photos of what the backyard looked like when we moved in, and I talked about the initials plans we made. This week, I’m going to show you the construction of the patio that we designed specifically for entertaining.
Modern Concrete Paver Patio Construction

But before I walk you through the patio construction process, let me remind you what we started with {you can also read more about the “befores” and the evolution of our design plans in Part 1}.
Before photo of small, urban backyard
A few things I want to point out in this before picture… (1) the patio in front of our outdoor fireplace {at the bottom of the photo above} was much too small to be functional; (2) the building at the top of the photo is our detached garage, which is a sea of white stucco; and (3) the air conditioning unit was an eyesore in the yard.
We determined that we wanted a large patio that would allow plenty of room for entertaining, so we decided to utilize the entire space between the house and the garage. After looking at the cost effectiveness and practicality of numerous patio options {which you can read about here}, we hired a landscaper to install a patio created from 3 foot square concrete pavers. In addition to being much more affordable than a stone paver patio, we felt that this style would fit well with the modern architecture of our home.
The process began by ripping out all of the existing concrete and grass between the house and the garage.
Patio Construction
The landscaper recommended moving the AC unit around the corner of the garage, which we agreed to, but unfortunately it couldn’t be moved very far back, leaving it still in an awkward position right in the middle of our remaining strip of grass {an issue we are finally now addressing in our latest round of landscaping, and which I’ll show you in a few weeks.}
AC Unit Relocation
AC Unit Relocation
Once the space for the patio was leveled, the crew began construction of the planter bench against the garage wall {which was inspired by a photo I came across in Sunset Magazine the year before}. The purpose of this bench was to add both style and function {my favorite kind of project}. The bench would add interest to the sea of white stucco on the garage wall, and would provide added seating around the outdoor dining table we had purchased in anticipation of the new patio.
Planter Bench Construction

Next, the pavers were delivered {and I snapped a quick photo late one night after work before installation began}.

Concrete Paver Patio Construction

The following day I returned from work to find that the patio was starting to take shape! It’s always so exciting when a project finally reaches that point where you can see it really come together!

Concrete paver patio construction

At this point, I was getting really eager for the patio to finally be complete so that we could start to enjoy our outdoor fireplace {which is also open to our kitchen}!

Concrete paver patio construction


Concrete paver patio construction

But first, the gaps between the pavers needed to be filled. We initially thought about filling these gaps with pea gravel or grass {two common choices between concrete pavers}, but both options had some big negatives {as I discussed in last week’s post} that caused us to look for alternatives. The landscaper recommended filling the gaps with a dark mortar, and the crew got to work.

Modern concrete paver patio

The final step in the process was the completion of the planter bench. The cinder block structure was covered in white stucco to match the garage and the wood bench was added.

Modern, urban patio

We were eager to get something planted behind the bench right away, but it took quite a while for us to find just the right option. From the inspiration photo in Sunset Magazine, we knew that soft grasses would end up flopping over the bench, making it hard to sit there, but when we researched stiffer grasses that grow tall and straight, we learned that most of quite spiky and would be very uncomfortable if you leaned back against them.

We debated on some kind of crawling vine, but that didn’t seem to be the right choice for the style of our home, so the search continued. Finally we happened upon the perfect solution while wandering the aisles of our local nursery – it’s a plant called Elegant Feather, which is a perennial in the northeast, but can only grow as an annual in our neck of the woods {Colorado}.  What makes Elegant Feather so fabulous for the planter bench is that it grows straight and tall {upwards of 6 feet by the fall}, but it is incredibly soft – it definitely earned it’s name!

Elegant Feather

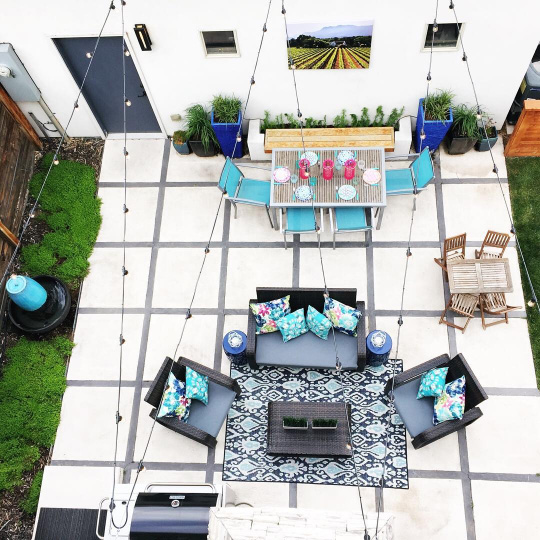
We placed three large pots on each side of the bench and added the furniture that we had purchased the year before on clearance. At last, our backyard was ready for entertaining!

I absolutely love the modern, grid pattern of the concrete pavers! The color of the concrete blends nicely with the white stucco of the garage, as well as the lighter tones of the stone on our house, and the dark charcoal mortar ties in the darker tones of the stone.

Obviously, by choosing to add such a large patio, we eliminated some grass {not that we had much to start with}, but the work we are doing this summer is helping to address that problem and give us a bit more space for the kids to play.
So now that you’ve had a peek at the completed patio space, come back next week and I’ll talk more about how we use the space for entertaining and I’ll give you a more close up tour of the pops of color we added to the patio!


  • Facebook
  • Twitter

07.09.15

« {seasonal style} Christmas in July – DIY, Craft & Decor Ideas for Those that Like to Plan Ahead
{link party} The Creative Circle – Week 23 »

Meet Angela

Angela, the founder of Blue i Style, strongly believes that decor should be functional, organizing can be beautiful, smart DIYs help stretch your budget, and an organized and stylish home can still be practical for life with kids.

Her work has been featured in print in Better Homes & Gardens and 5280 Home magazine, and online by HGTV, the Today Show, Good Housekeeping, and more. She was also named a 2018 Stylemaker by Better Homes & Gardens.

You can reach Angela at angela@blueistyle.com

COPYRIGHT & PHOTO SHARING POLICY

All text, images, and other content that are part of this blog are the property of Blue i Style, unless otherwise noted. All material is copyright protected.

If you wish to feature one of my projects, feel free to share a single photo (no collaged images, or images with text overlays) as long as the no pin code is used to prevent my image from being pinned from your site.

All features must include credit to Blue i Style with a link back to the original content (not just to the homepage). The project steps, supply list, and/or sources may not be disclosed.

Please read my full content and photo sharing policy to ensure you comply with all guidelines. Failure to do so constitutes copyright violation.

Create At Your Own Risk

Any and all content on this website is for personal use only and created exclusively for inspiration purposes.

Creating with my suggested methods, products used, and tools is at your own risk.

Please ensure you are following proper guidelines with anything used, and you receive professional guidance when necessary.

Read my complete disclosure at: Policies & Disclosures.

Sponsorships & Affiliations

To help fund this blog, I accept some forms of advertising, sponsorships, and affiliate links.

If you buy something that I recommend, you pay the same price, but I may receive a small commission. As always, all opinions are my own.

Blue i Style is a participant in the Amazon Services LLC Associates Program, an affiliate advertising program designed to provide a means for sites to earn advertising fees by advertising and linking to amazon.com.

I use an affiliate marketing service which may automatically put links into some posts, so please assume any/all links may be affiliate links.

Read my full Disclosure Statement.

Copyright © 2023 · Dazzling Theme theme by Restored 316

  • Facebook
  • Twitter
  • Pinterest