• About
    • About Blue i Style
    • Tour Our Home
    • Free Organizing eBook
    • Blogging Resources
  • Work With Me
    • Interior Decor & Organizing Services
    • Partnerships & Collaborations
    • Blogging Resources
  • Features & Press
  • Policies & Disclosures
  • Contact

Blue i Style

Creating an Organized & Pretty, Happy Home

  • Decor
    • Tour Our Home
    • Room Makeovers & Design Plans
    • Decorating Tips & Tutorials
    • Outdoor Decor
    • One Room Challenge
  • Organizing and Cleaning
    • Organizing Tips & Tutorials
    • Organizing By Room
    • Organizing on the Go
    • Cleaning
  • DIY
    • DIY Tips & Tutorials
    • Smart Home & Safety
    • Paint Tips & Projects
    • Crafts
    • Cricut Projects
  • Kids
    • Decor & DIY for Kids
    • Organizing Kids
    • Life With Kids
  • Five Minute Projects
  • Holidays & Entertaining
    • Seasonal & Holiday Decor
    • Entertaining
    • DIY Gifts & Gift Guides
    • Facebook
    • Instagram
    • Pinterest
    • Twitter
    • YouTube

Organizing

DIY Numbered Storage Bins

  • Facebook
  • Twitter

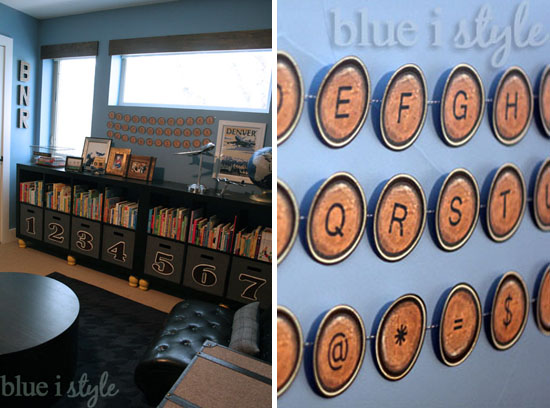
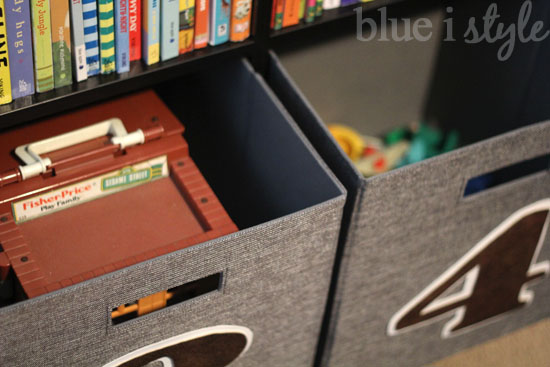
Beckett is two and a half, and it is such a wonderful age! He is so curious and eager to learn new things, and he asks the best questions! He can sing the alphabet and counts really well, but he doesn’t yet recognize all of the letters and numbers, so it was important to me, in planning the design for his new room, to find a way to incorporate the alphabet and numbers to help him learn. To stay true to the vintage vibe of the room, I created typewriter key alphabet flashcards that hang above the bookshelves, and numbered toy storage bins that fit inside the bookshelves.

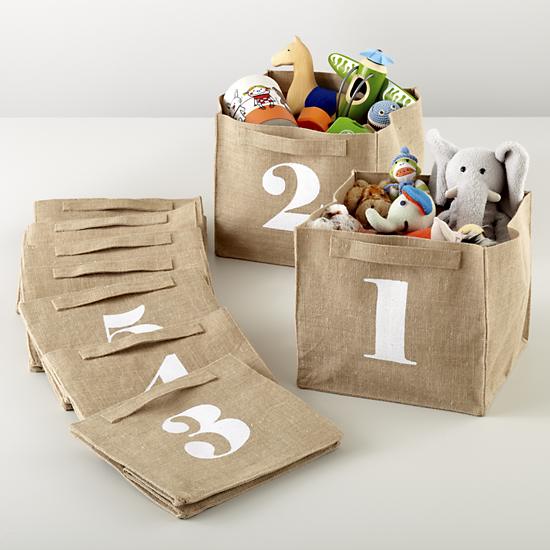
I originally had my eye on these Store By Number Cube Bins from the Land of Nod, but once I purchased the Expedit book shelves from Ikea, I realized the the cube openings were quite a bit larger than the Land of Nod bins. I was concerned that the smaller-sized bins would look odd in the larger Expedit openings, in addition to the fact they they wouldn’t maximize the available storage space.

Since the Land of Nod bins were just a little too small for what I needed, I decided to DIY my own {I know, no surprise there, right?!}. Of course, the first challenge was to find bins just the right size for the cubical openings in the Expedit, and I found exactly what I was looking for in the Threshold Storage Bins at Target.

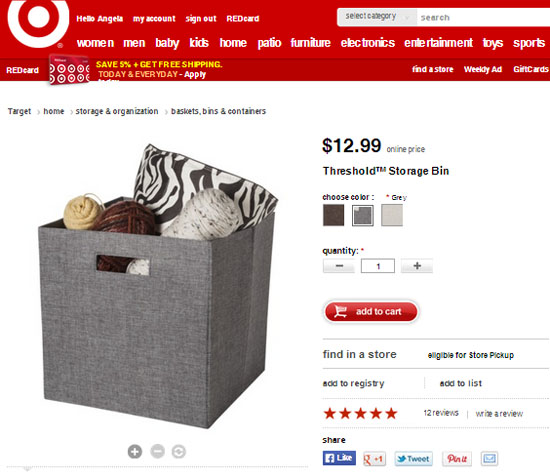
Now, let’s be clear, this wasn’t a knock-off or high-low project for me. The listed price for the Threshold bins is exactly the same amount as the original numbered bins from the Land of Nod. While I did get the Target bins on sale, when you add in the cost of the additional materials, it was a break even. So this post isn’t about how I saved money {although I wish it were}, it’s just about how I was able recreate the look of the numbered bins in a size that better fit my needs. That’s not to say that you couldn’t save some money making your owned numbered bins. Depending on the color and size of bins you are after, it’s likely that you could find less expensive bins to add your numbers to.

I considered a lot of different ways to replicate the look of the Land of Nod numbered bins. Probably the easiest would have been to stencil the numbers on using fabric paint, but because of the texture of these bins, I didn’t think paint would give me a crisp, clean look. I also considered making my own iron on transfers, but again, because of the texture of the bins, I wasn’t sure how well this would work.

Then my mom suggested I use some of the white vinyl fabric she had left over from a recent project, and she recommended a permanent fabric glue that she’d used with great success in the past. I would have been happy with plain white numbers, but then my mom also showed me some really unique brown fabric that appears to have the texture of a football, but is soft with a bit of a squishy foam backing.

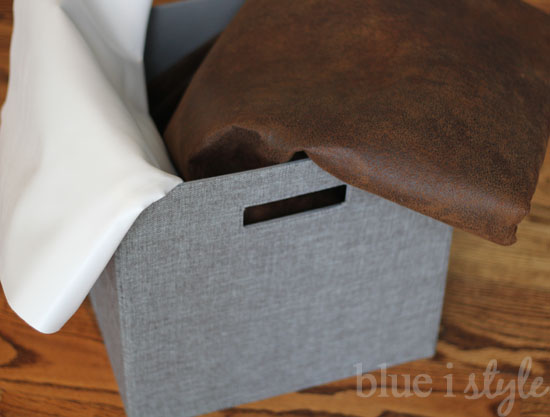
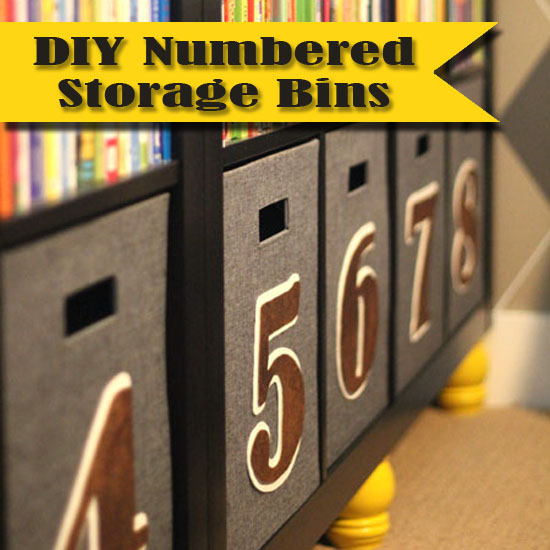
The leathery texture of the brown fabric was perfect for the masculine feel of the room, and I decided to use the white vinyl to border the brown in order to help tie in the white baseboards in the room, as well as the white lines in the argyle feature wall. Of course, the colors I chose were a matter of personal preference, but the important thing to note is that neither of these fabrics fray, making them perfect for this project!

Alright, so on to the tutorial! The first step was to determine the size of numbers I wanted for the bins, and to create patterns for cutting out the fabric. I measured and estimated that I wanted each number to be approximately 7 inches tall. I used Photoshop {although you could use Word or any other word processing program} and picked a font {Bernard MT Condensed} and a font size {575 pt}.

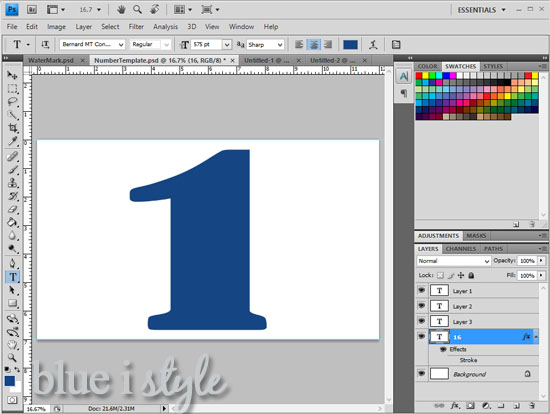
Since I had decided to layer the brown and white fabrics, I was going to need the number template in two different sizes. However, it wouldn’t work to simply use different font sizes because a change in font size is not a proportional change. What I needed was a border of the same width all the way around each number, and the easiest way to do this is to add a “stroke” element. Using Photoshop, stroke is an option under the “Layer Style” menu.

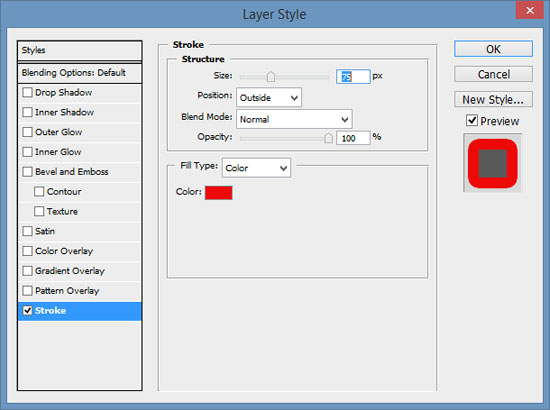
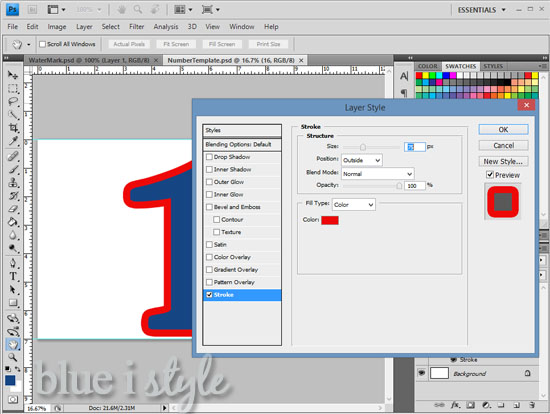
To ensure that the “stroke” border would show up well on my templates, I chose red to contrast against the blue numbers, and then adjusted the stroke size until I achieved the look I wanted {I ended up with a stroke size of 75 px}. Here, the blue represents what will be the brown fabric, and the red represents what will be the white vinyl border.

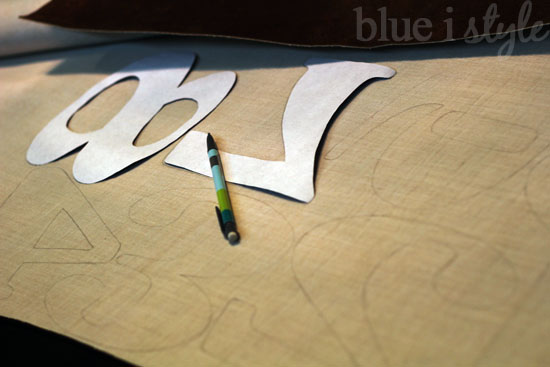
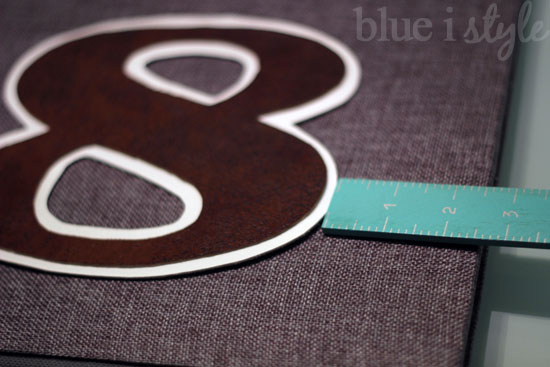
Once I had added the stroke to the numbers, I printed out a number and laid the paper on top of the bin to ensure that the scale was appropriate.

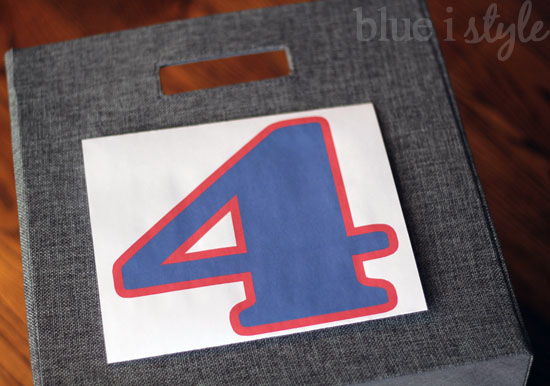
I was happy with the scale, so I continued to print out the rest of the numbers, and then began cutting out the numbers around the edge of the red border.

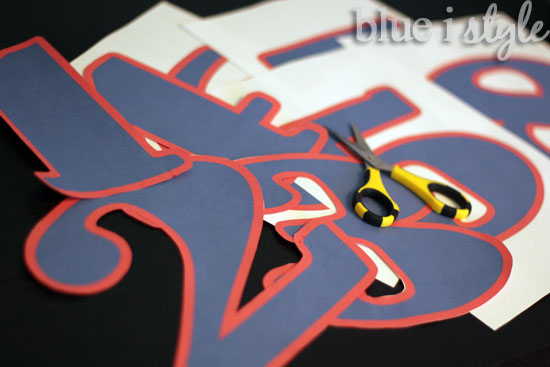
After all of the numbers were cut out, I laid them upside down and reverse traced them onto the back of the white vinyl fabric.

Once all of the numbers were traced on to the white fabric, I cut the red border off of each paper number template, leaving me with just the blue numbers.

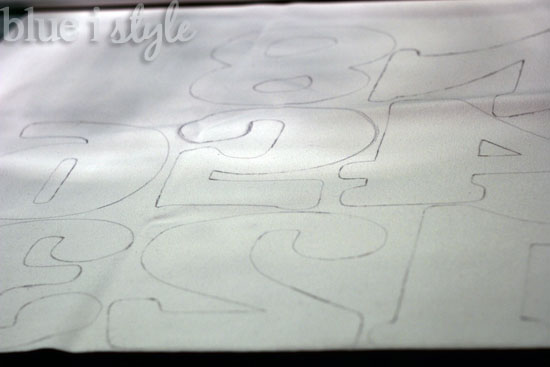
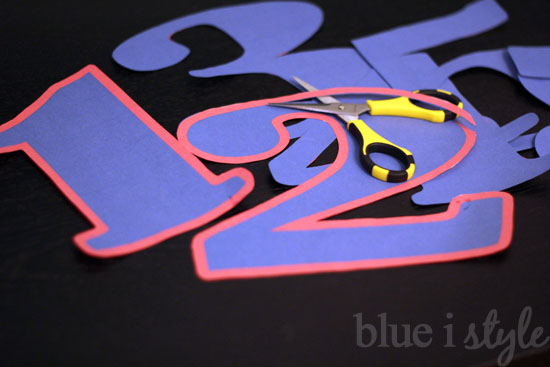
I then reverse traced the blue numbers on to the back of the brown fabric.

I used fabric scissors to cut all of the numbers out of the white vinyl and brown fabric. I mentioned it above – and it bears repeating here – neither of these fabrics fray when cut, making them perfect for this project. If you are considering trying a similar project, be sure to select fabrics that don’t fray. Your local fabric store should be able to make some good recommendations depending on the style and look you are going for.
Next it was time to glue together the pairs of numbers. I turned each of the brown numbers upside down and added a bead of glue around the edge and spread some glue throughout the center, being sure not to get the glue too thick.  

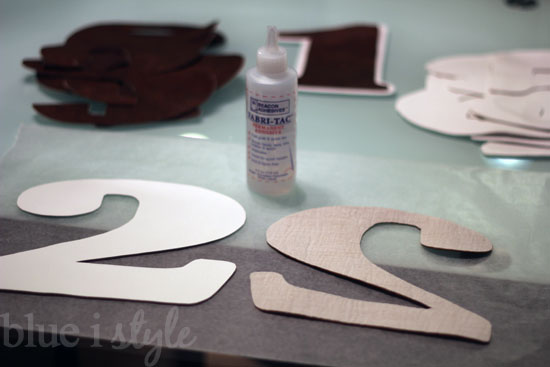
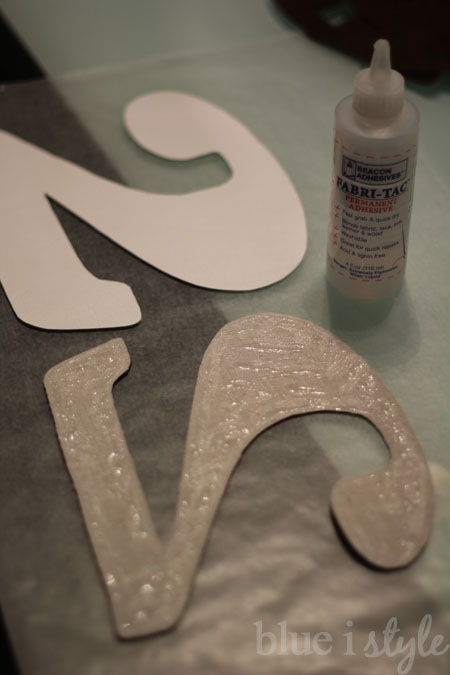
One by one, I affixed the brown numbers to the white numbers, being careful to center each as closely as possible.

Finally it was time to attach the numbers to the bins. Because the glue dries quickly and permanently, I didn’t want to simply eyeball the placement of the numbers since I wouldn’t be able to reposition the them once they were on the bins. Instead I laid each number on a bin, and then used a ruler to measure the space around the sides to ensure it was centered.

I then used blue painters tape to tape around each number, marking off the exact placement. I then spread the glue on the back of the numbers, one by one, and placed them onto the bins using the blue tape as my guide for perfect positioning.

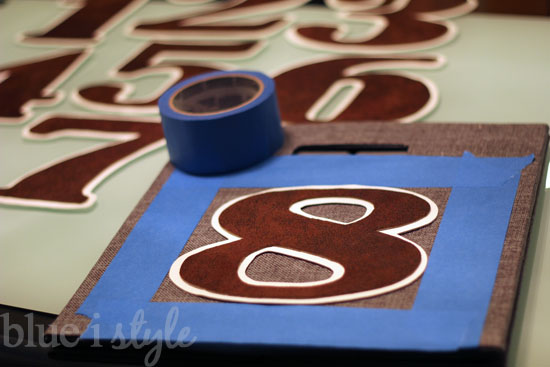
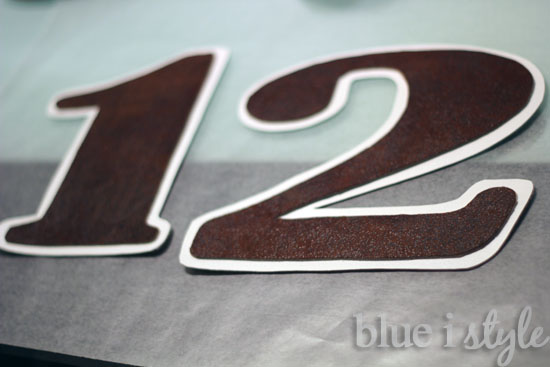
All that was left to do was remove the blue tape and admire my completed bins.

Not only do the completed bins look great – they also provide tons of storage for all of Beckett’s toys!
I am thrilled with how this project turned out, and I love hearing Beckett point to the bins and practice his numbers and counting. 

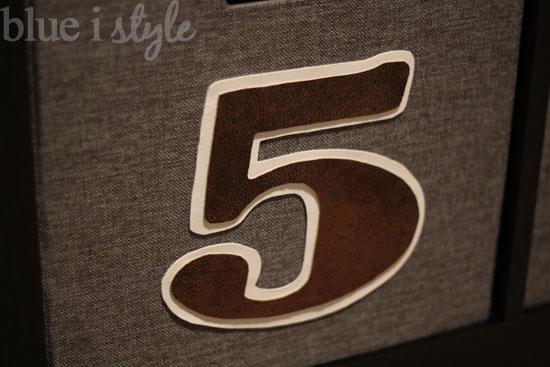
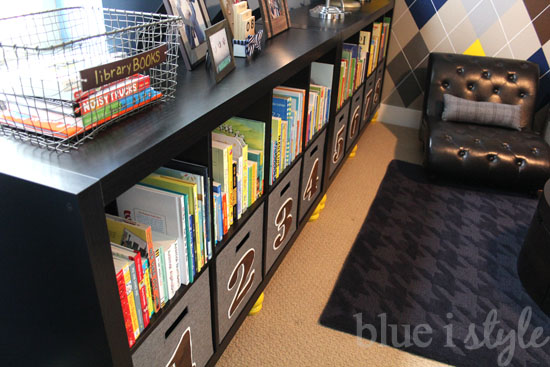
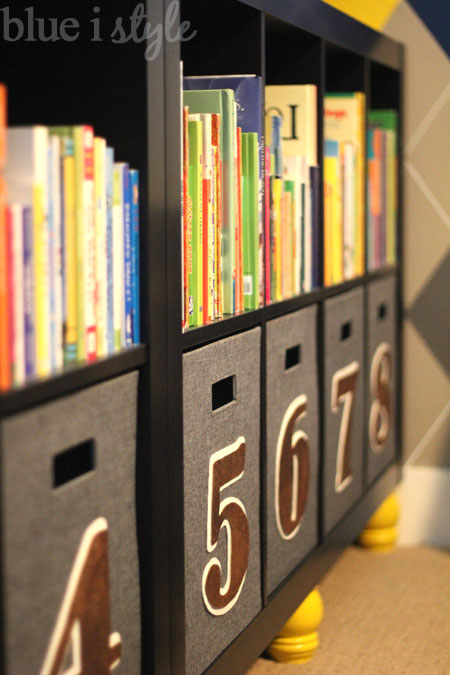
I think that the brown numbers with the white border on the grey bins are the perfect combination to compliment the colors and style of the room.

Overall, the room has a very sophisticated and masculine feel, but it was important to me to keep it kid friendly. These DIY number bins are one of the elements in the room that really say a kid lives here! In the future, as Beckett grows up in this room, if he ever feels like the numbers on the bins are too juvenile, all we have to do is flip the bins around to face the numbers back toward the wall and he’ll be left with grey bins that will continue to provide ample storage!

The links below include all of the other projects that went into the creation of the Vintage Preppy Little Gentleman’s Lounge:


Are you looking for more tips for organizing your life with kids? Here are some great posts that you might be interested in:


  • Facebook
  • Twitter

06.03.14

« Mustache Bash First Birthday Party Invitation
{style inspiration} From the Set of Melissa & Joey »

Meet Angela

Angela, the founder of Blue i Style, strongly believes that decor should be functional, organizing can be beautiful, smart DIYs help stretch your budget, and an organized and stylish home can still be practical for life with kids.

Her work has been featured in print in Better Homes & Gardens and 5280 Home magazine, and online by HGTV, the Today Show, Good Housekeeping, and more. She was also named a 2018 Stylemaker by Better Homes & Gardens.

You can reach Angela at angela@blueistyle.com

Get Email Updates!

Thanks for subscribing! Check your email a welcome message and your free organizing eBook!

Get Email Updates!

Plus a bonus free organizing eBook!

COPYRIGHT & PHOTO SHARING POLICY

All text, images, and other content that are part of this blog are the property of Blue i Style, unless otherwise noted. All material is copyright protected.

If you wish to feature one of my projects, feel free to share a single photo (no collaged images, or images with text overlays) as long as the no pin code is used to prevent my image from being pinned from your site.

All features must include credit to Blue i Style with a link back to the original content (not just to the homepage). The project steps, supply list, and/or sources may not be disclosed.

Please read my full content and photo sharing policy to ensure you comply with all guidelines. Failure to do so constitutes copyright violation.

Create At Your Own Risk

Any and all content on this website is for personal use only and created exclusively for inspiration purposes.

Creating with my suggested methods, products used, and tools is at your own risk.

Please ensure you are following proper guidelines with anything used, and you receive professional guidance when necessary.

Read my complete disclosure at: Policies & Disclosures.

Sponsorships & Affiliations

To help fund this blog, I accept some forms of advertising, sponsorships, and affiliate links.

If you buy something that I recommend, you pay the same price, but I may receive a small commission. As always, all opinions are my own.

Blue i Style is a participant in the Amazon Services LLC Associates Program, an affiliate advertising program designed to provide a means for sites to earn advertising fees by advertising and linking to amazon.com.

I use an affiliate marketing service which may automatically put links into some posts, so please assume any/all links may be affiliate links.

Read my full Disclosure Statement.

Copyright © 2025 · Dazzling Theme theme by Restored 316

  • Facebook
  • Twitter
  • Pinterest