• About
    • About Blue i Style
    • Tour Our Home
    • Free Organizing eBook
    • Blogging Resources
  • Work With Me
    • Interior Decor & Organizing Services
    • Partnerships & Collaborations
    • Blogging Resources
  • Features & Press
  • Policies & Disclosures
  • Contact

Blue i Style

Creating an Organized & Pretty, Happy Home

  • Decor
    • Tour Our Home
    • Room Makeovers & Design Plans
    • Decorating Tips & Tutorials
    • Outdoor Decor
    • One Room Challenge
  • Organizing and Cleaning
    • Organizing Tips & Tutorials
    • Organizing By Room
    • Organizing on the Go
    • Cleaning
  • DIY
    • DIY Tips & Tutorials
    • Smart Home & Safety
    • Paint Tips & Projects
    • Crafts
    • Cricut Projects
  • Kids
    • Decor & DIY for Kids
    • Organizing Kids
    • Life With Kids
  • Five Minute Projects
  • Holidays & Entertaining
    • Seasonal & Holiday Decor
    • Entertaining
    • DIY Gifts & Gift Guides
    • Facebook
    • Instagram
    • Pinterest
    • Twitter
    • YouTube

Uncategorized

{organizing with style} Closet Rod Divider Tutorial

  • Facebook
  • Twitter

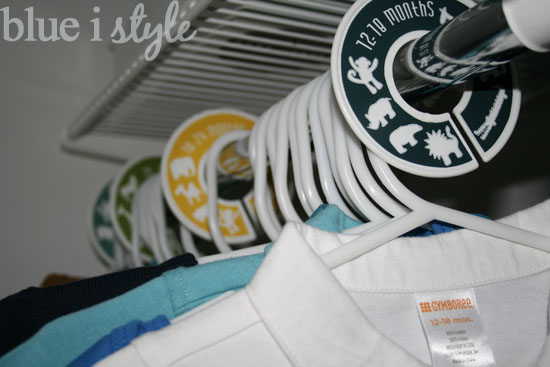
Thanks to everyone who checked out our organized nursery closet earlier this week.  Now I’m back with a quick tutorial on how I made custom clothing dividers to organize the different sizes of clothes.


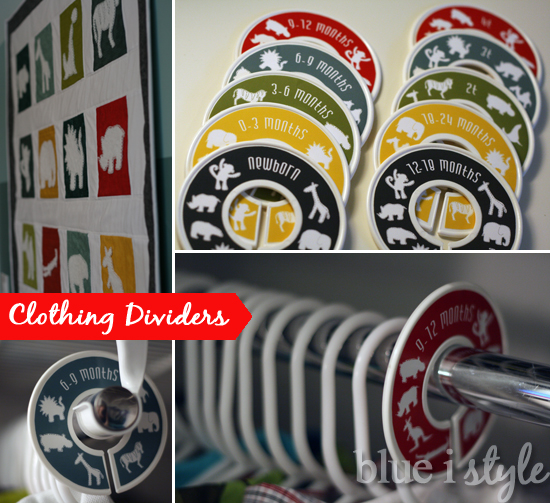
I purchased the plastic closet rod dividers {affiliate link} at the Container Store for only $.99 each. They are also available on Amazon {affiliate link} in larger quantities for slightly less, depending on how many you need.

To make the labels, I used printable glossy sticker paper {Amazon affiliate link} which comes in full 8.5″ x 11″ sheets.  The plastic dividers have a lip around the edge, so I took careful measurements and created a template in Photoshop for labels that would fit nicely within the lip.  I was able to fit 6 labels onto one sticker sheet.

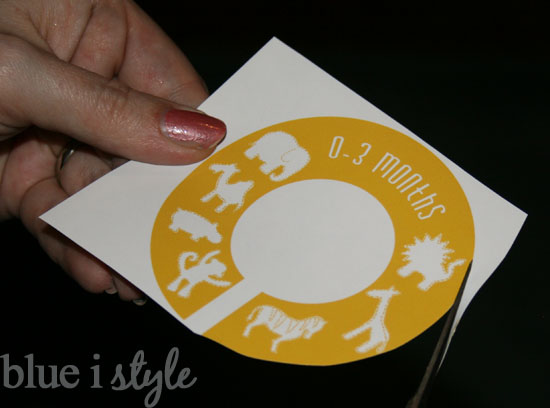
Creating this template was a bit tricky, so to save you some time and effort, you can download my closet rod divider template as a JPG file. Once downloaded, you can use Photoshop or your favorite editing program to change the color and add your own text and patterns or images.  Just be sure to print the file at 100% {do not choose any “scale to fit” options} and the labels should fit perfectly on 3.5″ plastic closet rod dividers.

To customize my dividers, I used each of the colors found in our nursery design (light and dark teal, red, yellow and green), and added some of the white animal silhouettes that I had drawn for the nursery quilt.  I created labels for different sizes of clothes, including:  Newborn, 0-3 months, 3-6 months, 6-9 months, 9-12 months, 12-18, 18-24, 2T, 3T and 4T.  

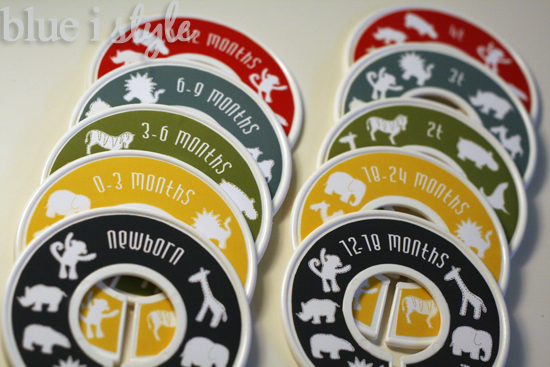
Once I had the labels designed, it was simply a matter of printing them onto the sticker paper, cutting them out, and sticking them onto the plastic dividers.  Cutting them is a bit of a time-consuming process (especially because I labeled both sides of each divider), but using sharp, fine-tipped scissors (like my favorite, the Cutter Bee Precision Cut Scissors) makes it much easier to cut the inside of each circle.

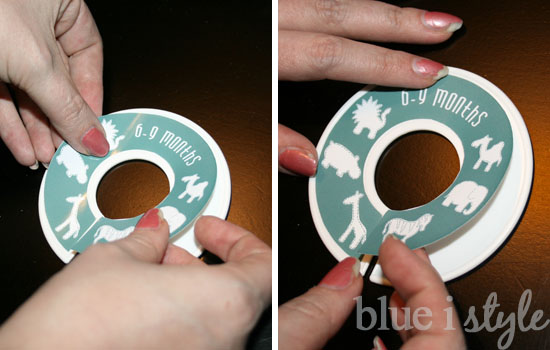
After cutting out each label, I peeled off the backing and stuck the labels onto the plastic dividers.  The sticker paper has a strong adhesive and is difficult to remove or re-position, so be careful to line the sticker up correctly before sticking it down.  I recommend holding the sticker just above the plastic while aligning it, and then sticking the top center down first and smoothing it out around the edges moving toward the bottom – this helps to avoid wrinkles or bubbles.  (Wow – please ignore my nail polish in these photos…I promise I repainted them the next day!)

These clothing dividers have been a huge help in organizing our nursery closet, ensuring that we can keep track of all the different sizes of clothes and that nothing gets overlooked and outgrown without being worn.
Of course, clothing dividers can be useful in any closet – not just in a nursery. I recently added two to our coat closet to make clear which coats belong to which boy.
If you don’t want to go to the work of designing your own using my downloadable template, you can simply write directly on to the white dividers, or if you are specifically interested in purchasing cute custom dividers – email me and we can work something out! 🙂 

Check out these links for all of the posts about the nursery…

Are you looking for more tips for organizing your life with kids? Check out my complete kids’ organizing gallery!


  • Facebook
  • Twitter

04.26.13

« How to Organize a Nursery Closet
{featured} Check Me Out at IHeart Organizing »

Meet Angela

Angela, the founder of Blue i Style, strongly believes that decor should be functional, organizing can be beautiful, smart DIYs help stretch your budget, and an organized and stylish home can still be practical for life with kids.

Her work has been featured in print in Better Homes & Gardens and 5280 Home magazine, and online by HGTV, the Today Show, Good Housekeeping, and more. She was also named a 2018 Stylemaker by Better Homes & Gardens.

You can reach Angela at angela@blueistyle.com

COPYRIGHT & PHOTO SHARING POLICY

All text, images, and other content that are part of this blog are the property of Blue i Style, unless otherwise noted. All material is copyright protected.

If you wish to feature one of my projects, feel free to share a single photo (no collaged images, or images with text overlays) as long as the no pin code is used to prevent my image from being pinned from your site.

All features must include credit to Blue i Style with a link back to the original content (not just to the homepage). The project steps, supply list, and/or sources may not be disclosed.

Please read my full content and photo sharing policy to ensure you comply with all guidelines. Failure to do so constitutes copyright violation.

Create At Your Own Risk

Any and all content on this website is for personal use only and created exclusively for inspiration purposes.

Creating with my suggested methods, products used, and tools is at your own risk.

Please ensure you are following proper guidelines with anything used, and you receive professional guidance when necessary.

Read my complete disclosure at: Policies & Disclosures.

Sponsorships & Affiliations

To help fund this blog, I accept some forms of advertising, sponsorships, and affiliate links.

If you buy something that I recommend, you pay the same price, but I may receive a small commission. As always, all opinions are my own.

Blue i Style is a participant in the Amazon Services LLC Associates Program, an affiliate advertising program designed to provide a means for sites to earn advertising fees by advertising and linking to amazon.com.

I use an affiliate marketing service which may automatically put links into some posts, so please assume any/all links may be affiliate links.

Read my full Disclosure Statement.

Copyright © 2023 · Dazzling Theme theme by Restored 316

  • Facebook
  • Twitter
  • Pinterest