• About
    • About Blue i Style
    • Tour Our Home
    • Free Organizing eBook
    • Blogging Resources
  • Work With Me
    • Interior Decor & Organizing Services
    • Partnerships & Collaborations
    • Blogging Resources
  • Features & Press
  • Policies & Disclosures
  • Contact

Blue i Style

Creating an Organized & Pretty, Happy Home

  • Decor
    • Tour Our Home
    • Room Makeovers & Design Plans
    • Decorating Tips & Tutorials
    • Outdoor Decor
    • One Room Challenge
  • Organizing and Cleaning
    • Organizing Tips & Tutorials
    • Organizing By Room
    • Organizing on the Go
    • Cleaning
  • DIY
    • DIY Tips & Tutorials
    • Smart Home & Safety
    • Paint Tips & Projects
    • Crafts
    • Cricut Projects
  • Kids
    • Decor & DIY for Kids
    • Organizing Kids
    • Life With Kids
  • Five Minute Projects
  • Holidays & Entertaining
    • Seasonal & Holiday Decor
    • Entertaining
    • DIY Gifts & Gift Guides
    • Facebook
    • Instagram
    • Pinterest
    • Twitter
    • YouTube

Organizing

Pretty Pantry Labels Three Ways + FREE PRINTABLE LABELS

  • Facebook
  • Twitter
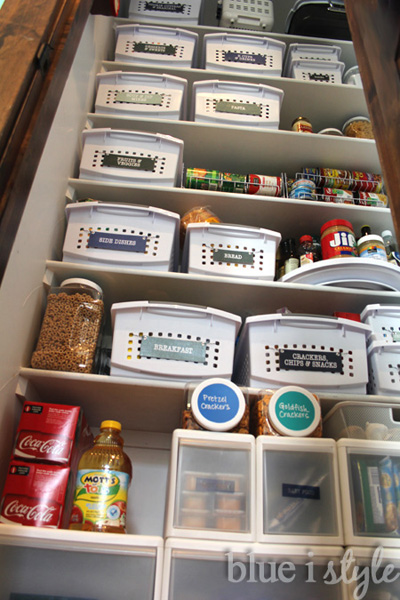
Last week I shared my five steps for creating an organized and pretty pantry, and I gave you a tour of our pantry space. Over a year after first completing our pantry makeover, the space is functioning just as well today as it did on day one – and I believe we have the labels to thank for that!

Pretty Pantry Labels Three Ways

Without labels, our pantry would just be a sea of matching white bins. I would have a pretty good idea of what goes where, since I organized it to start with, but imagine my poor kids and husband! They would never be able to find things, and certainly wouldn’t be able to help put groceries away without things quickly becoming a disorganized mess!

Pretty Pantry Labels Three Ways
This post contains some affiliate links. If you purchase something I recommend, you will pay the same price, but I may receive a small commission, which helps keep this blog free. As always, I only recommend products I truly love!
When labeling, there are two keys I always like to keep in mind – making it pretty and keeping it flexible. Certainly your labels don’t have to be pretty to be functional, but over time I’ve discovered that when I take a few extra minutes to make thing pretty, I am much more likely to keep things in order so that the space stays pretty. Flexibility is also important, because no matter how well you plan a space, it’s inevitable that your needs will change over time, so you’re labels will need to be able to change to keep up with the times.
In our pantry, I used three different methods for labeling the baskets, drawers and canisters – each with varying degrees of flexibility depending on how frequently I anticipate the need to update the labels. 
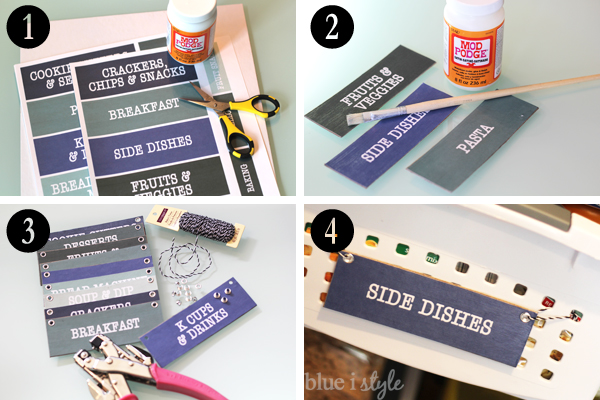
BASKET LABELS.  The labels on the white stacking baskets identify major categories of food we keep in our pantry at all times. I anticipate that these categories will rarely change, so for these labels I focused on durability, but still maintained flexibility by simply tying them to the baskets, making it quick and easy to remove and replace a label if need be. 
Since these baskets will be constantly moved on and off of the shelves, it was vital that these labels be durable. I knew that simple paper labels wouldn’t hold up over time. Instead, I created heavier duty labels with a protective coating. To create these basket labels:

(1)
 I printed my labels on to card stock and cut them out;
(2) I glued each label to thin, medium weight chipboard {left over from creating my paint and fabric swatch kit} and trimmed the chipboard down to the same size as the labels before sealing each label with a coat of Mod Podge {over the top, back and sides of the labels};
(3) I inserted an small silver eyelet in the top corners of the labels using my Cropadile eyelet setter; and
(4) I then used black and white baker’s twine to tie each label onto my baskets.
Pantry Basket Lables
DRAWER LABELS.  Unlike the white baskets which contain major categories of food that we always have on hand, the contents of the drawers on the floor will change over time. Last year, when I first completed the pantry, two of these drawers contained baby food and formula. Since that time, our younger son has left the baby stage, and we have repurposed those drawers to store the small, reusable containers that we use for packing preschool lunches. Over time, the contents of the other drawers {like the one packed full of bibs} will also change. 
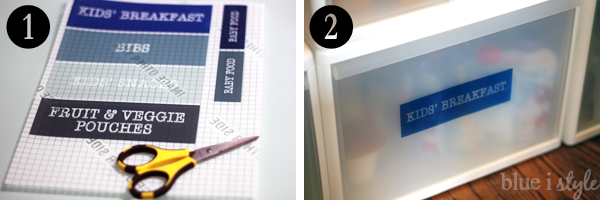
Since the contents of these drawers will change occasionally, I wanted to ensure that the labels could be updated from time to time. I considered using sticker paper, but I have found that the adhesive is strong and it can be difficult to cleanly remove. Instead, I used printable window decal film to label the drawer fronts, assuring that the labels will stay firmly in place until I choose to remove them, but will be easy to remove when the time comes to update them. To create these drawer labels:

(1) I printed the labels on to the window decal film and cut them out; 
(2) Then I peeled the decals from the backing and stuck them to the drawer fronts.
Pantry Drawer Labels

It only took one of the ten decal sheets in the package to label all of my drawers, leaving me with nine more sheets for the future {and I plan to use some of those extra sheets to help my boys make holiday decorations for our windows}. By using window decals to label the drawer fronts, I am assured that the labels will stay firmly in place until I choose to remove them, but will be easy to remove when the time comes.

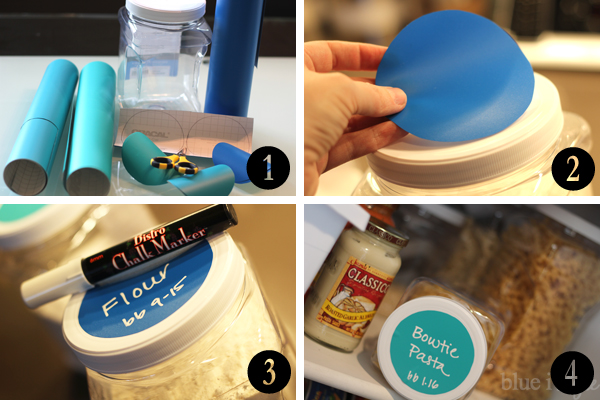
CANISTER LABELS.  I addition to the baskets and drawers, I also used quite a few plastic screw top canisters in my pantry organization. When filling these canisters, I discarded the original packaging, but I wanted to retain the important information {like best by dates}. Since the contents of these canisters will change frequently as we use up items and purchase refills, I needed the canister labels to be very easy to updated.

Since the canisters will need to be washed from time to time, I opted to label the lids rather than the fronts of the containers. This way the canisters can be popped in the dishwasher, and the lids can be quickly wiped down. To create these canister labels:

(1) I used some colorful adhesive backed vinyl, which can be purchased at any craft store {mine was left over from prior projects {like this one, and this one, and this one};
(2) I cut traced circles on the backing of the vinyl, cut them out, and stuck them to the top of the canisters;
(3) Then I used a chalk marker to label the contents and the “best by” date.
(4) The chalk marker quickly wipes away with a damp cloth, and the labels are then ready to be marked with the new contents and date.

Pantry Canister Labels

FREE PRINTABLE PANTRY LABELS! Are you ready to get your pantry organized with some pretty labels? To get you started, you can download the labels that I used for our pantry baskets! Happy organizing!
   
  • Facebook
  • Twitter

05.28.15

« How to Cover a Wall in Vinyl Records – Damage Free!
{link party} The Creative Circle – Week 17 »

Meet Angela

Angela, the founder of Blue i Style, strongly believes that decor should be functional, organizing can be beautiful, smart DIYs help stretch your budget, and an organized and stylish home can still be practical for life with kids.

Her work has been featured in print in Better Homes & Gardens and 5280 Home magazine, and online by HGTV, the Today Show, Good Housekeeping, and more. She was also named a 2018 Stylemaker by Better Homes & Gardens.

You can reach Angela at angela@blueistyle.com

COPYRIGHT & PHOTO SHARING POLICY

All text, images, and other content that are part of this blog are the property of Blue i Style, unless otherwise noted. All material is copyright protected.

If you wish to feature one of my projects, feel free to share a single photo (no collaged images, or images with text overlays) as long as the no pin code is used to prevent my image from being pinned from your site.

All features must include credit to Blue i Style with a link back to the original content (not just to the homepage). The project steps, supply list, and/or sources may not be disclosed.

Please read my full content and photo sharing policy to ensure you comply with all guidelines. Failure to do so constitutes copyright violation.

Create At Your Own Risk

Any and all content on this website is for personal use only and created exclusively for inspiration purposes.

Creating with my suggested methods, products used, and tools is at your own risk.

Please ensure you are following proper guidelines with anything used, and you receive professional guidance when necessary.

Read my complete disclosure at: Policies & Disclosures.

Sponsorships & Affiliations

To help fund this blog, I accept some forms of advertising, sponsorships, and affiliate links.

If you buy something that I recommend, you pay the same price, but I may receive a small commission. As always, all opinions are my own.

Blue i Style is a participant in the Amazon Services LLC Associates Program, an affiliate advertising program designed to provide a means for sites to earn advertising fees by advertising and linking to amazon.com.

I use an affiliate marketing service which may automatically put links into some posts, so please assume any/all links may be affiliate links.

Read my full Disclosure Statement.

Copyright © 2023 · Dazzling Theme theme by Restored 316

  • Facebook
  • Twitter
  • Pinterest