• About
    • About Blue i Style
    • Tour Our Home
    • Free Organizing eBook
    • Blogging Resources
  • Work With Me
    • Interior Decor & Organizing Services
    • Partnerships & Collaborations
    • Blogging Resources
  • Features & Press
  • Policies & Disclosures
  • Contact

Blue i Style

Creating an Organized & Pretty, Happy Home

  • Decor
    • Tour Our Home
    • Room Makeovers & Design Plans
    • Decorating Tips & Tutorials
    • Outdoor Decor
    • One Room Challenge
  • Organizing and Cleaning
    • Organizing Tips & Tutorials
    • Organizing By Room
    • Organizing on the Go
    • Cleaning
  • DIY
    • DIY Tips & Tutorials
    • Smart Home & Safety
    • Paint Tips & Projects
    • Crafts
    • Cricut Projects
  • Kids
    • Decor & DIY for Kids
    • Organizing Kids
    • Life With Kids
  • Five Minute Projects
  • Holidays & Entertaining
    • Seasonal & Holiday Decor
    • Entertaining
    • DIY Gifts & Gift Guides
    • Facebook
    • Instagram
    • Pinterest
    • Twitter
    • YouTube

Gift Ideas· Uncategorized

DIY Photo Transfer Tray

  • Facebook
  • Twitter
With Valentine’s Day right around the corner, I wanted to show you how easy it is to transfer one of your favorite photos to an acrylic serving tray! It makes a meaningful gift for your significant other, or even your best friend, and the possibilities are endless!

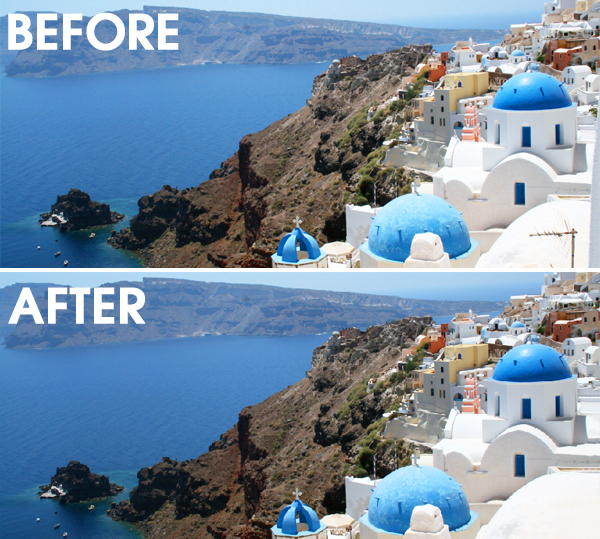
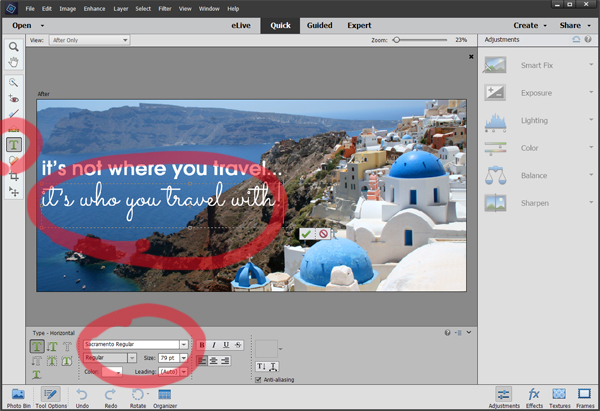
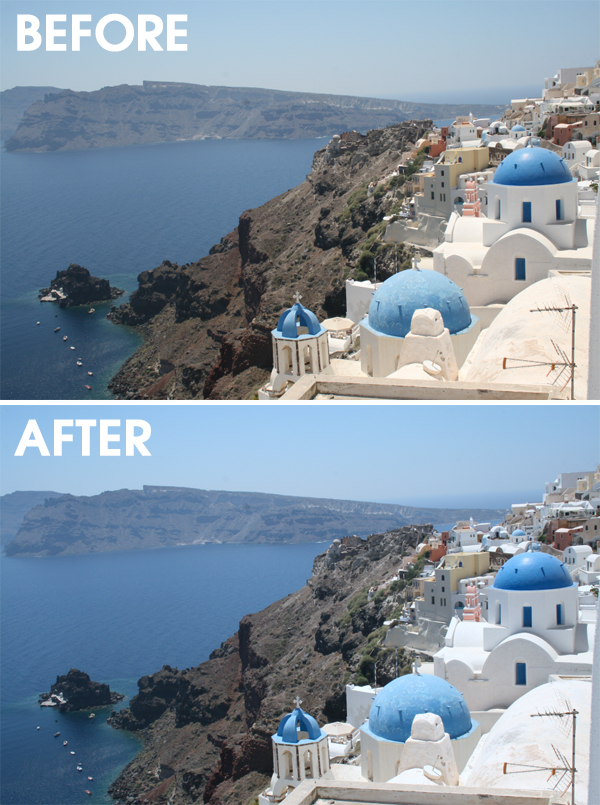
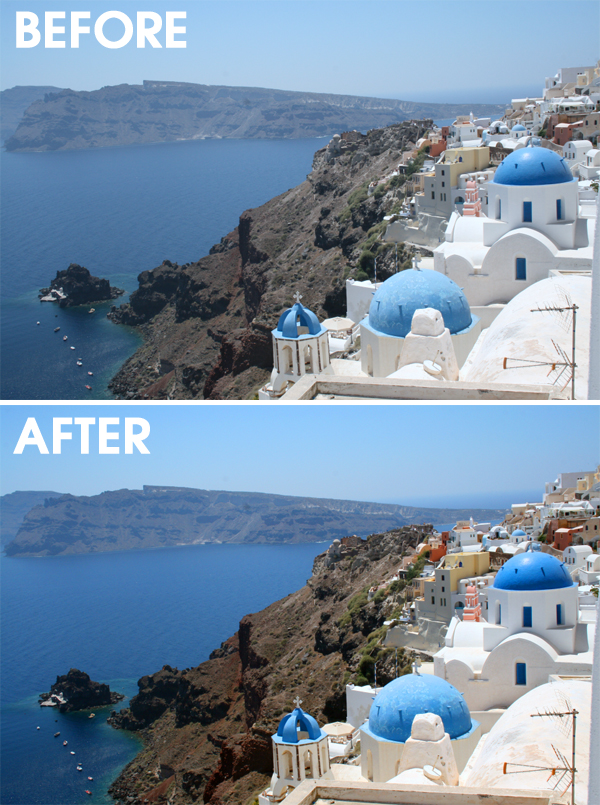
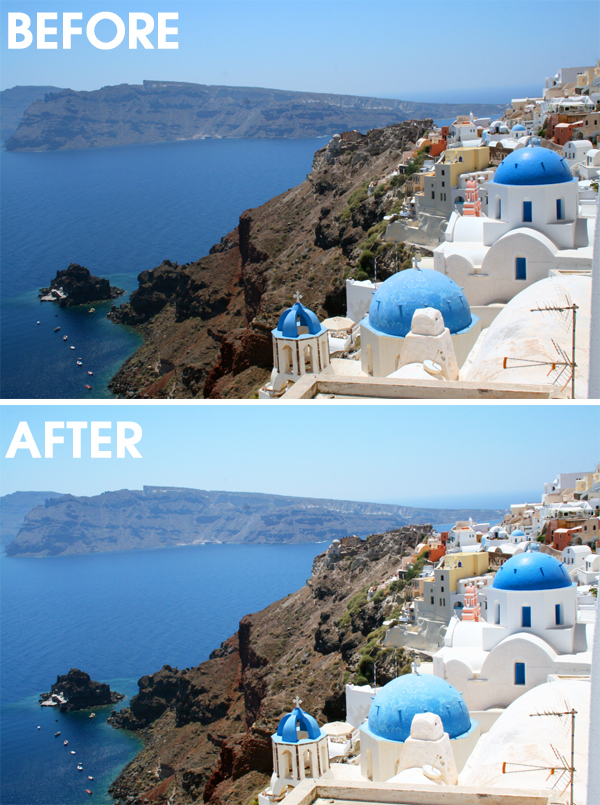
For my tray, I chose a photo from our honeymoon in Santorini, Greece, and overlaid the quote, “It’s not where you travel…It’s who you travel with!”


Thank you to Adobe for providing the supplies for this project! This post contains some affiliate links.

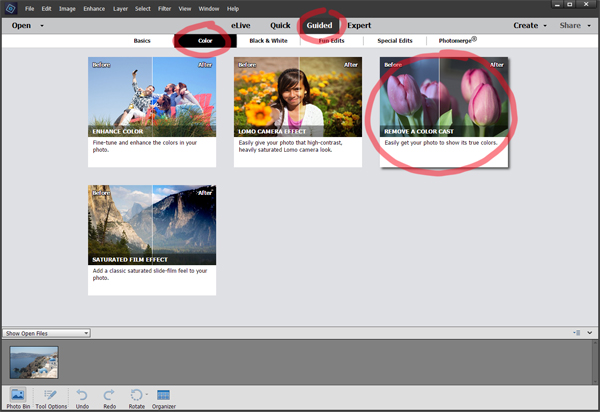
I get asked on almost a weekly basis, from friends and readers alike, what program I use to edit my photos and create graphics. When I answer Photoshop, people often look disappointed because it can be an intimidating program to learn, with a fairly steep learning curve. So when my friends over Adobe invited me to try out Photoshop Elements 15 for this project, I thought it would be a great opportunity for me to try it out to see if Elements might be a good alternative for my readers and friends who don’t want to learn the full Photoshop program just yet.

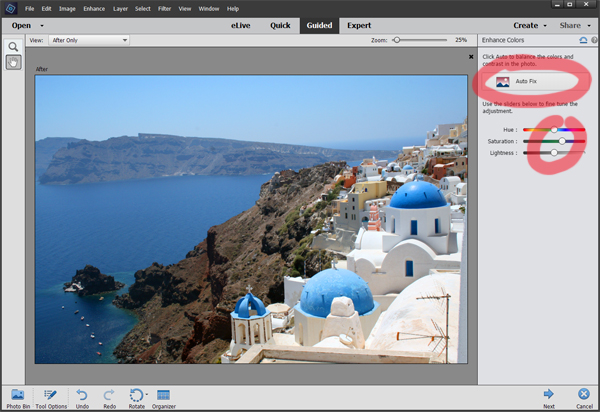
I’m happy to report that Photoshop Elements 15 offers all of the photo editing capabilities you’ve been wanting in a super user friendly manner. I especially love the Guided Edits feature that makes it easy to edit your photos like a pro right from the start!

At the end of this post, I’ll show you the easy step by step process I used to edit and resize the photo for my acrylic tray using Photoshop Elements 15. But first, I’ve got a quick video to show you how to transfer your finished photo to the bottom of an acrylic tray!

SUPPLY LIST

Photoshop Elements 15
Clear acrylic tray
Scissors
Paint Brush
Matte Medium
Squeegee
Sponge
Gloss Varnish
HOW TO TRANSFER THE IMAGE ONTO THE TRAY


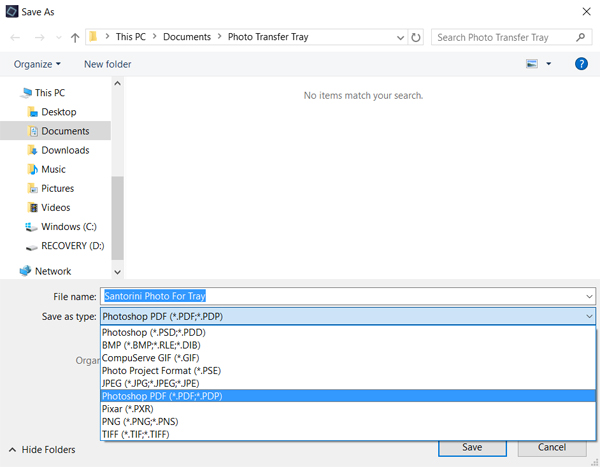
1. PREPARE YOUR PHOTO. Edit you photo and resize it to fit the tray {detailed instructions below}. Print the photo on a laser printer. 

2. CUT. Use scissors to cut out the your photo or image. 
3. BRUSH ON MATTE MEDIUM. Use a paintbrush to apply a thin, even coat of matte medium all over the entire front side of the image. Also apply a thing coat of matte medium all over the bottom of the tray. Allow both to completely dray about 30 minutes.
4. APPLY THE PHOTO. After 30 minutes, apply a second generous but even coat of matte medium all over the bottom of the tray. Immediately place the printed photo, with the image side down, onto the tray {so that the photo can be viewed through the top of the tray}. Use the squeegee to smooth out any bubbles. Allow the tray to dry completely {at least 2 hours}.
5. REMOVE THE PAPER. Once the paper is completely dry, wet a sponge rub it all over the back of the printed page. Use a circular motion to remove the paper, rewetting the sponge as necessary.
6. FINISH WITH MATTE VARNISH. After the paper is completely removed, allow the tray to dry. Then paint all over the image on the bottom of the tray with a coat of gloss varnish. This will prevent the image getting scratched. Once the gloss varnish is dry, the tray is ready to be used!
Honeymoon Photo Transfer Tray DIY Gift Idea

Be sure to pin this tutorial so you can find it when you’re ready to make a gift! How about a favorite family photo on a tray for Mother’s Day or Father’s Day? Or use this method to create a tray to add to your seasonal decor for spring, fall, or even Christmas!

DIY Gift Idea Photo Transfer Tray
HOW TO EASILY EDIT & PREPARE YOU PHOTO
USING 
PHOTOSHOP ELEMENTS 15

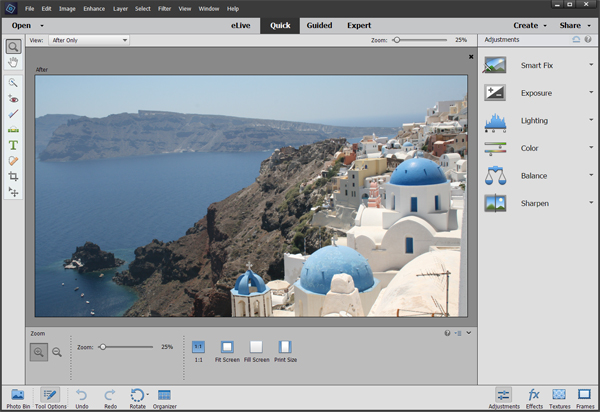
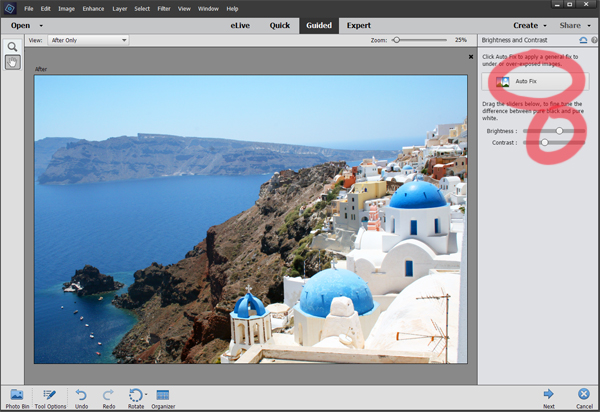
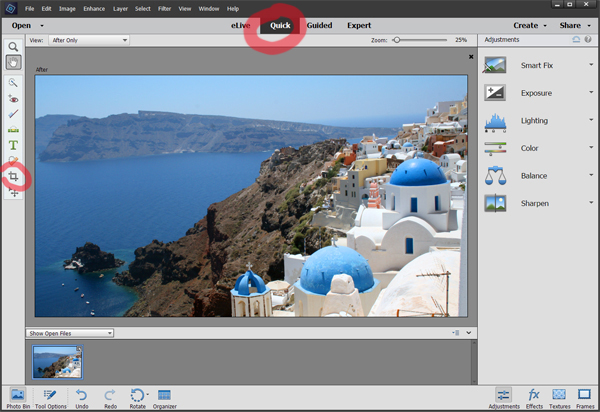
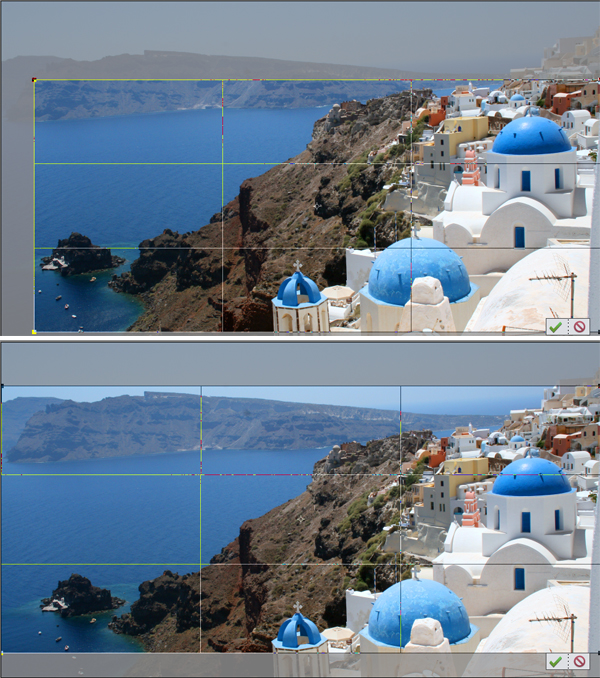
Ok, now that you know how to transfer a photo to a tray to create an easy and stylish gift, let’s talk about how to edit photos in Photoshop Elements 15. I’ll show you how I enhanced and cropped the honeymoon photo that I used to create this tray, but you can use these same basic steps for any photo that you want to edit.

1. OPEN YOUR PHOTO in Photoshop Elements 15.
It looks pretty good, right? I was pretty proud of this photo that we took on our honeymoon in Santorini… but let me show you how I made it look even better with a few quick and easy edits.
2. CORRECT THE WHITE BALANCE. Guided Edit > Color > Remove Color Cast
After clicking “Remove Color Cast” you’ll be taken back to the screen with your photo and prompted to click on the portion of you photo that should be pure black, gray, or white. In my photo of Santorini, the white buildings in the bottom right corner should be pure white, but were reading a bit yellow-ish. I clicked on one of the white buildings and the color of the photo was automatically adjusted to remove the slight yellow cast.
3. ENHANCE THE COLORS. Guided Edit > Color > Enhance Color
After clicking on the “Enhance Color” button, I first used the “Auto Fix” option, and the adjusted the “Saturation” slider a bit to the right of center, making the blues bluer in order to better reflect the colors as we saw them in person.
Here’s the side by side comparison of the color enhancement.
4. ADJUST THE BRIGHTNESS AND CONTRAST. Guided Edit > Basics > Brightness Contrast
When I clicked on the “Auto Fix” button on the Brightness and Contrast adjustment screen, the photo didn’t change at all. Obviously Photoshop Elements thought the brightness and contrast was already about right. I decided however, to try brightening up the photo just a bit more by dragging the “Brightness” slider to the right. 
I ended up deciding that I did, in fact, like the photo better when it was just a little brighter, because it made it feel like the sunny day that we were enjoying when we took the photo. In the side by side comparison you’ll see that the difference is slight… you notice it mostly in the sky and on the cliff-side.
5. ENTER QUICK EDIT MODE & RESIZE THE PHOTO. 

Selecting “Quick” from the center menu near the top of the screen brings up a tool bar along the left side of the screen. Choose the crop tool {second from the bottom}.


The size of the tray I used was 14″ x 6.25″ – much longer and thinner than the original proportions of my photo. To crop the photo to the exact right ratio, while maintaining the freedom to choose the portion of the photo that I wanted to use, I selected “Use Photo Ratio” from the Crop drop down menu in the bottom left corner of the screen, and set the ratio to 14″ x 6.25″. 
Using the Photo Ratio tool allowed me to simply drag the corners of the crop area to see how the photo would look with various crop options, while always maintaining the exact right size ratio.
I wanted to maintain some of the sky as well as all of the blue domes, so I chose the widest possible crop option. Once I was happy with the crop, I clicked the green check mark.
6. TOUCH UP ANY BLEMISHES IN THE PHOTO. Specs of dirt, paint, or other small items can be removed from the photo using the Spot Healing Brush tool. I wanted to remove the edge of a wall and the antennae from the bottom right corner of the photo. I simply selected the Spot Healing Brush, adjusted the size of the brush, and then repeatedly clicked on the items I wanted to remove until all trace of them was gone.

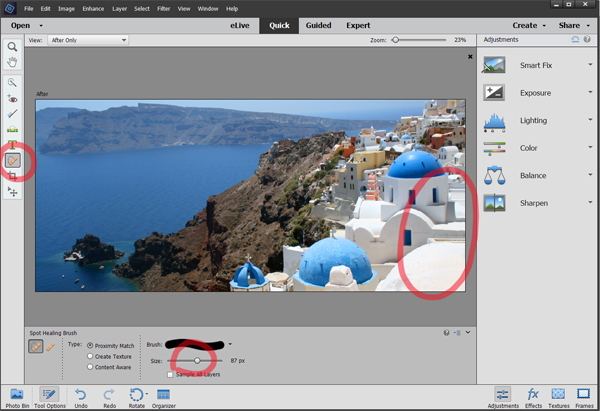
Having used the full version of Photoshop in the past to remove similar blemishes from photos, I was amazed how easy and effective the Spot Healing Brush worked in Photoshop Elements to achieve the same goal with less effort!

7. ADD TEXT ON TOP OF THE PHOTO. Select the Horizontal Type tool from the tool bar. Click and drag across the width of the image to create a text box. Using the options at the bottom of the screen, select the font and font size, then type in the words you want. 

I used two separate text boxes – one for my top line of text, and a second for my lower line of text. This made it quick and easy for me to set different fonts and sizes. In retrospect, I shouldn’t have put my words so close to the left edge as the first letters get a bit lost due to the depth edge around the tray.
8. SAVING & PRINTING. FILE > SAVE AS >  PDF
In order to prepare my image for printing and transferring to the bottom of my acrylic tray, I chose to save my file as a PDF. I named the file and hit save.
After saving my final image, I took the file on a flash drive to my local print shop because it needed to be printed on a large format laser printer. I requested that they print the image at 100% (14″ x 6.25″) on to an 11″x17″ piece of paper.
Photoshop Elements Tutorial
And you know the rest… Once my photo was printed, I used the method above to transfer the photo to my acrylic tray.  
  • Facebook
  • Twitter

02.02.17

« Charger Cord Organizer with Custom Icon Labels
Paint Chip Labels »

Meet Angela

Angela, the founder of Blue i Style, strongly believes that decor should be functional, organizing can be beautiful, smart DIYs help stretch your budget, and an organized and stylish home can still be practical for life with kids.

Her work has been featured in print in Better Homes & Gardens and 5280 Home magazine, and online by HGTV, the Today Show, Good Housekeeping, and more. She was also named a 2018 Stylemaker by Better Homes & Gardens.

You can reach Angela at angela@blueistyle.com

COPYRIGHT & PHOTO SHARING POLICY

All text, images, and other content that are part of this blog are the property of Blue i Style, unless otherwise noted. All material is copyright protected.

If you wish to feature one of my projects, feel free to share a single photo (no collaged images, or images with text overlays) as long as the no pin code is used to prevent my image from being pinned from your site.

All features must include credit to Blue i Style with a link back to the original content (not just to the homepage). The project steps, supply list, and/or sources may not be disclosed.

Please read my full content and photo sharing policy to ensure you comply with all guidelines. Failure to do so constitutes copyright violation.

Create At Your Own Risk

Any and all content on this website is for personal use only and created exclusively for inspiration purposes.

Creating with my suggested methods, products used, and tools is at your own risk.

Please ensure you are following proper guidelines with anything used, and you receive professional guidance when necessary.

Read my complete disclosure at: Policies & Disclosures.

Sponsorships & Affiliations

To help fund this blog, I accept some forms of advertising, sponsorships, and affiliate links.

If you buy something that I recommend, you pay the same price, but I may receive a small commission. As always, all opinions are my own.

Blue i Style is a participant in the Amazon Services LLC Associates Program, an affiliate advertising program designed to provide a means for sites to earn advertising fees by advertising and linking to amazon.com.

I use an affiliate marketing service which may automatically put links into some posts, so please assume any/all links may be affiliate links.

Read my full Disclosure Statement.

Copyright © 2023 · Dazzling Theme theme by Restored 316

  • Facebook
  • Twitter
  • Pinterest