• About
    • About Blue i Style
    • Tour Our Home
    • Free Organizing eBook
    • Blogging Resources
  • Work With Me
    • Interior Decor & Organizing Services
    • Partnerships & Collaborations
    • Blogging Resources
  • Features & Press
  • Policies & Disclosures
  • Contact

Blue i Style

Creating an Organized & Pretty, Happy Home

  • Decor
    • Tour Our Home
    • Room Makeovers & Design Plans
    • Decorating Tips & Tutorials
    • Outdoor Decor
    • One Room Challenge
  • Organizing and Cleaning
    • Organizing Tips & Tutorials
    • Organizing By Room
    • Organizing on the Go
    • Cleaning
  • DIY
    • DIY Tips & Tutorials
    • Smart Home & Safety
    • Paint Tips & Projects
    • Crafts
    • Cricut Projects
  • Kids
    • Decor & DIY for Kids
    • Organizing Kids
    • Life With Kids
  • Five Minute Projects
  • Holidays & Entertaining
    • Seasonal & Holiday Decor
    • Entertaining
    • DIY Gifts & Gift Guides
    • Facebook
    • Instagram
    • Pinterest
    • Twitter
    • YouTube

Crafts· Entertaining· Holidays & Seasons

How to Make a Reusable Chalkboard Pennant Banner

  • Facebook
  • Twitter
I’m pretty good at a lot of artsy and craftsy things, but my sewing skills are very basic! But when my mom showed me how to make a fabric banner using chalkboard fabric, I thought, “now that’s a sewing project simple enough that even I could do it!” And if I can do it, then anyone can! 
So today I’m excited to show you just how easy it is to make your own DIY pennant banner with reusable chalkboard fabric that you can write on and wipe off over and over to decorate for any special occasion or season!
Easy DIY Chalkboard Pennant Banner
I love these chalkboard fabric pennants for many reasons – because they are reusable and versatile, because I can string together as many or as few as I want, and most of all, because it takes just a few minutes to write on them and hang them up to create a banner for any celebration!
If you’ve been following my blog for a while, then you’ve probably seen my chalkboard banner show up in quite a few different posts – from my 4th of July backyard, to my Halloween decor, and my Christmas home tours.

CHALKBOARD FABRIC BANNER SUPPLY LIST:

This post contains affiliate links. If you buy something that I recommend, you pay the same price, but I may receive a small commission.

  • Blackboard Fabric (27.5” wide, $4.19/yard)
  • Fabric Cutting Ruler
  • 8” 60 Degree Triangle Cutter
  • Cutting Mat
  • Rotary Cutter
  • Rotary Pinking Blade
  • Sewing Machine
  • Black Thread
  • One Wrap Velcro
  • Regular Chalk or Chalk Markers
*If you don’t own a cutting mat and rotary cutter, you can instead use a pen to mark the triangles on the back of the fabric, then cut them with scissors, and trim the edges with a pair of pinking shears.

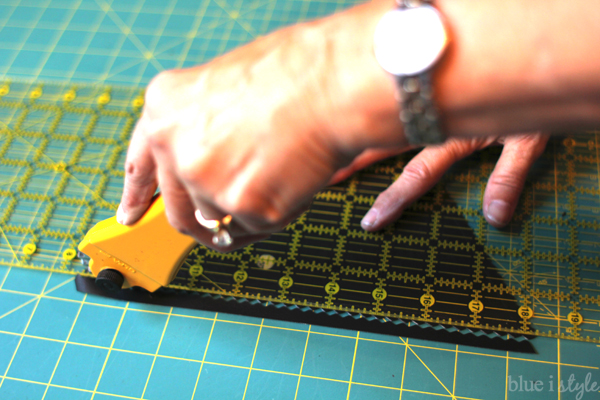
STEP 1: CUT CHALKBOARD FABRIC

Begin by cutting an 8 inch strip of chalkboard fabric. Using a fabric cutting ruler, cutting mat, and a rotary cutter makes this very quick and ensures a nice, straight, clean cut. But if you don’t have these supplies – no worries! You can simply cut with scissors taking care to get a very straight strip.
Then lay your 8 inch strip of fabric on your cutting mat and place an 8″ 60 degree triangle cutter on top. Starting at one end of the strip, use a rotary cutter to cut the first triangle, then flip the triangle cutter over and cut another.
How to Make a Fabric Banner
Continue cutting triangles until you have reached the end of your strip of fabric.

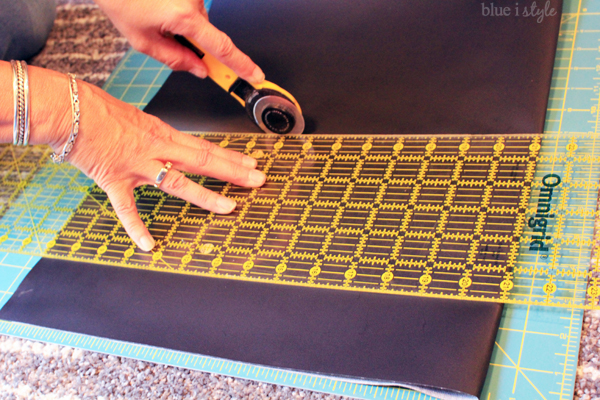
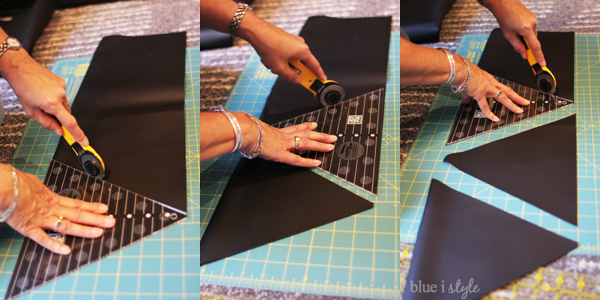
You will need two triangles per pennant, so continue cutting as many 8″ strips and as many triangles as necessary, depending on the number of pennants you would like to create. Think about the various works and phrases you might want to spell out, and then make a few more for good measure.

How to Make a Fabric Banner
With all of your triangles of chalkboard fabric cut, begin pairing up the triangles, placing them back to back. They may not line up exactly, but that’s ok – I’ll address it in a later step.

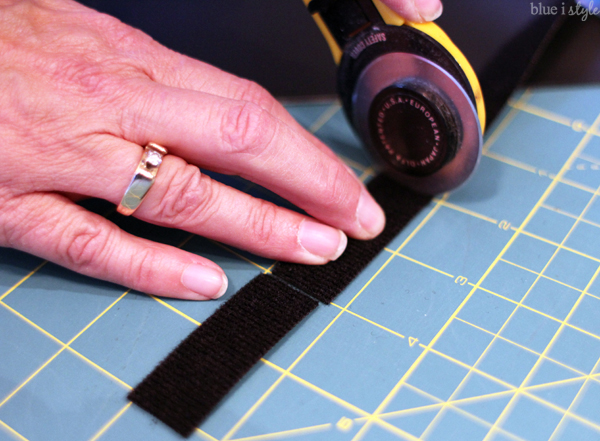
STEP 2: CUT VELCRO STRIPS

Next, unroll a length of One Wrap Velcro and cut it into two
inch strips. You will need one piece of Velcro for each pennant that you make.

One Wrap Velcro is double sided and sticks to itself when it’s wrapped around, making it perfect for this project, as I’ll show you later!

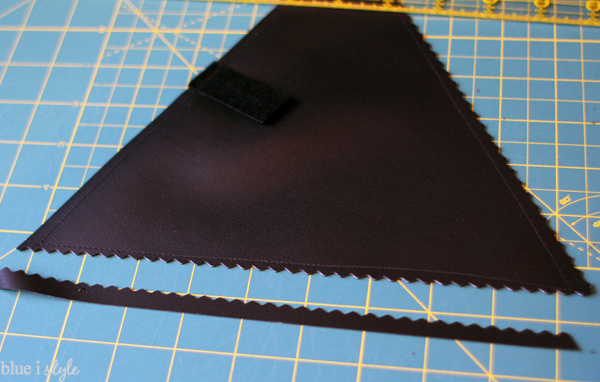
STEP 3: SEW CHALKBOARD PENNANTS

Now you are ready to sew your chalkboard pennants together. Take one pair of triangles {laid back to back}, and fold them in half to quickly find the top center.

Then unfold the triangles and place one piece of Velcro on top, with the edge of the Velcro aligned with the center of the top triangle {as shown in the photo below}.

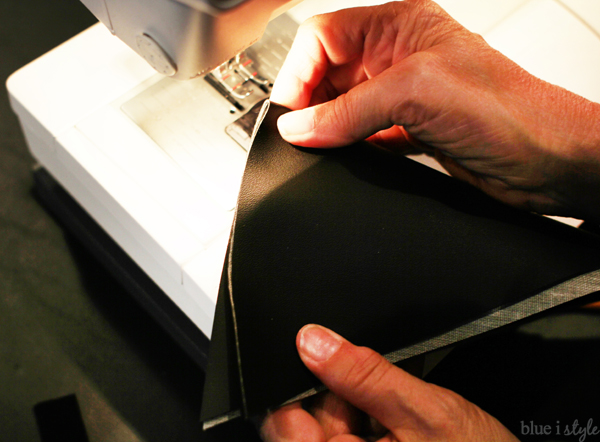
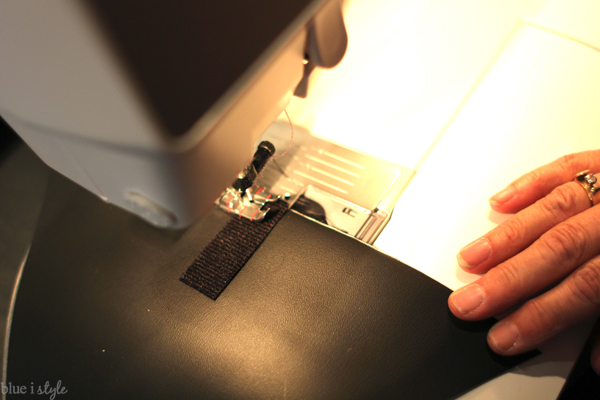
Using black thread, sew around the triangles, stitching the Velcro in place as you go. Leave about a quarter of an inch seam allowance around all edges {error on the side of a larger seam allowance, rather than a smaller one}.

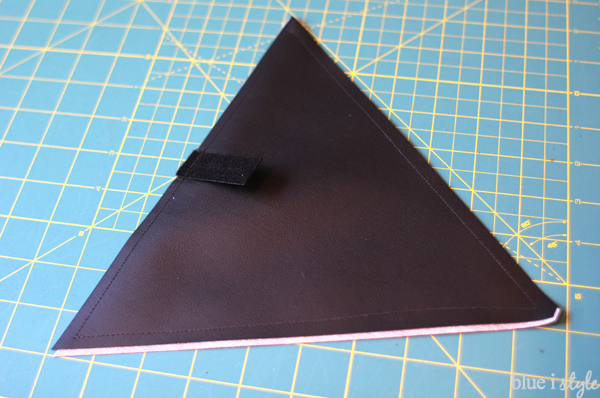
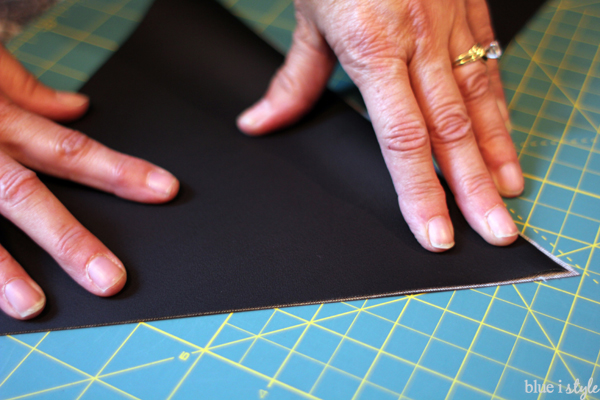
STEP 4: TRIM EDGES OF PENNANTS

Now that the pennants are sewn together, it’s time use a rotary pinking blade to clean up the edges of the triangles that may not line up perfectly. 

Lay each pennant on your cutting mat cutting mat and place a cutting ruler on top of the fabric to give you a straight edge to cut against. Then use a pinking rotary cutter to trim off the very edges of the triangles being careful not to cut into any of the seams!

The pinking cleans up the look of the edges, and make the chalkboard pennants extra cute! 

If you do not own a pinking rotary cutter, just use a pair of pinking shears. As is true anytime you are using scissors on fabric, make sure the pinking shears are nice and sharp. Do not attempt to use scissors that have previously been used to cut paper. Paper quickly dulls scissors, and dull scissors do not cut fabric well.
You’re chalkboard pennants are now complete and ready for
use!

TIP: Preparing the Pennants for Use with Chalk

Chalkboard fabric {or blackboard fabric as it may be called, depending on where you purchase it} can be used with regular chalk, or with chalk markers. If you are going to use regular chalk on your pennants, you will first need to prime the fabric by rubbing the side of a piece of chalk over the entire surface, then wiping off the chalk with a soft cloth. If you don’t prime the chalkboard fabric first, it may result in the chalk becoming permanent, or not cleaning of well.

Write On Wipe Off Chalkboard Pennant Banner
If instead you plan to write on the pennants with chalk markers {my preferred method}, you don’t need to prime the fabric with chalk before use.

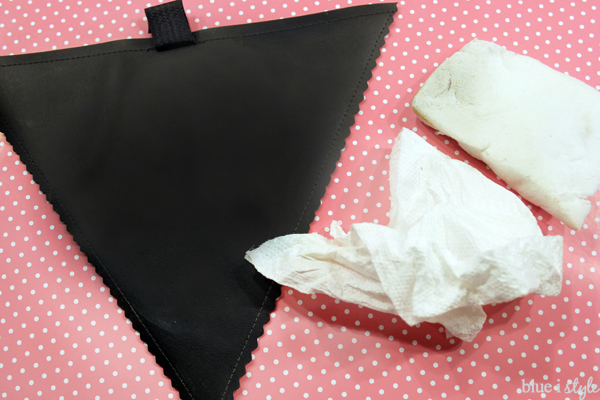
TIP: Cleaning Chalk Markers Off of the Chalkboard Pennants

Chalk markers should wipe off of with a damp cloth, but I have found a Magic Eraser is the fastest and easiest way to clean off you chalkboard pennants. Simply dampen the Magic Eraser to erase the writing, then use a dry paper towel to wipe away the excess. If any residue remains, simply repeat the process.

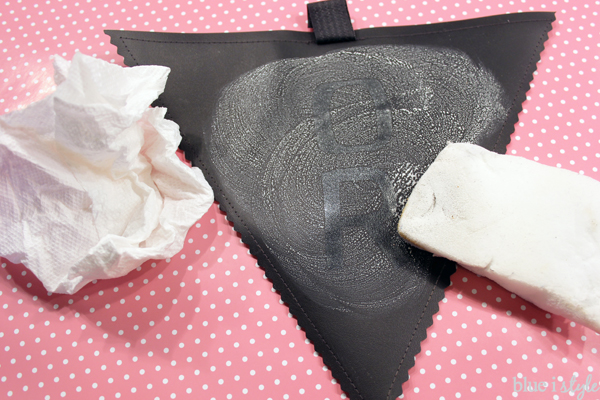
It best to clean off the pennants immediately after each use, but even when I’ve been lazy and left the chalk marker writing on my pennants for months at a time, I’ve never had any trouble erasing the writing. When you first wipe off the pennants, you may notice a faint shadow of the writing remains, but that shadow quickly fades away.

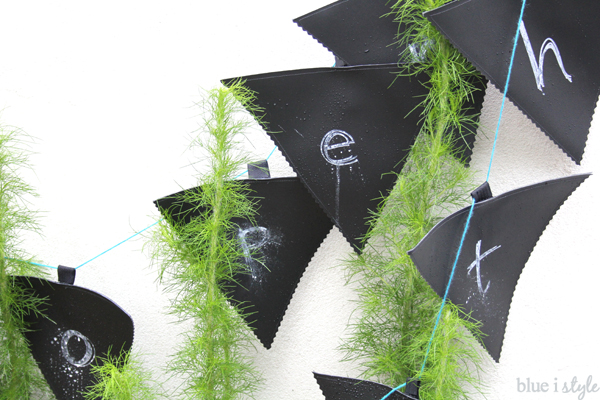
HANGING YOUR CHALKBOARD PENNANT BANNER

After you’ve written on your chalkboard pennants, you’re ready to hang it with coordinating ribbon or twine. Because the One-Wrap Velcro sticks to itself, all you need to do is wrap the Velcro around the ribbon or string, press it together, and it will hold securely.
DIY Reusable Chalkboard Banner
Once your pennants are on the string, you can easily adjust the spacing by sliding them back and forth. This makes it quick and easy to get your banner centered and hanging just the way you want it. The pennants look great spaced apart or overlapping.
How to Make a Reusable Chalkboard Banner

I generally end up hang my chalkboard banner in front of a wall, but because the pennants are double-sided, there is no right and wrong side. That means that if you want to hang the banner along a railing, or between two pillars or trees for an outdoor party, you could easily write on both sides of the pennants for added effect!

DIY Birthday Banner Ideas - How to Make a Fabric Banner with Chalkboard Fabric

I use my chalkboard pennant banner all around the house for all of our celebrations and to decorate for the holidays.

Last summer we hung the banner in the backyard for the 4th of July, spelling out “STARS AND STRIPES” on my chalkboard pennants above our outdoor dining table. That flag inspired centerpiece for the 4th of July was a simple IKEA hack, and filled with citronella tea lights it helps keeps the bugs away when we dine outdoors.

DIY 4th of July Banner - DIY Pennant Banner
For Halloween, I like to spell out “TRICK OR TREAT” and hang the banner above our kitchen fireplace. If you’re already looking forward to Halloween, or just like to plan ahead, you can check out my full Halloween Home Tour, complete with lots of fun seasonal DIYs.

Halloween Banner Idea - Chalkboard Fabric Banner

At Christmas, we set up our tree in our basement between our family room and the boys’ play area. The last couple of years, I have strung the chalkboard pennants up above their toys and spelled out “NAUGHTY OR NICE” as a cute little reminder that Santa is always watching and they needed to be good if they wanted to find presents under the tree on Christmas morning!

Naughy or Nice Christmas Banner - Modern Christmas Decor

You can find a lot of paper chalkboard banner options at craft and party supply stores, but these paper banners are really only good for use only. I love that my chalkboard fabric banner can be used over and over again for every party and every season! 

How to Make a Fabric Banner
I also like that I can use as many or as few of the pennants as I need to spell out my message, and they are virtually indestructible! No, really…

A couple of summers ago, I hung a chalkboard banner in the backyard for my son’s first birthday party. The weather was forecast to be nice, but right before the party started, a huge storm moved though with crazy amounts of rain and hail, and even tornado warnings. We quickly grabbed as many of the decorations as we could and ran into the house, but some decorations – including the chalkboard banner – were left outside until after the storm ended. Fortunately, all I had to do was wipe the pennants down and lay them flat to dry, and they were good as new!
  • Facebook
  • Twitter

06.22.16

« The No-Sew Way to Reupholster Outdoor Cushions
Dollar Store Storage with an Anthropologie Inspired Gold Basket »

Meet Angela

Angela, the founder of Blue i Style, strongly believes that decor should be functional, organizing can be beautiful, smart DIYs help stretch your budget, and an organized and stylish home can still be practical for life with kids.

Her work has been featured in print in Better Homes & Gardens and 5280 Home magazine, and online by HGTV, the Today Show, Good Housekeeping, and more. She was also named a 2018 Stylemaker by Better Homes & Gardens.

You can reach Angela at angela@blueistyle.com

COPYRIGHT & PHOTO SHARING POLICY

All text, images, and other content that are part of this blog are the property of Blue i Style, unless otherwise noted. All material is copyright protected.

If you wish to feature one of my projects, feel free to share a single photo (no collaged images, or images with text overlays) as long as the no pin code is used to prevent my image from being pinned from your site.

All features must include credit to Blue i Style with a link back to the original content (not just to the homepage). The project steps, supply list, and/or sources may not be disclosed.

Please read my full content and photo sharing policy to ensure you comply with all guidelines. Failure to do so constitutes copyright violation.

Create At Your Own Risk

Any and all content on this website is for personal use only and created exclusively for inspiration purposes.

Creating with my suggested methods, products used, and tools is at your own risk.

Please ensure you are following proper guidelines with anything used, and you receive professional guidance when necessary.

Read my complete disclosure at: Policies & Disclosures.

Sponsorships & Affiliations

To help fund this blog, I accept some forms of advertising, sponsorships, and affiliate links.

If you buy something that I recommend, you pay the same price, but I may receive a small commission. As always, all opinions are my own.

Blue i Style is a participant in the Amazon Services LLC Associates Program, an affiliate advertising program designed to provide a means for sites to earn advertising fees by advertising and linking to amazon.com.

I use an affiliate marketing service which may automatically put links into some posts, so please assume any/all links may be affiliate links.

Read my full Disclosure Statement.

Copyright © 2023 · Dazzling Theme theme by Restored 316

  • Facebook
  • Twitter
  • Pinterest