Our backyard patio is situated between our kitchen and our detached garage, so I always envisioned lights strung back and forth between the house and the garage.
PLANNING FOR & PURCHASING PATIO STRING LIGHTS
I honestly think that figuring out the layout for the lights and determining the lengths, wattage and socket spacing was harder than the actual installation of the lights. However, I fully admit that is probably a biased perspective because since I was in charge of the measuring and planning, but I didn’t have to do any of the work of installing the lights.
Nonetheless, planning is obviously an important step, so let me show you the plan we came up with. As we went along, I learned that there is a lot more to it than just measuring for the length of your string lights, and it can get pretty confusing, so I’ll try to sum up all of the things you need to consider before purchasing your string lights.
Because of the placement of our outlet in the garage eave, we actually used two separate strands of lights {as represented by the red and blue in the diagram below}. Each strand plugs in to the outlet on the garage eave, and then zig zags back and forth between the garage and the house. We measured the length of the garage, including the overhang of the roof line. Taking into account the location of the electrical outlet, we determined that 5.25 feet between points would allow us to have five evenly spaced connection points, as illustrated in the diagram below. {The gray in the diagram represents where the roof line extends beyond the garage building.}
We then identified four corresponding connection points on the house side of the patio – each evenly spaced between the connection points on the garage. Knowing the distance between the garage and the house, and given the 5.25 foot distance between connection points, we were able to calculate the length of each zig {or is it a zag?} at 230 inches. Who ever said you’d never need the Pythagorean Theorem in real life?!
- Commercial Grade String Lights from PartyLights.com {discussed above}
- 1/16″ Wire Rope
- 1/16″ Wire Rope Clamps
- Eye to Eye Turnbuckle
- Screw Hooks
-
Zip Ties
- Outdoor rated plugs
The screw hooks at each far end of the garage have just one eye to eye turnbuckle {because this is where the string lights end}. All of the other screw hook has two turnbuckles on it, so the guys zip tied the two turnbuckles together to secure the position of the each guide wire.
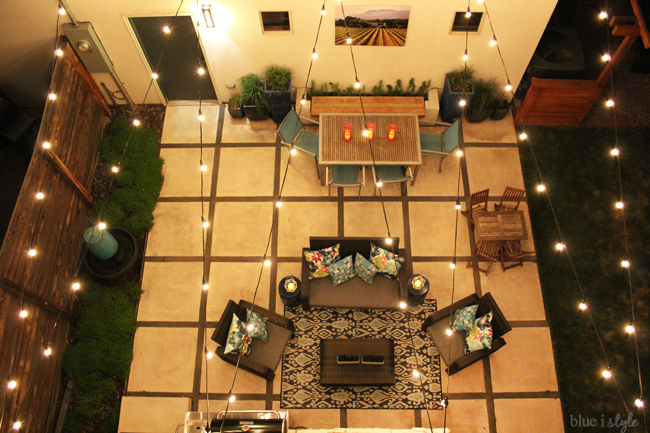
We swapped out the regular light switch inside the garage for a dimmer switch, allowing us to control the amount of light that we get from the string lights at night. When not dimmed, the lights make the backyard quite bright {but not too bright} – perfect for entertaining or letting the kids play at night. But for a quieter backyard dinner, or when relaxing on the outdoor couch, we enjoy being able to dim the lights a bit for more ambiance.
- Late Summer 2015:The backyard renovation is complete! Come see how we made our yard feel twice as big!
- Summer 2016: Backyard Tour – Creating a Colorful Outdoor Living Room
Thrift Dee says
I love your string lights! Is there any chance that you are in the Denver area? I am too! I would love to pay your friend to install lights for us. (Or maybe he knows someone that does installation?) I am a DIY-er but hanging something that could electrocute me makes me a little cringy!!
blueistyle says
Sorry for my delayed response! I am in Denver! I would be happy to ask our family friend if he is interested in doing another string light installation, or if he can recommend someone else. Are you looking to do it this fall, or wait for spring?
Chris DeLong says
Excellent post ! I live in Denver and just bought a duplex with rooftop patio. My backyard is almost identical to yours with patio in between detached garage. I am going to follow this exact guide and design my patio exactly like yours! Thank you for the wonderful post..
Cheers !
blueistyle says
I love hearing from other Denverites! I hope you lights turned out great!
Sheryl says
Me too!! I live north of Denver but I can't find time to do all the projects I see on Pinterest! I would gladly pay your friend to hang the lights!
blueistyle says
I totally get that! I would be happy to ask our family friend if he is interested in doing more string light installs, or if he can recommend someone else! I'll let you know when I hear back from him!
Hubnames LLC says
This is a great post about string light, Angela.
Thank for share with us ! I had shared your post on my Facebook group
Unknown says
I'm curious about the wires (?) that are attached to the turnbuckles with some kind of clamp. How are they attached to the strand of lights? And is their purpose to provide strain-relief or to protect the strands from rubbing on hooks?
Angela, Blue i Style says
I am not sure if I understand your question correctly, but I will try to answer. Please let me know if I am not answering the question you're trying to ask. The strands of lights are attached to the guide wires with zip ties (as explained above). We used guide wires, rather than just stringing the strands of lights back-and-forth by themselves, because these are commercial grade string lights intended for "permanent" installation and the lights hang year around including under the weight of snow during the winter. If you were talking about where the two turnbuckles come together, we used the zip ties to hold the turnbuckles together, thereby securing the position of each guidewire. All of this is explained in much more detail above under the installation instructions.
Amanda Mize says
This may be a dumb question but would a heavy duty staple gun work to hang up the lights as well?
Angela, Blue i Style says
That would probably work fine for a temporary installation for a party or a short period of time, but wouldn't be a good solution for a permanent installation of commercial grade lights with guidewires (which is what I was after).
Amanda Mize says
Ps, seen your blog on Pinterest! Your yard is super cute!
Angela, Blue i Style says
Thanks so much, Amanda!
John Baldree says
Great post! Would your friend be willing to help me out . Happy to pay to do so? I'm in Denver and pregnant looking to have it done this month? Thanks!
Angela, Blue i Style says
I am happy to ask him. Send me an email at blueistyleblog@gmail.com so that I can reply with his contact info if he is interested.
John Baldree says
Great Post! Thanks for sharing. I'm in Denver and my wife is pregnant and I would love to have this done this month ? Would be happy to pay to have some help ! We have almost the same layout between the garage and house. Please help!.
Zeke Clemmens says
What gage is the guide wire?
Anonymous says
This is a great post! I am putting up acoustic treatment in my home studio. I need to suspend some acoustic panels from the ceiling, BUT I have those deadly asbestos popcorn ceilings and disturbing the ceiling is a no-no. So I figured I'd run a wire rope across the room from wall to wall and hang the panels from their. I didn't really know how to translate that bright idea into reality, but here it is in your post. Thanks!
Electrician says
A well planned project! All this advice about "permanent installation" and then using zip ties that will last (2)years max.
Angela, Blue i Style says
I appreciate your concern, but in fact the particular zip ties that we selected are rated for a 10 year life when used outdoors exposed to both UV rays and snow. There are certainly different types of zip ties, intended for different uses and rated for different periods of time. I should add a note about that to the post, so thank you for pointing that out. However, when I reference "permanent installation" I don't intend to suggest that anything lasts forever. I recognize that at some point in time we may need to replace the zip ties (or some other part of the installation). Permanent installation is the term commonly used to refer to string lights that are left up year round, as distinguished from installation methods or light/socket types that are put up in the spring and taken down before winter. When we eventually see that any of the zip ties are beginning to fail, we will, at that time, replace all of them. Unless every zip tie were to fail simultaneously, the lights won't come crashing down, so we shouldn't have any problems even if the zip ties were to not live up to their estimated life.
Elizabeth in Santa Cruz says
Wow — I really appreciate the photos and details of this post. We followed it almost to the letter and put our string lights up today. Thank you!
Angela, Blue i Style says
So glad to hear that!
Marv says
Thank you for this excellent post! I just put in my string lights today and you have the best guide online, hands down. The lights look amazing and I'm glad I followed all your advice despite the 5hour+ project.
Romilda Gareth says
Thanks
Angela Tefft says
Awesome post, and very helpful. What size turnbuckles and hook screws did you use?
Thanks
Angel
Angela Tefft says
This was an awesome post, and very helpful. We are planning on putting lights between trees out by our firepit. What size turnbuckles and eye hooks did you use?
Charles says
Outstanding report of how the project was done! I'm curious, I live in Houston and we have an occasional rather nasty storm that comes by (hurricane) and I'd like to be able to take the lights down prior to. Looking at the screw hooks, would you say that the weight of the run of lights and cable going to each hook isn't so great that the turnbuckles can be lifted off either as is or turning the screw hooks 180 degrees to face inward? I'm guessing the greater the swag, the easier this might be accomplished.
Cindy Keller says
Awesome post – never knew about commercial lighting options for outdoor use. Will look into that as we plan to rejuvenate our patio this spring. Thanks for sharing and thank you so much for the installation tips!!!!! The lights look great!
Trena Urbin says
I am looking at istalling commercial grade string lights…. but dont have two permanent structures. I'm attaching between my house and some 2×2 8' posts I'm attaching to corners of my pool fence. All the commercial grade stuff is way too heavy and just droops. Will the guide wire help to hold that weight or will it just pull on my 2x2s too much?
Todd Peppers says
Trena,
I'm having the same issues with 4×4 posts bending and we used the guide wire. The wire definitely helps, but the wire is not strong enough to support the weight of all of the lights. I'd recommend buying a heavy duty wire that's capable of support several hundred pounds. The wire we are using supports 120 pounds and is still drooping.
Angela, Blue i Style says
I don't personally have experience with attaching the lights to wood posts, but I do know quite a few people who have had good success using metal poles set either in the ground with concrete or set into concrete filled pots. You may have better luck with metal poles rather than wood posts.
Unknown says
My wife and I are currently installing a similar setup, but using 4×4 posts to hang the lights. We're noticing the weight of the lights are bending the posts. We've tried to reinforce by packing extra dirt around the poles, hoping they'll hold. Does your friend who did the install have any recommendations how to balance out the weight or install a cantilever cable to pull the post back to an upright position? Thanks for any assistance!
Angela, Blue i Style says
I think at the very least, your posts will need to be set with concrete. However, the wood may still bend. I know quite a few people who have had good success using metal poles set either in the ground with concrete or set into concrete filled pots. You may have better luck with metal poles rather than wood posts.
Unknown says
Thanks for your great blog post. I followed your instructions and installed four aluminum fence posts to my deck and strung the lights on th eperimiter of my deck.
I bought blank 2×2 aluminum fence posts that were 9 feet tall (no pre-drilled holes). I used 3" deck screws to attach them to the deck sides, placing the psist at the corners. I used Nylock screws on the top eyelets to hold them steady in the fence post. They seem sturdy enough and even came with plastic caps. We shall see how they hold up in the wind.
Thanks again!
Anonymous says
To the June 17th poster above – can you post a photo or more detailed description of your hardware setup using the poles attached to your deck corners? (how you connected the guide wire to your poles, how you attached the poles to the deck, etc…) Thanks! This sounds like a good option for stringing lights on deck perimeter.
Anonymous says
I'm about to do a very similar setup at my house on my back patio. Although, I'm a little worried about connecting the strands of lights together and the connection spot being exposed to weather (rain). Does anyone have any thoughts about the plug connection spot being exposed or any prior experience doing this?
Thanks in advance.
Billie Sue Patrick says
Great information and very well written! Thanks for taking the time to write this article. As a math instructor, I got a kick out of your plug for the Pythagorean Theorem. Yes, math is actually useful.
I have experience that addresses some of the questions/concerns raised in the comments. Our house came with a shade sail set up so we have four anchor points already. Two of the cleats are attached to the house, and the other two are on posts. One of the posts is 6×6 and the other is a 4×4. They are set in concrete leaning at about 30° away from the house. Although a shade sail creates a much heavier load than string lights, my advice is don't skimp on materials or installation. You can do it right once, or do it over and over. It's a safety issue also to have insufficient support for your lights.
Someone mentioned sagging. That's what the turnbuckles are for. Even steel cable will stretch over time the turnbuckles give you several inches of adjustment to the out the slack. When we were using the shade sail, we even had to take out length at the cable fasteners occasionally. But your posts have to be up to it. You could easily snap a 2×2 applying this amount of leverage. As for the question about an outdoor outlet constantly exposed to the weather, the author leaves hers plugged in continuously because it is switched inside. Most of you are going to be turning your lights on and off by plugging and unplugging them. Your exterior outlet should already be a GFI so if you get a shower while your lights are on, you should be Ok. Putting them on a dimmer switch is genius, though! I will certainly keep that in mind when I plan our installation.
Unknown says
Was wondering if you think I will need to use the cable for the string lights if I am going to be attaching them along my building, about 150 feet, instead of across from building to building? This is a four story building and I want to run it between the first and second floor along the building.
Angela, Blue i Style says
I think it still might be a good idea, because it lends stability to help the lights withstand weather and keep them from sagging. It's definitely helpful in a place with snow, but would also help with wind and other weather as well.
Anonymous says
Thank you so much for this article! We followed your suggestions step by step and got our lights hung yesterday. I love them:)
Angela, Blue i Style says
Yay! I'm so glad to hear that! Enjoy them!
Anonymous says
Any advice securing the guy wire into stucco? I do not have any wood available on this side of the house.
Selina Rupers says
Best instructions I've found on Pinterest! We just bought our light strands and will be installing them this spring. 🙂 I have my spacing & zig-zagging plan set. The only part that eluded me so far is the HOW to get them up in a way that will stand up to the weather year-round. This post makes it perfectly clear what to use, and why. Brilling! What I also like about your method, is that if a strand ever needed to be replaced, we'd simply need to cut the zip ties holding that strand to the wire, but the entire wire structure remains in place to hook the replacement strand onto. Actually, I can see how this would be helpful even for weather events where we decide it may be best to take the lights out of the elements – just snip the zip ties to remove the lights, while the entire structure remains intact to easily re-attach the lights when ready. Thank you, thank you!!
Jess J says
Too funny we live like 2 doors south from you on Penn. we were wanting to hang our lights too and I happened across this. Thanks neighbor!
Angela, Blue i Style says
So glad you found it and I hope it helped! You’re welcome to stop by to see them if n person anytime!
John says
Great write up – the details were very appreciated! I’m looking to do my yard very soon so this was invaluable. Cheers!
Anonymous says
Where is your kids tabke set from? It is sooo perfect!
Linda says
Can you please share where I could get the blue water fountain?
It’s just what I am looking for!
Thanks.
Angela, Blue i Style says
I bought it at a store in Denver called Birdsall.
Deux Lignes says
Great post. I am going to upgrade an installation I had someone do a few years ago that is becoming problematic. Question: Did you do anything when plugging one strand of lights into another? I am concerned that just plugging them into each other will not support the weight of the lights over time and at some point they will come undone and fall possibly injuring someone. Thanks!
Angela, Blue i Style says
Since we attached the string lights to guide wires with zipties, the wires support the weight of the lights. If you use guidewires, this should prevent the plug from pulling apart or the strings from falling down. I would, however, do some research on whether you need to do anything additional to make the plug connection between the two strings of lights waterproof.
Eric says
How did you cap off the ends without plugs? Only part I felt I didn't see up there. Thanks!
Dr. Jeff says
Great post! I'm in Denver too, and I'm interested in doing a similar installation. Are the lights still holding up well? I'm concerned about having the same hail problem you encountered. Has that continued to be an issue? Any better solutions other than just replacing bulbs after every storm? Any idea how Larimer Square gets around that problem? Thank you!