This post is sponsored by Closet Factory, but, as always, all opinions are my own. You can read my full disclosure policy here.
Is it normal to want to sit on the couch and stare at your coat closet all day? Probably not…but that’s what I want to do! I just love a pretty and organized space, and for the very first time, our coat closet is both of those things! Best of all, it now serves the needs of our entire family, and I have seven tips to help you make your coat closet function better for your family as well!

Our coat closet has been one of the biggest thorns in my side ever since we became a family of four. It was so frustrating to know that there was plenty of space in there for the everyone, and yet, due to very poor use of space and a complete lack of organization, it wasn’t really working for any of us. Think I’m exaggerating? Let me remind you what the closet looked like just three weeks ago!
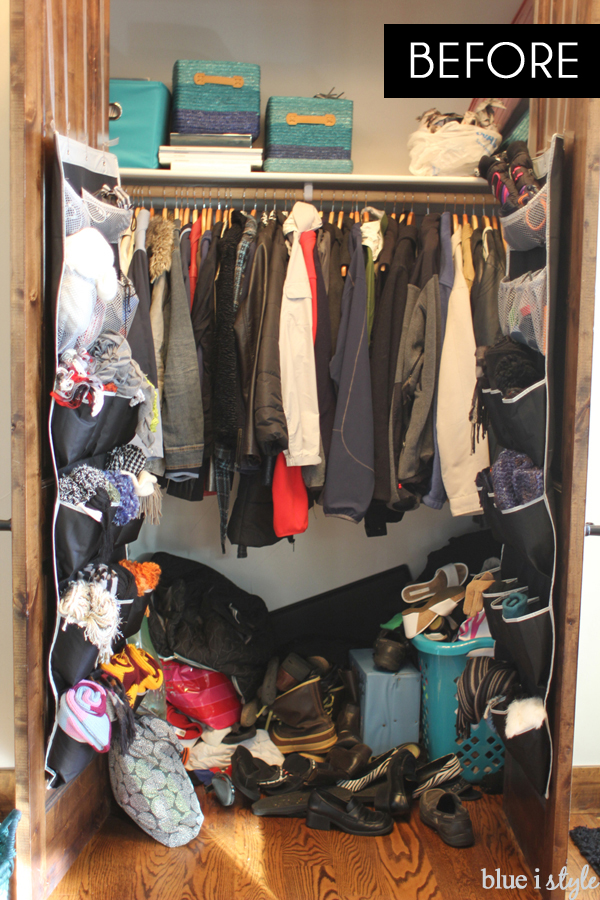
The only thing that was working about the closet were the shoe bags on the back of the doors for our scarves. Other than that, it was chaos. See that pile of shoes on the floor … they literally fell out when I opened the doors to take that awful before photo. And that teal bin on the floor … I truly had no idea what was in it until I emptied it as part of this reorganization process. Worst of all, not one thing belonging to our boys had a space in this closet, which made for way too many trips up and down the stairs to the kids’ rooms to get their coats, hats, and gloves before we could leave the house.
But not any more! Our coat closet is now a thing of organized beauty!

I am so grateful for the opportunity to work with Closet Factory on this project, and I could have never created such a perfect coat closet for our family without their help! Not only does all of our winter gear now have a designated space, we now have room to store other items that had been piling up around the house – and we even room to spare, if you can imagine that! And because the entire Closet Factory system that we had installed is adjustable, we’ll be able to adapt this closet to our family’s changing needs as the boys get older!
You can read all about why we decided to work with Closet Factory on this project, rather than attempting a DIY fix, in Coat Closet Part 1. And in Coat Closet Part 2 I talked through each step of the planning, design, and installation process. Taking what I learned from working with Closet Factory, and combining it with my love of creating pretty, organized spaces, I’ve come up with Seven Tips to an Organized Coat Closet that Maximizes Space for the Whole Family!
TIP #1: ADD A SECOND ROW OF HANGING SPACE, BUT KEEP IT FLEXIBLE
If it looks like we own a lot of coats…well, we do! And that’s even after donating a box full of others. But living in Colorado, we need coats or jackets throughout most months of the year, and throughout much of the winter, coats, scarves and gloves make more of a fashion statement than any of the clothes hanging upstairs in my bedroom closet, because they are always covered up.
One of the first challenges we needed to address in this closet was to make space for our sons’ coats, which we had previously kept in their bedroom closets. Additionally, I wanted the boys to be able to reach their own coats so they can become more independent – both with getting their coats on when it’s time to leave, and also learning to hang their coats up when we get home.
To address this challenge, we decided to add a second row of hanging space. Since the boys quickly grow from one size to the next, we knew they would never collect as many coats and Scott and I have over the years, so we only needed to provide them a small section of hanging space. For now, their hanging rod is quite low, with a small shelf above it that I am using for extra blankets {since the coat closet opens into the living room}. But as the boys get older, and their coats get bigger, we’ll be able to remove that extra shelf and move their rod higher to accommodate longer coats.
In order to make room for this lower rod, and to make use of the height of our coat closet, we moved the upper rod almost a foot higher than it was in the original closet. Even at 5’1″, I am still able to reach this upper rod with no problem, and we gained lots of additional usable space below our coats.
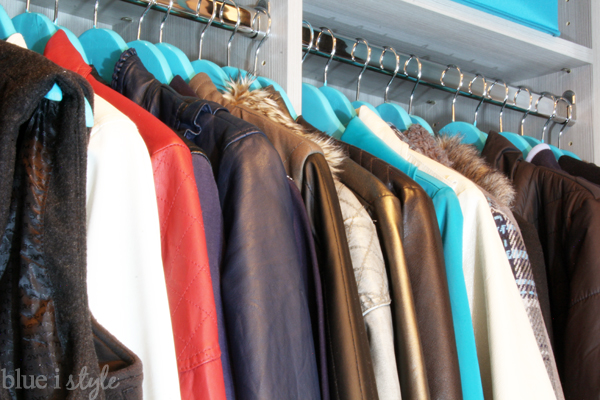
I have a number of long coats, so we created a dedicated space {on the far right} for longer hanging, with shelves below, and added drawers below the shorter coats in the center.
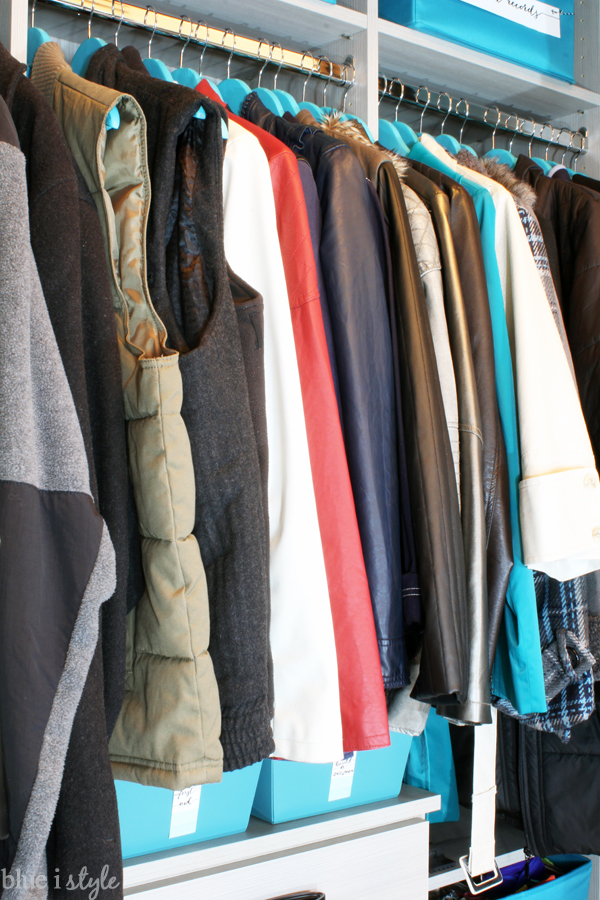
You probably noticed all of those teal painted hangers. Aren’t they pretty? That was a fun and quick DIY project that I blogged about last week, and I love the pop of color they add to the closet!
TIP # 2: PROVIDE A DRAWER FOR EACH MEMBER OF THE FAMILY
When I met with the professional closet designer from Closet Factory, one of my first requests was a drawer for each member of the family. However, thanks to moving the upper clothing rod higher in the closet, Closet Factory was actually able to give us a bonus fifth drawer!
The four lower drawers are quite deep and provide us with ample space for winter gear! Having one drawer dedicated to each member of the family will help us stay organized, make getting bundled up much quicker, and make it easier for the boys to participate in keeping the space organized.
I really love the system that Closet Factory provides for flexible drawer organization! Each of our deep drawers came with matching drawer dividers that can be fitted into any position thanks to a series of grooves along the bottom of each drawer.
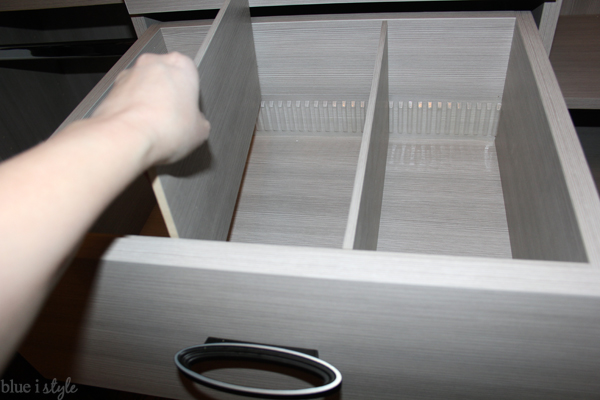
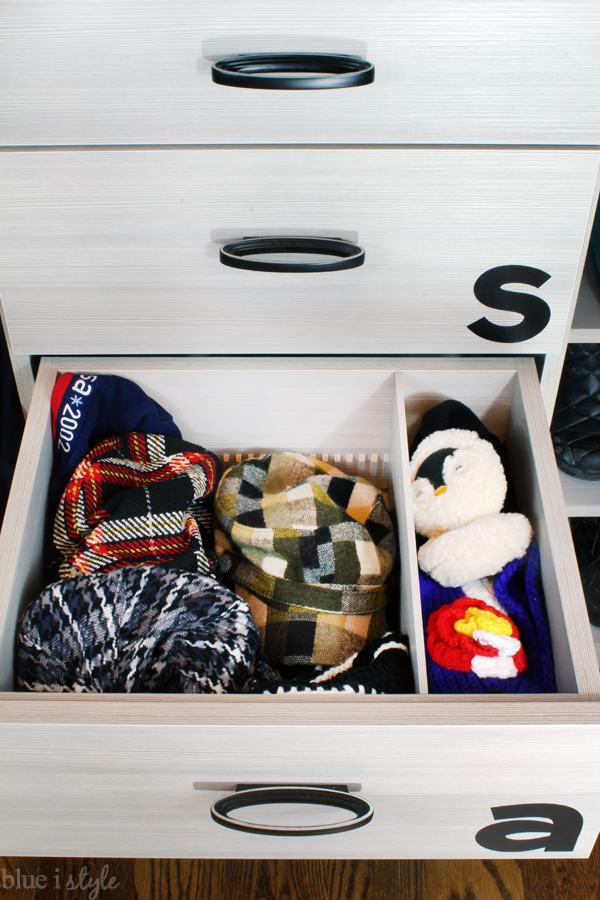
I am using two dividers in each of the boys’ drawers to separate their hats, scarves, and gloves.
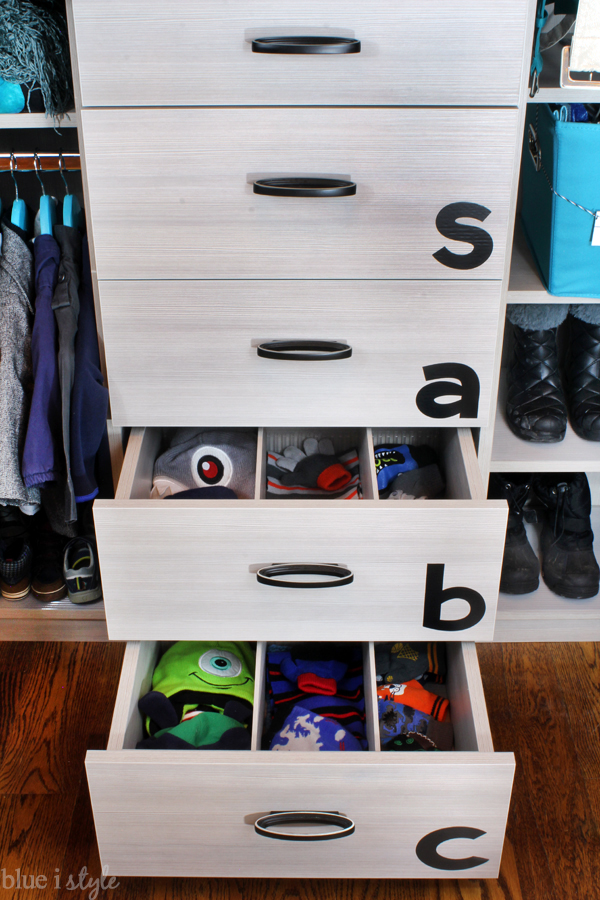
Scott and I both own quite a few wool hats that we wear throughout the winter months, so I used just one divider in each of our drawers to allow a larger space for our hats, and a narrower space for earmuffs. We have a different method for storing our scarves and gloves, which I’ll talk about below, but these deep drawers would also work perfectly for rolled up, adult-sized scarves!
If you don’t have room for one drawer for each member of the family, no problem! Just use drawer dividers to segregate one half of a drawer for each person to keep things neat and organized.
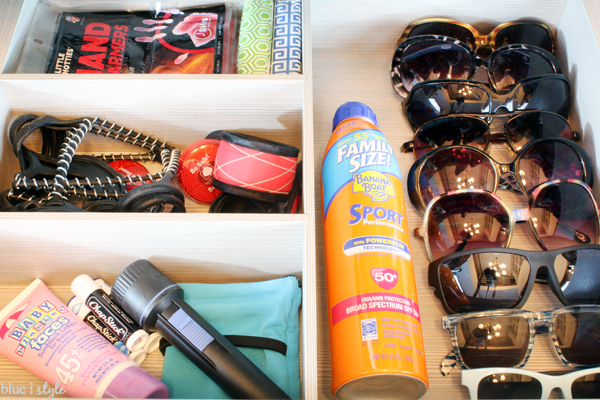
As I mentioned before, we originally anticipated only fitting four drawers into the closet, but Closet Factory was able to squeeze in a shallow fifth drawer with built-in dividers. I am using this drawer for all those items that we might need on our way out the front door, whether in sun or in snow – everything from hand warmers and ice traction for our shoes for safety in the cold, to reflectors for walking at night, and sunscreen and glasses for sunny days.
I even wound up with just enough space on top of the bank of drawers to add two small bins.
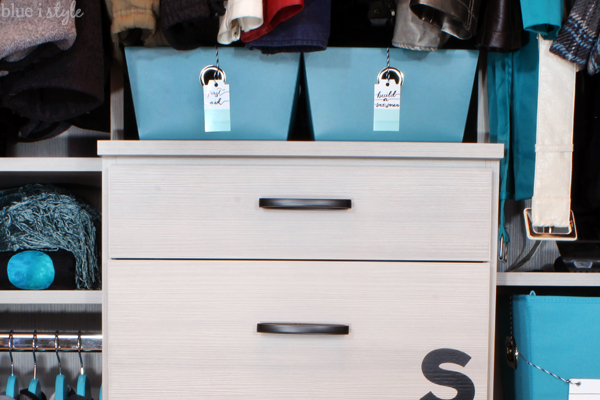
One bin holds first aid supplies {solving the problem of running up two sets of stairs to our medicine cabinet to grab a band-aid if someone scrapes a knee playing in the yard}.

The second small bin holds all of the adorable wooden pieces my mom made for us to use in building a snowman!
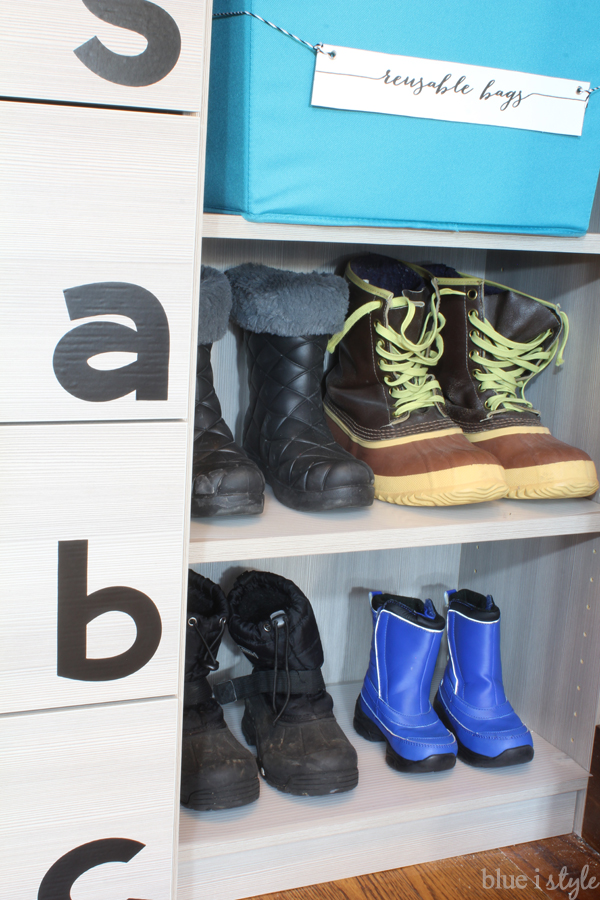
TIP #3: MAXIMIZE FLOOR SPACE WITH SHELVES FOR BOOTS & SHOES
As you saw in the scary before photo, shoes were only one part of the problem when it came to stuff piling up on the floor! For me, floor space without a designated purpose is an “if you have it, junk will come” situation. For that reason, I didn’t want any open floor space in the new closet plan.
I had already thought up a new solution for the shoes that belong in our bedroom but always manage to collect on the main floor – so I didn’t want to dedicate space to Scott’s and my shoes in the coat closet, but the closet designer from Closet Factory reminded me that still left the issue of snow boots. Of course, he was right! It makes much more sense to keep our boots in the coat closet, rather than two floors up in our bedroom, so shelves became part of the closet plan.

I don’t ever intend to put boots back in the closet while they are still snowy or wet, but nonetheless, boots are dirty business and I don’t want to muck up the shelves in our pretty new coat closet. So, I bought a roll of clear ribbed shelf-liner {affiliate link} and cut a piece to fit each shelf. Now I can rest easy knowing the shelves are protected, and if the liner gets dirty I can easily lift it out and clean it.

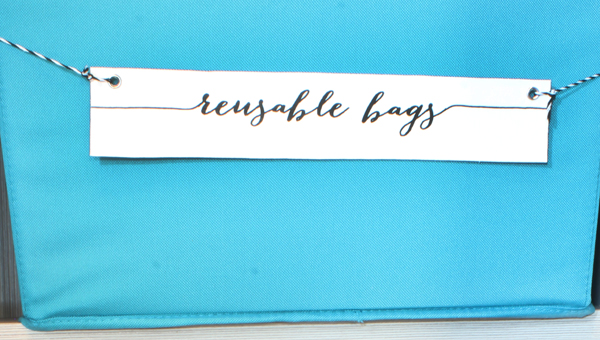
We were able to fit three shelves in this section of the closet, but since we each only have one pair of snow boots, this left me with an extra shelf. I hate to see a usable space go to waste, so I grabbed a basket and filled it with all of our reusable shopping bags that I could previously never find when I needed them. Now they’ll be right by the front door and easy to grab when I head out shopping or to our neighborhood farmer’s market.

Once I hung the boys’ coats in place, I realized that there was still enough space below to make use of that bottom “shelf” space as well. Since the boys typically take their shoes off as soon as they walk in the door, I decided we could store all of their little shoes right here in the coat closet. I again lined this shelf with the clear ribbed shelf-liner {affiliate link}.
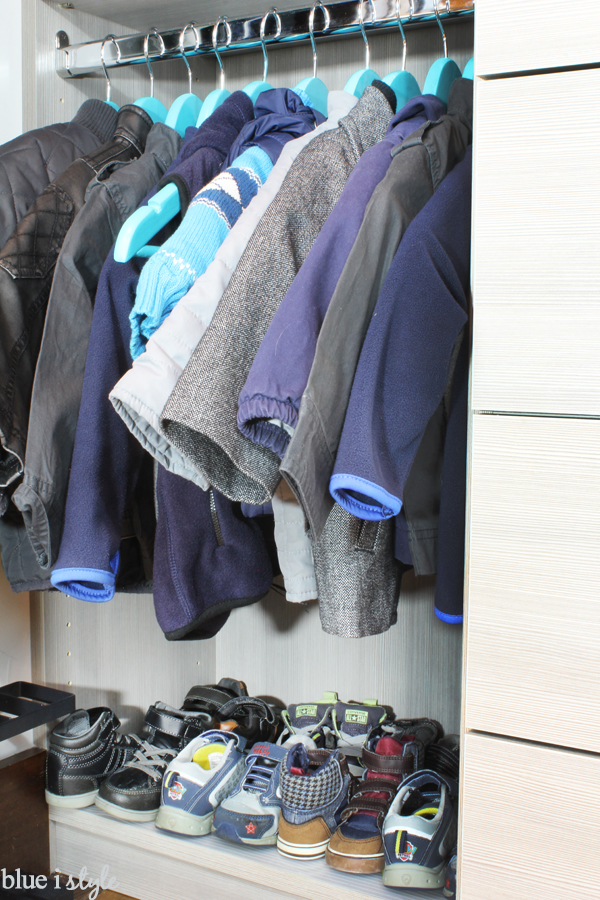
As their coats get longer and their shoes get bigger, we’ll relocate their shoes back to their bedrooms, but for now, this is allowing us to make good use of the extra space!
TIP #4: CREATE MORE STORAGE ON THE BACK OF THE DOORS
I view scarves as my winter jewelry – they are how I accessorize when it’s cold outside, and I have a lot of them {most made by my mom}. But a large collection of bulky scarves can pose a storage challenge. This is where the back of our doors come in, and this is the only thing I had done “right” in our old closet space.

The back of doors is an often overlooked space to add storage, and it’s a trick I use in just about every closet in our house {from the stationery storage on the back of my guest room closet door to the space for hanging clothes to dry on the back of our laundry closet door; and from the accessory storage on the back of Beckett’s closet door to the bulletin board on the back of our pantry door}.
Shoe bags are a great way to add storage to closet doors, and they are perfect for so much more than shoes. The deep pockets are ideal for holding many things, including rolled up scarves! The shoe bag on the door to the right of the coat closet is filled with all of my pretty scarves {and a few knit hats on the top row}, and the door on the left holds Scott’s scarves down at the bottom and his and my gloves in the middle pockets.

You may notice that the shoe bags on the back of the doors in the new closet are a different color than in the before photo. For some time, I’ve been intending to buy two more to add to other closets in the house. So, when I came across shoe bags almost the exact same color as the gray-beige of the textured melamine, I decide that the new shoe bags should go in the coat closet, and the old, black shoe bags could easily be relocated to the closets-in-waiting. It’s just a little thing, but having everything match really helps tie together the look of the new closet.
TIP #5: DON’T IGNORE THE SIDE WALLS
Just like the backs of your doors, don’t overlook the potential of the side walls in your closet. I didn’t expect there would be much usable space on the walls because of the shallow depth of our coat closet, but the designer from Closet Factory pointed out several spaces that we could take advantage of, and suggested small hooks for hanging umbrellas and a larger hook for backpacks.
The umbrella hooks on the left side of the closet are positioned so they don’t interfere with the hanging space or the use of the shelf. Since we also have several large umbrellas that don’t have cords for hanging, I bought a narrow, weighted umbrella stand {affiliate link} that fits perfectly against the wall. At only 2.5″ deep, it takes up almost no space, but it keeps our tall umbrellas upright and out of the way.

On the right side, a larger double hook provides a perfect space to hang backpacks so they don’t have to be on display in our kitchen “mudroom” all week long!

TIP #6: MAKE FULL USE OF THE HEIGHT
Our closet is extremely tall, and in the old configuration with just one shelf above the too-low clothing rod, there was four feet of wasted space at the top of the closet. Once upon a time, I had tried stacking up lots of bins on the top shelf, but I’ve learned that if you stack anything more than two high, it’s just impractical and too hard to access what you need.
The new closet configuration is so much more functional! We now have two shelves for baskets and bins. I am using the first shelf for bins for the items we use more frequently {our snow pants, our picnic blanket and backpack, and the extra records for our jukebox that’s located very near the coat closet}.

On the second shelf up I was able to stacks bins two high, which allows me to maximize storage space without making anything too hard to get to. We have so much more usable space in this closet than we did before that I honestly haven’t yet figured out what I’ll put in each of these bins {which is why they remain unlabeled}. But I know that I’ll fill them up before long as I continue to sort through other rooms of the house, and through the items that are currently piled up in the garage waiting for a better home.

I originally measured the space for all of the bins and headed out shopping. After returning home empty handed, unable to find anything that fit the space just right without breaking the bank, I started shopping the house and realized I already had plenty of matching teal lidded bins {affiliate link} that would work perfectly. I know better – I should always shop the house before wasting time going from store to store! But in the end, I’m so glad that I was able to use what I already had without spending a dime!
TIP #7: ADD PRETTY LABELS TO HELP THE WHOLE FAMILY
I’ve said it before and I’ll say it over and over again. If I take a few extra minutes to make an organized space pretty, it really helps to motivate me to keep the space organized for the long haul.
Clearly this new closet system from Closet Factory is very pretty in its own right! I love the sleek, sophisticated look of the textured melamine, and the way that the melamine also covers the back wall of the closet, giving it that truly custom, built-in look! I also picked out some very fun drawer pulls {affiliate link} to add some of my own personal style to the space.

Despite how nice the closet was already looking all on its own, I still needed to label the bins, which gave me an excuse to add some more pretty touches. Without labels, the shelves would just be a sea of teal, and it would be anyone’s guess what was inside! To make it easier for everyone in the family to find what they are looking for, I added some stylish and durable labels. {Come back on Friday for a quick five minute tutorial on how to make labels that can hold up to lots of wear and tear}.
I also used adhesive vinyl, cut on my Cricut {affiliate link}, to add our first initials to each of our individual drawers. Not only do I love the look of this graphic element, it will also make it easier for each member of family to find their winter gear. I like labeling with adhesive vinyl because it can be removed totally damage free if I want to change things up in the future.

I had originally made sticker labels for the two teal bins that sit on top of the drawers, but they wouldn’t stick to the texture of the plastic. Instead, I raided my gift wrap supplies and used two cute little gift tags {from the Target dollar section} to label the bins.

I am truly over the moon with how our organized coat closet turned out, and because the shelves and rods are all adjustable, I know this closet system will be able to grow with our family for as long as we live in this house.

Working with Closet Factory was a fun and stress-free process, and I am already dreaming of all the other spaces in the house that could benefit from custom closet systems! If you have a closet or other space in your home that is in need of some serious organizing love, I highly recommend you give them a call for a free design consultation!

Linked up at Remodelaholic