• About
    • About Blue i Style
    • Tour Our Home
    • Free Organizing eBook
    • Blogging Resources
  • Work With Me
    • Interior Decor & Organizing Services
    • Partnerships & Collaborations
    • Blogging Resources
  • Features & Press
  • Policies & Disclosures
  • Contact

Blue i Style

Creating an Organized & Pretty, Happy Home

  • Decor
    • Tour Our Home
    • Room Makeovers & Design Plans
    • Decorating Tips & Tutorials
    • Outdoor Decor
    • One Room Challenge
  • Organizing and Cleaning
    • Organizing Tips & Tutorials
    • Organizing By Room
    • Organizing on the Go
    • Cleaning
  • DIY
    • DIY Tips & Tutorials
    • Smart Home & Safety
    • Paint Tips & Projects
    • Crafts
    • Cricut Projects
  • Kids
    • Decor & DIY for Kids
    • Organizing Kids
    • Life With Kids
  • Five Minute Projects
  • Holidays & Entertaining
    • Seasonal & Holiday Decor
    • Entertaining
    • DIY Gifts & Gift Guides
    • Facebook
    • Instagram
    • Pinterest
    • Twitter
    • YouTube

Uncategorized

{decorating with style} Zebra Cornice Boards – Part 1

  • Facebook
  • Twitter

Our nursery has been ALMOST complete since Beckett was born nearly 17 months ago. But the one project we never got around to finishing were the window coverings for the room. Now that Baby Number 2 is set to arrive in a matter of weeks, I decided it was time was finally get this project done!

We love how modern the architecture of our home is, but one element that poses a big challenge is the abundance of long, thin horizontal windows throughout the house. On the main floor of our house we have opted to leave these long, thin windows with no window coverings at all, but in the bedrooms we added roller style solar shades to block out some of the light and provide added privacy.

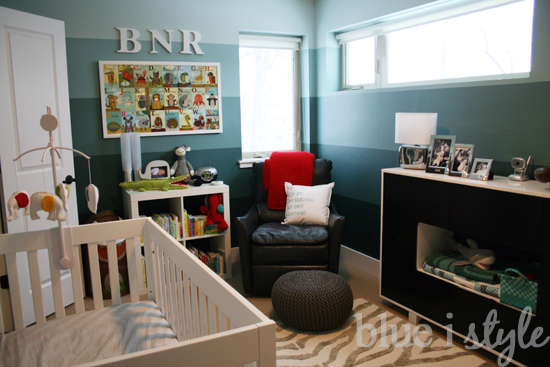
Way back when we started designing the nursery, I found some great tone-on-tone white zebra striped drapes at Target that I thought would be just perfect with the zebra striped rug in the room. And while these drapes could easily be hung in the standard vertical nursery window, I struggled to figure out how to address that long horizontal window.

Finally Scott and I concluded that the answer was to make cornice boards for each window – in the vertical window the cornice board would hide the curtain rod from which the drapes would hang, and in the horizontal window the cornice board would simply hide the roll of the roller shade. And to make the cornice boards even more of a feature in the room, I decided to add grey hand painted zebra stripes.

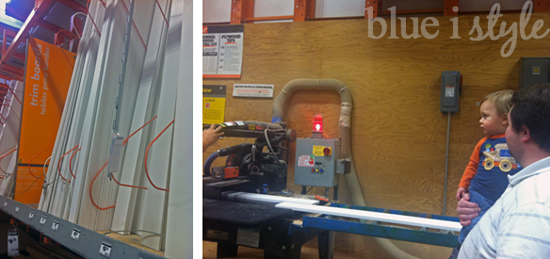
We purchased one 12′ x 6″ piece of trim board for $15 at Home Depot, and had that board cut down to the two lengths we needed for our windows.  Home Depot says they charge a small amount per cut – but we have never actually been charged by them for custom cuts.  However, even if there had been a charge, it would be worth it because pre-cutting the board in store not only saved us time, but also made it much easier to transport the boards home!  Plus, Beckett thought it was really fun to watch the giant saw in action!

The trim board we bought was already primed white, but there were a few marks on the boards from having been moved around at the hardware store and in our garage. I used a Magic Eraser to clean up the boards.  Then we used a paint roller to give each piece a quick coat of white paint using the same paint from the doors and trim throughout the nursery.

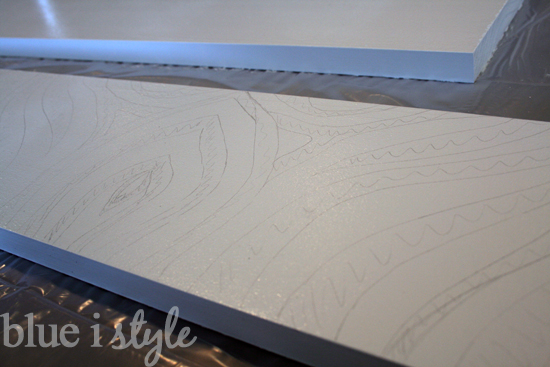
When we had the boards cut to length, we were left with one extra piece of board about two feet long. While the white paint was drying on our two cornice boards, I used this extra board to begin testing out the zebra stripes – including how I was going to draw them and what shade of grey acrylic paint I was going to use. I knew the biggest challenge was going to be figuring out how to make the stripes look like zebra when I only had six inches to work with. But I did a little searching online and found a good picture of a zebra print boarder that I used as a sample.

I used a pencil to very lightly sketch out some stripes on the extra board and then painted just a few make sure I was happy with the overall look. When I first drew the stripes on the test board, I was pretty skeptical of how it was going to look (as the pencil drawn stripes looked a bit like a messy kids art project)…but once I got a few test stripes actually painted, I could see that it was going to look pretty good.


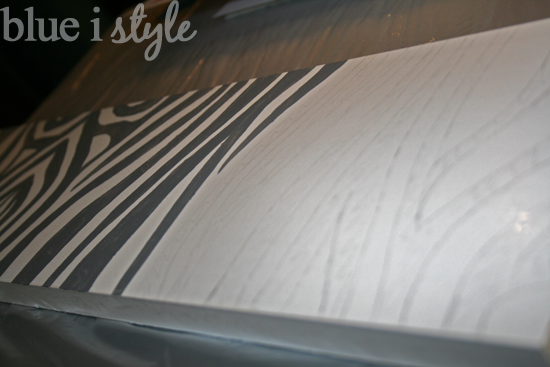
I initially debated about whether to continue the stripes onto the bottom edge of the boards, but decided against that.  I was worried that I might need to tape of the bottom of the board to get a nice crisp edge, however as I painted the test stripes, I discovered that this really wasn’t necessary.

Painting some stripes on the test board was also helpful because it allowed me to hold this board up in the nursery to ensure that I liked the way it looked in the room before committing to painting the stripes on the actual cornice boards.


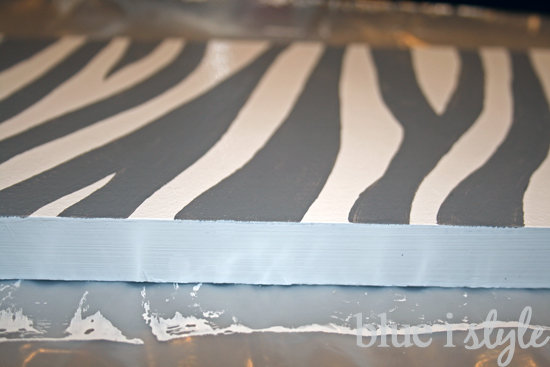
The next morning, once the white paint on the cornice boards was dry, I began sketching out zebra stripes along the full length of both cornice boards – using the test board as a guide.

I made sure to press very lightly when drawing the stripes, as I didn’t want my pencil lines to leave indentations in the wood that would be visible once the stripes were painted. I also quickly discovered that I needed to lightly shade inside of each stripe with my pencil as I drew, because it otherwise become very confusing trying to keep track of which stripes would be white and which would be painted grey.

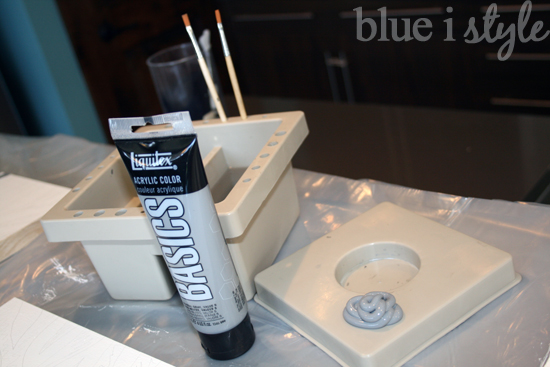
Once all the stripes were drawn on the boards, I readied my painting supplies and got started.

I didn’t worry about painting the stripes exactly as I had drawn them on, but rather used the pencil lines as a generally guide. I did make sure all the pencil lines were covered by paint so that I wouldn’t need to do any touch up or erasing.


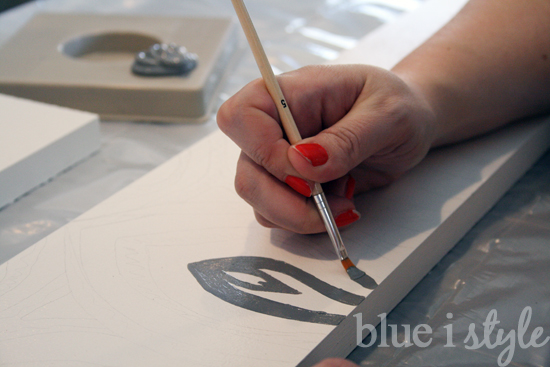
The longer of the two cornice boards is over 85 inches long, so it was a slow process to paint the narrow zebra stripes along the entire length. But unlike a lot of painting projects, this was actually a good project to tackle while Beckett was eating and playing in the kitchen, because after each individual stripe I was at a good stopping point if I needed to help him with anything. Surely taking a play break after every couple of stripes was not the fastest process, but a happy toddler is worth a loss of efficiency!

Rather than starting at one end of the long cornice board and working my way down – I broke the project into halves to make it seem more manageable. I started at the center of the longer board and worked my way to the right end – then turned the board over and again worked from the middle to the other right end. Being right handed, this ensured that I was never putting my hand in wet paint. Just painting the first half of the long cornice board took me hours, but it was a great feeling of accomplishment when I could see it half way done!


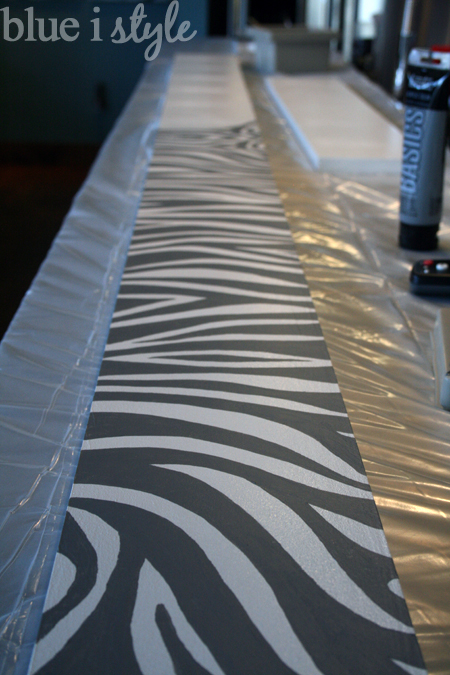
A few more hours of painting, I finally had the stripes completely painted on both boards. I had to do just a bit of touch up here and there where the paint was a bit thin – but for the most part, one coat of acrylic paint did the job.  Now that both boards are fully painted, the cornice boards are ready to be installed.

I’ll be back in a few days with the installation process and photos of the finished project, drapes and all!

Update: Check out these links for all of the posts about the nursery, including the completed cornice boards and drapes…

  • Facebook
  • Twitter

05.15.13

« {gifts with style} Teacher Appreciation Coloring Card
{gifts with style} Custom Animal Board Book »

Meet Angela

Angela, the founder of Blue i Style, strongly believes that decor should be functional, organizing can be beautiful, smart DIYs help stretch your budget, and an organized and stylish home can still be practical for life with kids.

Her work has been featured in print in Better Homes & Gardens and 5280 Home magazine, and online by HGTV, the Today Show, Good Housekeeping, and more. She was also named a 2018 Stylemaker by Better Homes & Gardens.

You can reach Angela at angela@blueistyle.com

COPYRIGHT & PHOTO SHARING POLICY

All text, images, and other content that are part of this blog are the property of Blue i Style, unless otherwise noted. All material is copyright protected.

If you wish to feature one of my projects, feel free to share a single photo (no collaged images, or images with text overlays) as long as the no pin code is used to prevent my image from being pinned from your site.

All features must include credit to Blue i Style with a link back to the original content (not just to the homepage). The project steps, supply list, and/or sources may not be disclosed.

Please read my full content and photo sharing policy to ensure you comply with all guidelines. Failure to do so constitutes copyright violation.

Create At Your Own Risk

Any and all content on this website is for personal use only and created exclusively for inspiration purposes.

Creating with my suggested methods, products used, and tools is at your own risk.

Please ensure you are following proper guidelines with anything used, and you receive professional guidance when necessary.

Read my complete disclosure at: Policies & Disclosures.

Sponsorships & Affiliations

To help fund this blog, I accept some forms of advertising, sponsorships, and affiliate links.

If you buy something that I recommend, you pay the same price, but I may receive a small commission. As always, all opinions are my own.

Blue i Style is a participant in the Amazon Services LLC Associates Program, an affiliate advertising program designed to provide a means for sites to earn advertising fees by advertising and linking to amazon.com.

I use an affiliate marketing service which may automatically put links into some posts, so please assume any/all links may be affiliate links.

Read my full Disclosure Statement.

Copyright © 2023 · Dazzling Theme theme by Restored 316

  • Facebook
  • Twitter
  • Pinterest