• About
    • About Blue i Style
    • Tour Our Home
    • Free Organizing eBook
    • Blogging Resources
  • Work With Me
    • Interior Decor & Organizing Services
    • Partnerships & Collaborations
    • Blogging Resources
  • Features & Press
  • Policies & Disclosures
  • Contact

Blue i Style

Creating an Organized & Pretty, Happy Home

  • Decor
    • Tour Our Home
    • Room Makeovers & Design Plans
    • Decorating Tips & Tutorials
    • Outdoor Decor
    • One Room Challenge
  • Organizing and Cleaning
    • Organizing Tips & Tutorials
    • Organizing By Room
    • Organizing on the Go
    • Cleaning
  • DIY
    • DIY Tips & Tutorials
    • Smart Home & Safety
    • Paint Tips & Projects
    • Crafts
    • Cricut Projects
  • Kids
    • Decor & DIY for Kids
    • Organizing Kids
    • Life With Kids
  • Five Minute Projects
  • Holidays & Entertaining
    • Seasonal & Holiday Decor
    • Entertaining
    • DIY Gifts & Gift Guides
    • Facebook
    • Instagram
    • Pinterest
    • Twitter
    • YouTube

Holidays & Seasons· Organizing

How to Organize Gift Wrap In a Closet

  • Facebook
  • Twitter
Confession time! I am a gift wrap hoarder! I’ve never met a pretty roll of wrapping paper that I didn’t like {especially if it’s on sale}, and I keep every gift bag that comes into our house for future reuse. Those adorable gift tags in the Target dollar section get me every time, I can’t pass up the giant bags of bows that are always on sale for 75% off after the holidays, and you’ll even find me refolding tissue paper if it’s not too wrinkled to use again.
But what is a gift wrap loving gal to do with all that stuff?! Organize it of course! 

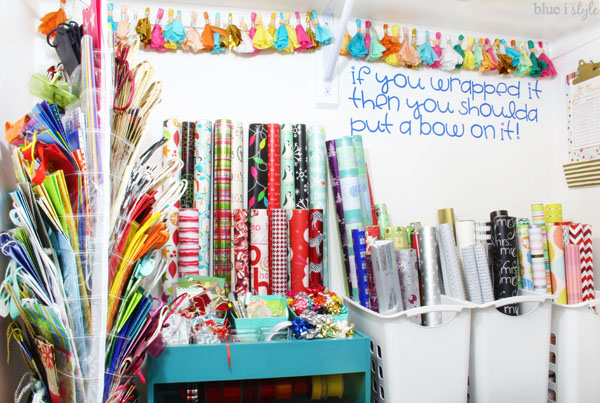
I turned one half of our guest room’s small walk in closet into an organized and pretty gift wrap central, and even used the back of the closet door for all of my greeting cards, stationery, and additional wrapping supplies.
This post contains some affiliate links, denoted by an asterisk(*). If you buy something that I recommend, you pay the same price, but I may receive a small commission.

Have I mentioned before that it’s challenging to photograph a closet? And yet, once again, that’s what I found myself doing. I seriously wish you guys could see some of the things that go on behind the scenes around here… picture me with a camera tripod and two gigantic umbrella lights all inside the small closet with the door closet and cords running everywhere. I was seriously tangled up as I tried to get all the different angles for this post. But there’s only so much you can do in a tiny space, and I really couldn’t get a photo that gives you a sense of the layout of the entire closet…so instead I’ll give you this simple illustration for context:
Over on the left side of the closet, there used to be nothing but a clothing rod with a high shelf above it. Great if you are hanging clothes in the closet…but not so useful for a guest room closet that doesn’t get used for clothes at all. I’ve always used this half of the closet for my gift wrap supplies, but for years struggled to use the most of the space.
Then, a while back, I found that teal rolling wrapping cart on clearance at a local framing and art supply store. I had seen the Stanton Wrapping Cart* in the Home Decorators Collection catalog and it was on my “someday I’ll splurge on that” wish list, so I couldn’t believe my eyes when I saw one lone cart in the corner of the store on sale for only $50. I knew it had to be mine!
And, as usually happens, one thing led to another and soon the gift wrap side of my guest room closet went from cluttered and dysfunctional to utterly fabulous!
There’s a whole lot going on in this small space, so I’ll walk you through it and show you all the organized details. And since the teal wrapping cart is what started it all, let’s begin there.
I was able to fit 16 rolls of wrapping paper in the designate section at the back of the wrapping cart. Since I’ll be wrapping lots of Christmas gifts in the next week, I decided to fill the cart with my favorite Christmas paper for now, but after the holiday, I’ll swap the paper in the rolling cart out for my favorite everyday papers so that I’ll be ready for the next birthday, wedding, or house warming.
In the section immediately in front of the wrapping paper, I used three bins from the dollar section at Target {now called Bullseye’s Playground – that awesome spot at the front of Target is one of my favorite places to pick up both organizing and gift wrap supplies}. I filled one bin with all of my Christmas gift tags; one with pens, tape, and scissors; and one with mini bows {which I always buy in the discount bins at the front of Michaels}.
In front of the larger cardboard bins, I used smaller, clear Linus drawer organizers* from The Container Store to hold smaller gift tags, my pop-up tape dispenser and refills, and pins and mini clothes pins {hang tight, and I’ll show you what I use those for}.
Here’s one of my favorite parts of the Stanton Wrapping Cart* – space for so much ribbon! And does it surprise you at all that I organized my ribbon by color?
As soon as I started to organize my ribbon, I ran into a little snag. The rods are pretty big around… too big for the holes in most of spools of ribbon. But I found a quick and easy fix! I simply pushed a closed scissor through the holes in the cardboard spools, then twisted them to enlarge the holes.
When I first put the ribbons on the rods, they kept unraveling, so I used a straight pins to keep the ends in place.
Next up, the drawers. Organizing these took some trial and error because I wasn’t sure which of my supplies would fit best in the shallower drawers. Once I found the best use for each drawer, I labeled each using washi tape and my label maker*.
I ended up using the deep bottom drawer for bows, and I used two more Target cardboard bins for pre-made curly ribbons.
The middle drawer stores all of my tissue paper, organized by color. Red, pink, orange, and yellows on the left; green, blue, and purple on the right, and mutli-colored in the center.
The top drawer holds black, white, and metallic tissue paper on the left, and extra ribbon {including all my scraps} on the right.
So, remember I said I’m a bit of a gift wrap hoarder…I’m not kidding. If save the ribbons off of everything! Long or short, I’ll end up finding a use for it, but as a result, I used to have a pile of ribbon that looked like this…
My former method of shoving all the ribbon scraps in a drawer wasn’t working all that well {shocking, I know!}, so I found a better way. I rolled up each ribbon and used a mini clothes pin to hold the roll together. I now keep those neatly bundled scraps of ribbon in a Viola Drawer Organizer* where I can easily see what I have when I wrap a present. 
The best part of the Stanton Wrapping Cart* is that it’s on wheels! So when I’m ready to wrap presents, I can just roll the cart out of the closet and have everything I need close at hand while I wrap presents on the floor of the guest room.
For most people, this gift wrap cart is probably all you need to organize your gift wrap supplies, and you could easily tuck it into any closet. But since I have a few more supplies I needed to organize, the story continues.
I love to buy pretty wrapping paper when it goes on clearance after the holidays, I’m always picking up inexpensive rolls at Ikea and in the Target dollar section, and I can’t say no to the multi-packs of double sided wrapping paper at Costco. As a result, I have a lot of wrapping paper! The good news is that I always have plenty of options on hand for baby showers, birthday parties, and weddings. But it poses a storage challenge.
I picked up three white laundry hampers* from The Container Store, and organized my wrapping paper by type. One hamper holds extra holiday paper, one holds metallics and papers ideal for weddings, and the final hamper holds papers ideal for birthday parties and baby showers.

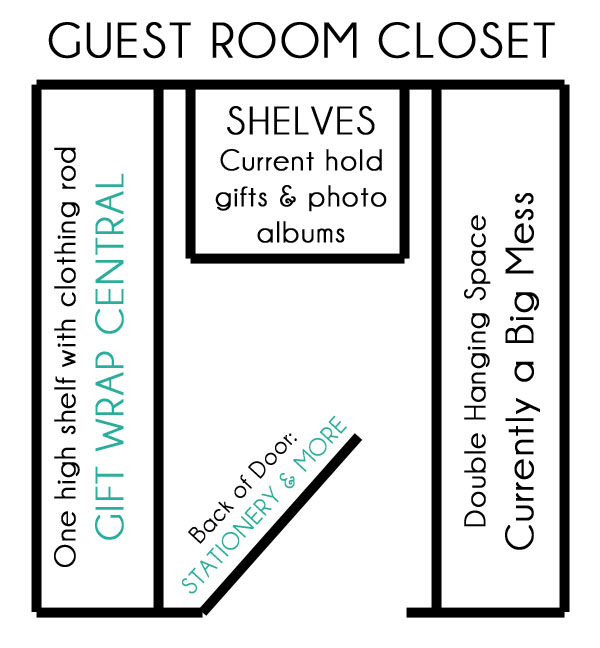
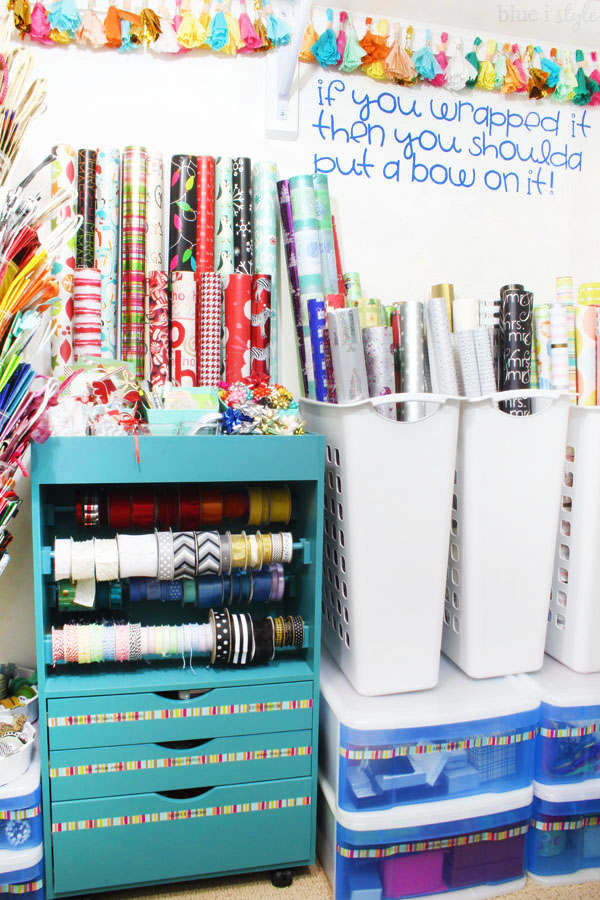
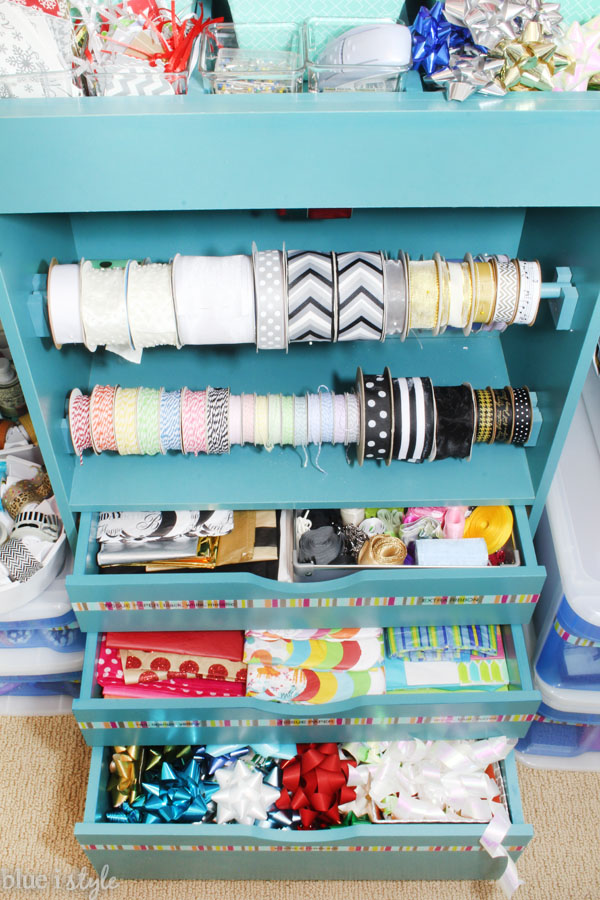
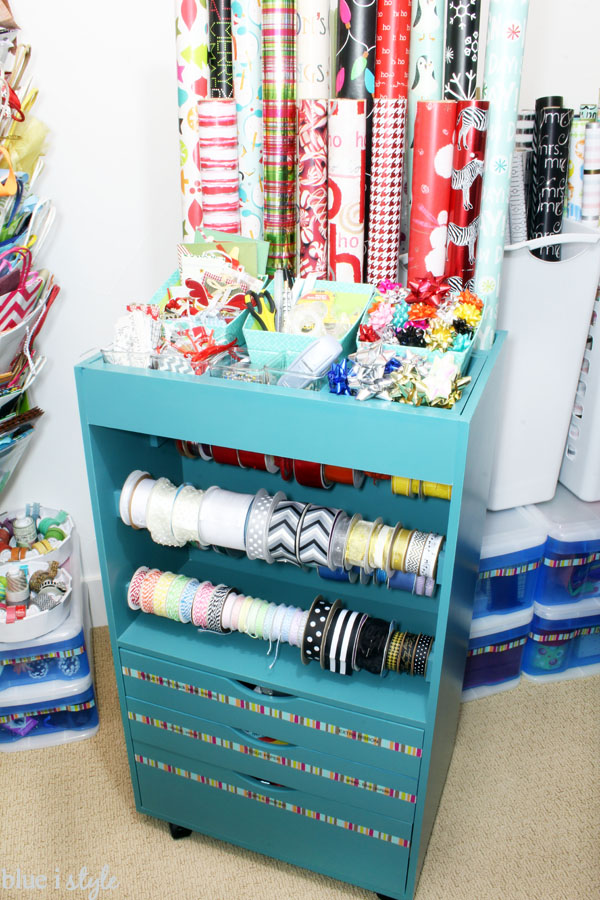
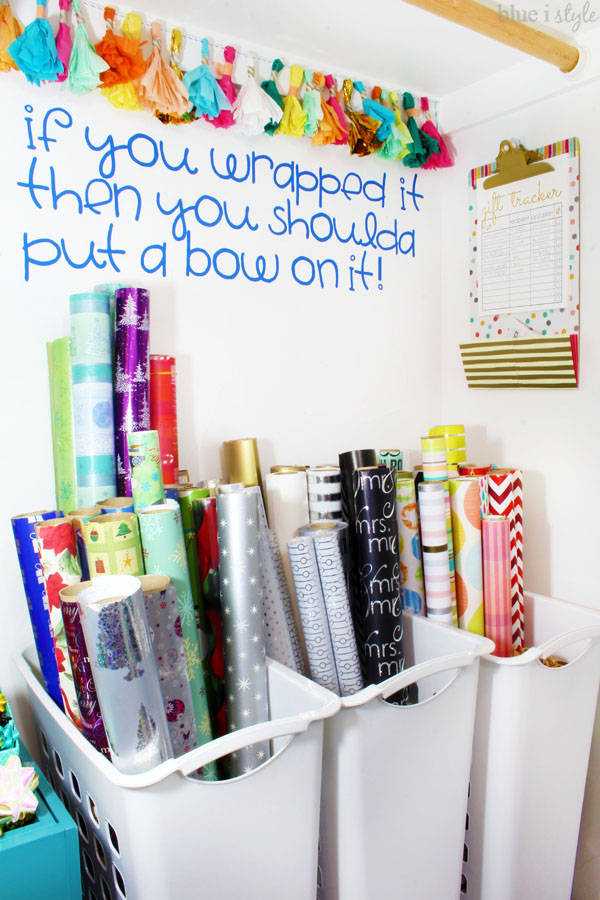
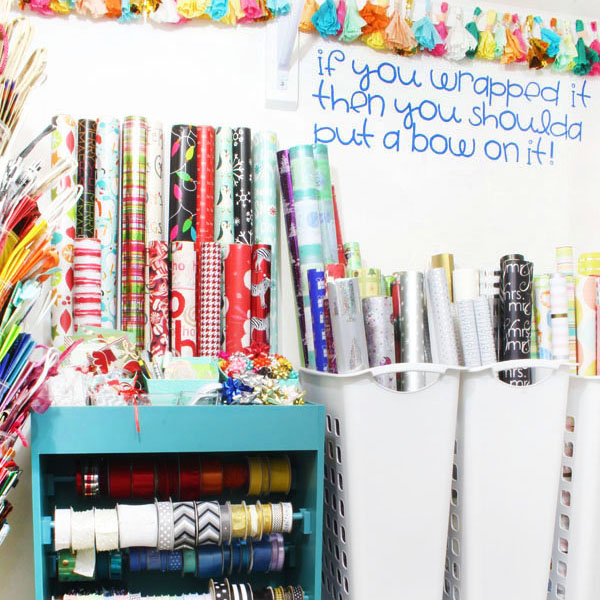
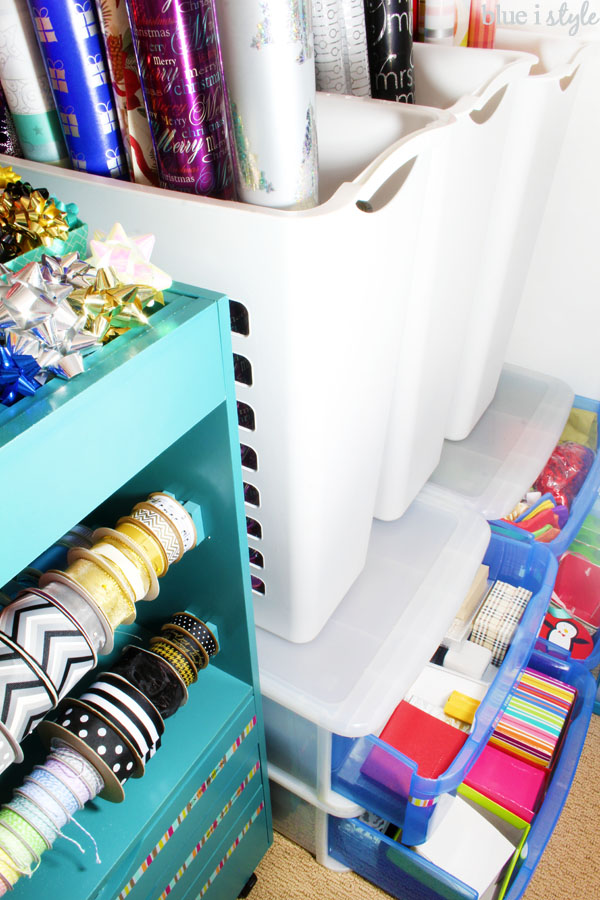
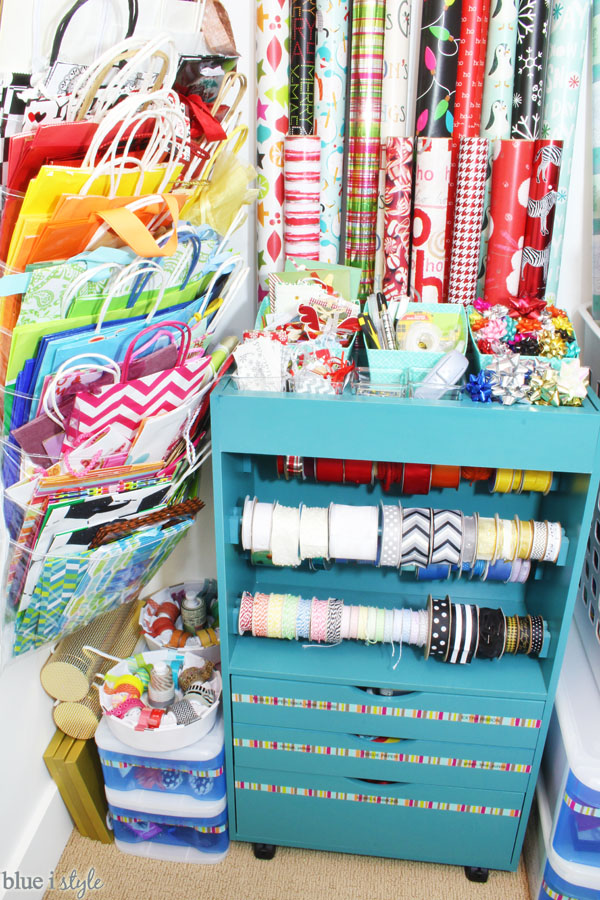
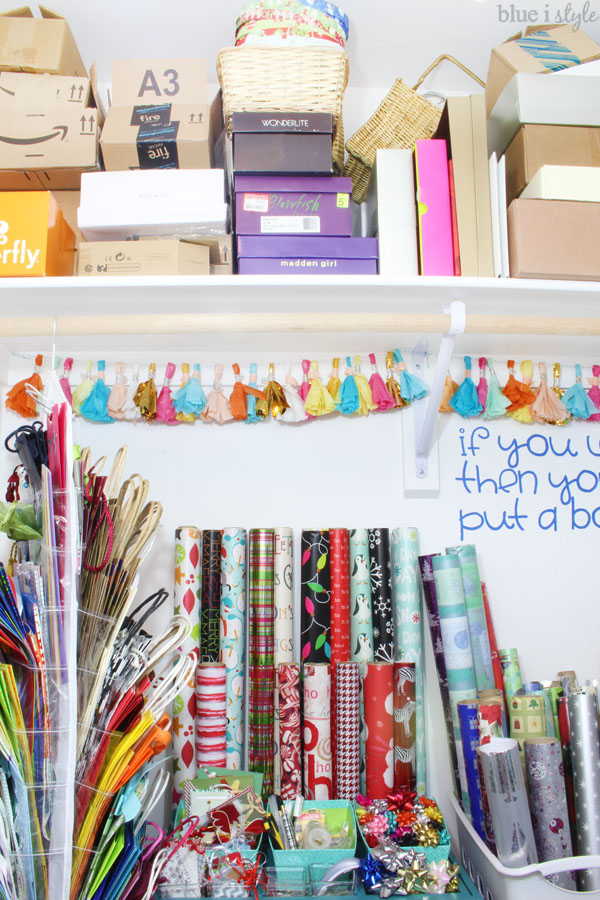
To make the most of the space, I placed the hampers of wrapping paper on top of two side-by-side sets of large tint stacking drawers* from The Container Store.

The two drawers closest to the rolling wrapping cart hold small and medium sized gift boxes, respectively {my gift wrap hoarding is at work again here…as all of these are boxes I have saved from gifts I’ve received}. The other two drawers hold Christmas gift boxes {bought on clearance at Costco last year}, fabric gift bags, and basket fillers.
I just couldn’t stand to see the the wall space above the wrapping paper go to waster, so I decided to use some left over vinyl to add a very punny saying on the wall. If this makes you roll your eyes, that’s ok…that was my husbands first reaction as well. But I make myself laugh! I also strung up the DIY tissue paper tassels that I made my sister-in-law’s wedding shower, and then cropped them off short enough that they weren’t overlapping the words.
On the wall to the right of the wrapping paper, I hung up my cute made-over thrift store clipboard. The clipboard holds my printable gift tracker that I use to keep track of items I have purchased for future gift giving, and it even has a handy-dandy pocket at the bottom for keeping track of gift receipts.

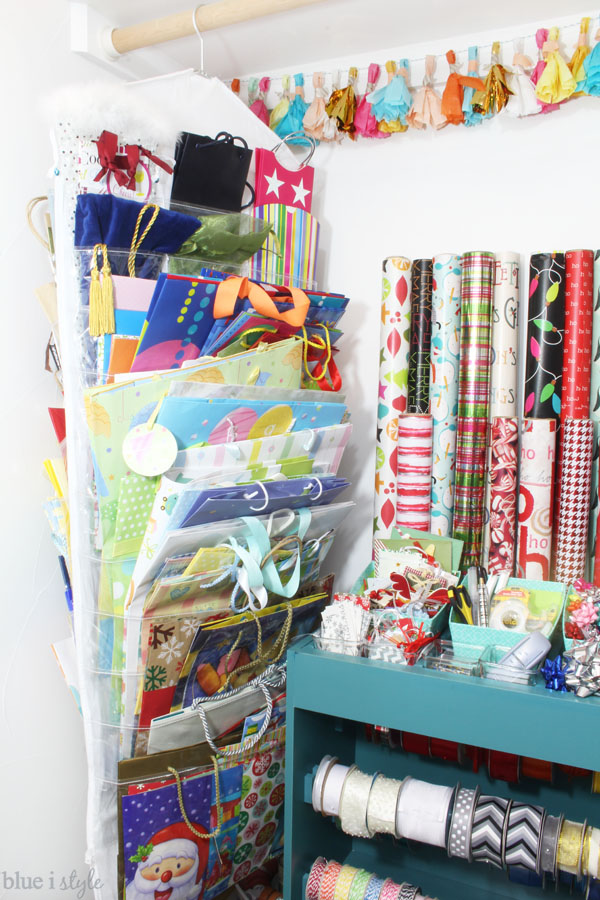
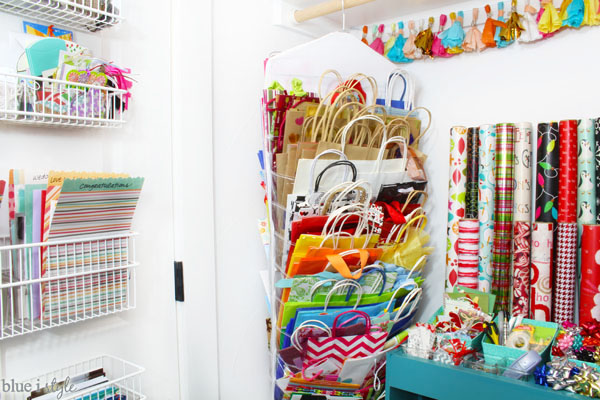
On the opposite side of the wrapping cart is one of my favorite organizing finds, a hanging gift tote organizer* from The Container Store! The hanger makes it perfect to hang from the rod in a closet, and the clear pockets make it easy to see what you have.

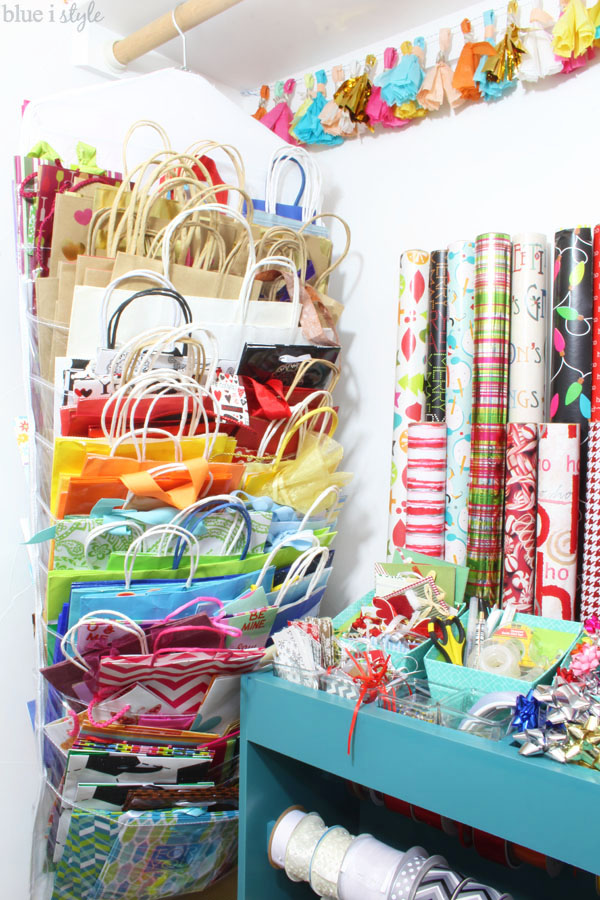
Since I keep every bag that we receive a gift in, I have quite a collection of gift bags. The hanging organizer is double-sided and rotates on the hanger, so I keep generic bags {organized by color} on one side, and bags specific to Christmas, birthdays, and baby showers on the other side.

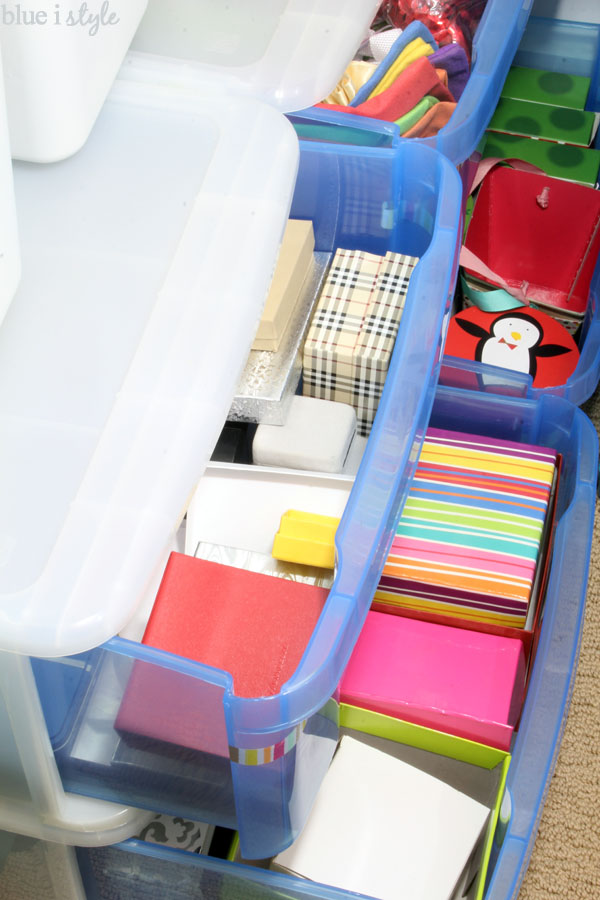
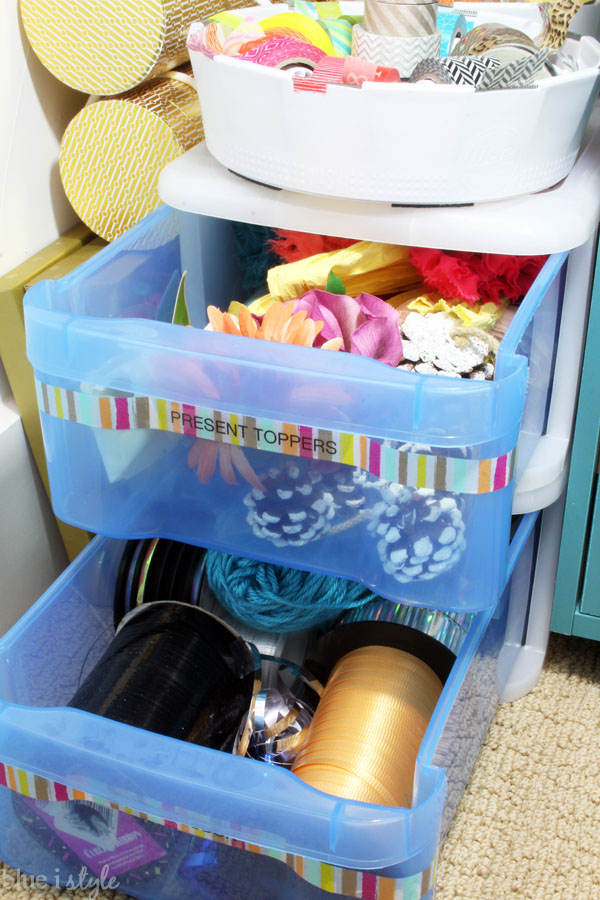
To take advantage of the floor space below the gift bags, I added two small tint stacking drawers* from The Container Store.

On top of the drawers are my washi tape dispensers.* I used to keep all of my washi tape in my craft room, but I found that I use it more often for gift wrapping and on stationery, so I relocated it all to the gift wrap closet. 

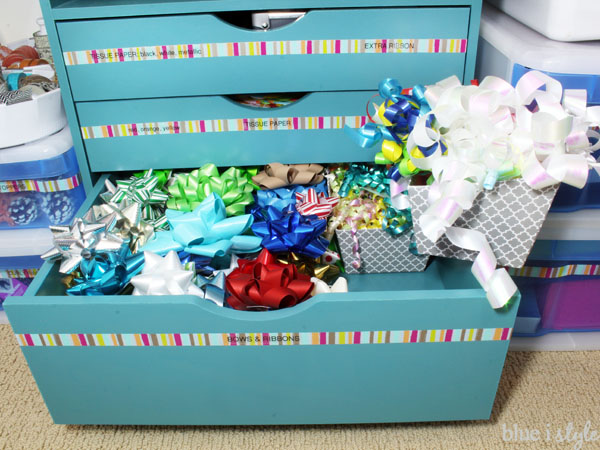
The two small drawers hold my large rolls of curly ribbon and miscellaneous present toppers {almost all of which I’ve save from presents I received and am waiting to reuse}.

I am so happy with how this gift wrap closet came together! It’s packed with function and it’s so colorful and pretty that I kind of just want to hang out in the closet all day!

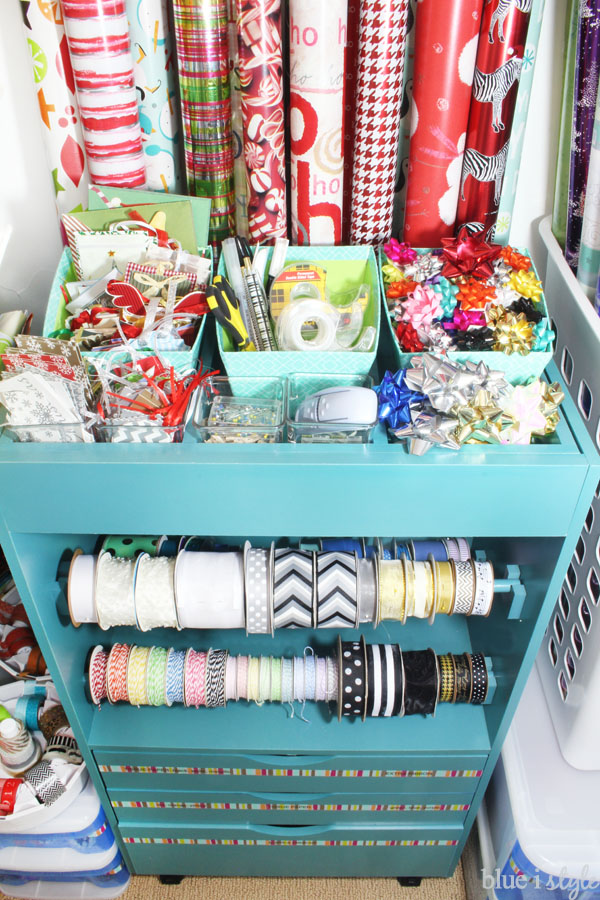
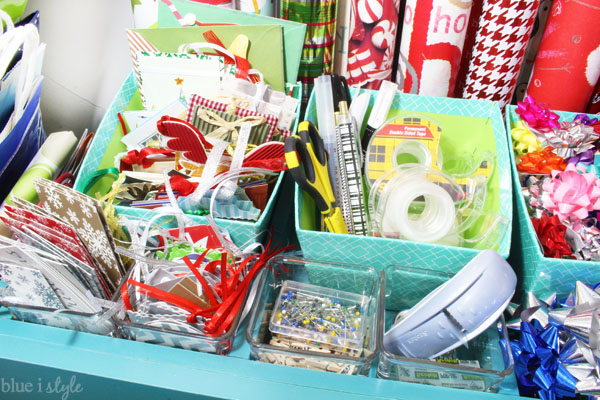
On the upper shelf {above the hanging rod}, I stash all sorts of various boxes so that I’m always ready when I need to wrap a gift or ship something.

Finally, let me show you the back of the closet door!
We installed a white Elfa back of door system* from The Container Store to organize all of my greeting cards and stationery, as well as extra gift tags, washi tape, and bows.
I like to always have greeting cards on hand since running into the store to grab a card on the way to a party is not so easy with two kids in tow.

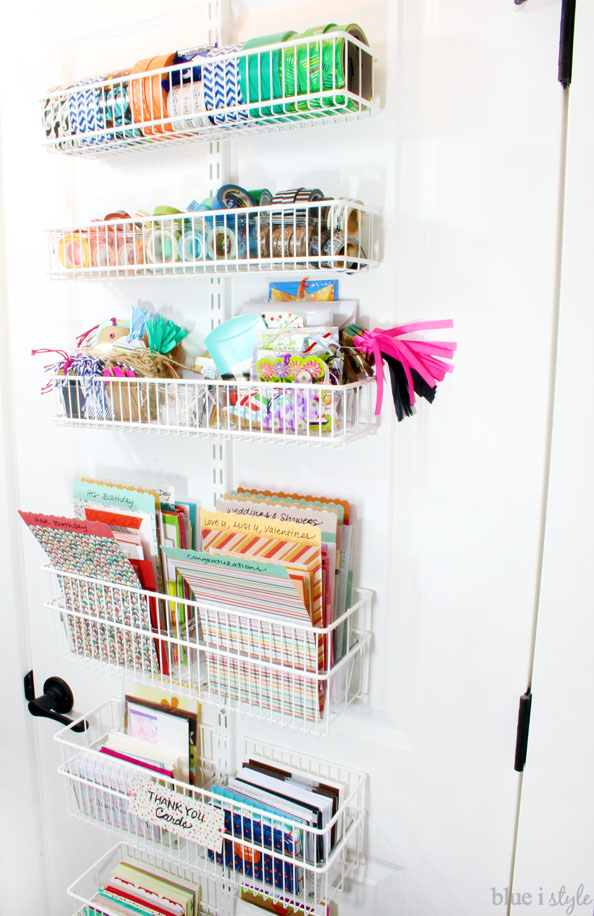
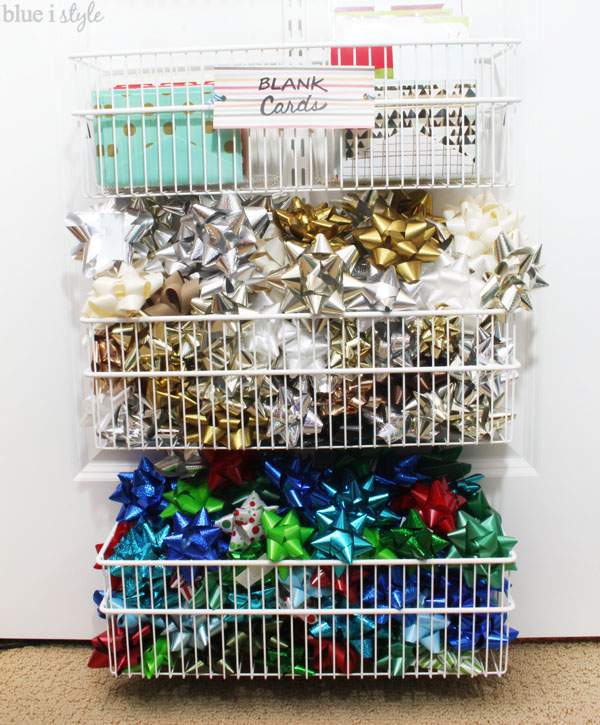
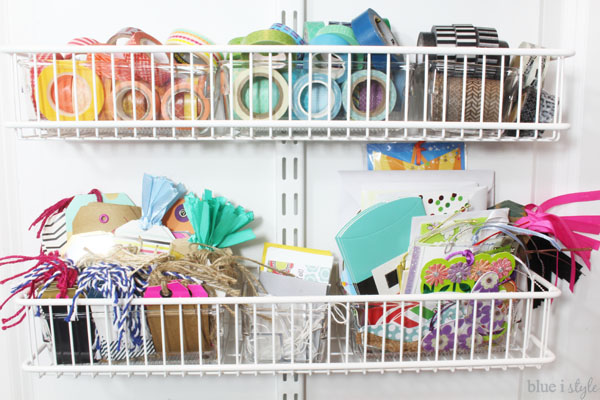
You can read all the details of my greeting card and stationery organization in this Five Minute Friday post.

After Christmas every year, stores like Target put giant bags of bow on clearance for pennies, making them hard to pass up. But then you get home and how do you store all. those. bows? My solution is to use two of the deep Elfa baskets  to store my extra bows – one basket for all the colors, and one for the white and metallic bows.
Higher up on the door, shallower Elfa baskets hold all of my non-Christmas gift tags and my extra washi tape. 
After the holidays, I’ll put these every day gift tags into my rolling gift cart, and will move the Christmas tags to the door. To make it easy to keep all of these small items organized and easy to move around, I keep everything contained inside of clear Linus drawer organizers* that can easily be lifted in and out of the Elfa baskets.
Whew! That’s a lot going on in a small space! But it makes me so happy to finally have all of my gift wrap supplies organized and easy to use, and the fact that it looks so pretty doesn’t hurt a bit… in fact, it helps motivate me to keep it organized.
If you have an underutilized corner of your guest room closet, craft closet, linen closet, or even coat closet, why not create your very own organized gift wrap center? Having everything right at hand not only saves time and reduces stress, it also ensures that you use what you have rather than running to the store to buy a bag or wrapping paper each time you have a gift to give!
Organized Gift Wrap Closet
Don’t forget to save your favorite ideas to Pinterest so that you’ll be ready to get organized in the new year – which just so happens to be perfect timing for all those tempting gift wrap clearance sales!
Linked up at Remodelaholic
  • Facebook
  • Twitter

12.16.15

« {seasonal style} 25 Unique Christmas Tree Styles to Inspire You
{seasonal style} My Modern Christmas Table + 10 More »

Meet Angela

Angela, the founder of Blue i Style, strongly believes that decor should be functional, organizing can be beautiful, smart DIYs help stretch your budget, and an organized and stylish home can still be practical for life with kids.

Her work has been featured in print in Better Homes & Gardens and 5280 Home magazine, and online by HGTV, the Today Show, Good Housekeeping, and more. She was also named a 2018 Stylemaker by Better Homes & Gardens.

You can reach Angela at angela@blueistyle.com

COPYRIGHT & PHOTO SHARING POLICY

All text, images, and other content that are part of this blog are the property of Blue i Style, unless otherwise noted. All material is copyright protected.

If you wish to feature one of my projects, feel free to share a single photo (no collaged images, or images with text overlays) as long as the no pin code is used to prevent my image from being pinned from your site.

All features must include credit to Blue i Style with a link back to the original content (not just to the homepage). The project steps, supply list, and/or sources may not be disclosed.

Please read my full content and photo sharing policy to ensure you comply with all guidelines. Failure to do so constitutes copyright violation.

Create At Your Own Risk

Any and all content on this website is for personal use only and created exclusively for inspiration purposes.

Creating with my suggested methods, products used, and tools is at your own risk.

Please ensure you are following proper guidelines with anything used, and you receive professional guidance when necessary.

Read my complete disclosure at: Policies & Disclosures.

Sponsorships & Affiliations

To help fund this blog, I accept some forms of advertising, sponsorships, and affiliate links.

If you buy something that I recommend, you pay the same price, but I may receive a small commission. As always, all opinions are my own.

Blue i Style is a participant in the Amazon Services LLC Associates Program, an affiliate advertising program designed to provide a means for sites to earn advertising fees by advertising and linking to amazon.com.

I use an affiliate marketing service which may automatically put links into some posts, so please assume any/all links may be affiliate links.

Read my full Disclosure Statement.

Copyright © 2023 · Dazzling Theme theme by Restored 316

  • Facebook
  • Twitter
  • Pinterest