• About
    • About Blue i Style
    • Tour Our Home
    • Free Organizing eBook
    • Blogging Resources
  • Work With Me
    • Interior Decor & Organizing Services
    • Partnerships & Collaborations
    • Blogging Resources
  • Features & Press
  • Policies & Disclosures
  • Contact

Blue i Style

Creating an Organized & Pretty, Happy Home

  • Decor
    • Tour Our Home
    • Room Makeovers & Design Plans
    • Decorating Tips & Tutorials
    • Outdoor Decor
    • One Room Challenge
  • Organizing and Cleaning
    • Organizing Tips & Tutorials
    • Organizing By Room
    • Organizing on the Go
    • Cleaning
  • DIY
    • DIY Tips & Tutorials
    • Smart Home & Safety
    • Paint Tips & Projects
    • Crafts
    • Cricut Projects
  • Kids
    • Decor & DIY for Kids
    • Organizing Kids
    • Life With Kids
  • Five Minute Projects
  • Holidays & Entertaining
    • Seasonal & Holiday Decor
    • Entertaining
    • DIY Gifts & Gift Guides
    • Facebook
    • Instagram
    • Pinterest
    • Twitter
    • YouTube

Uncategorized

{diy with style} Leather Belt Drawer Pulls

  • Facebook
  • Twitter

Last week I told you all about my first experience using chalk paint, and how I finally achieved the smooth finish I wanted for the dresser drawers in Beckett’s new room, and now I’m here to share the second half the dresser drawer story – how we created custom drawer pulls from inexpensive belts.

Leather Belt Drawer Pulls

A few months ago I was browsing furniture stores {a favorite pastime} and came across the gorgeous Tremont Dresser at Arhaus.  I immediately fell in love with the leather drawer pulls.

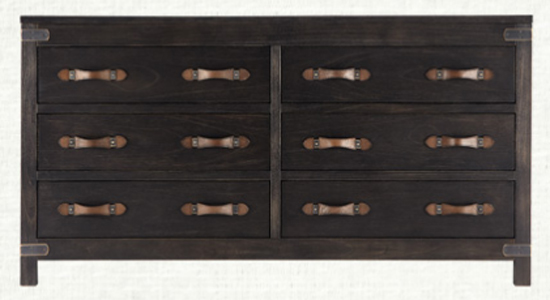
At $1,600, the dresser was out of my price range, and totally impractical for a toddler’s room, but I had my eye on the black-brown Hemnes dresser at Ikea and thought it would look great dressed up with some leather drawer pulls. I found a number of leather cabinet hardware options online {like these}, but the price was too high and I thought I could come up with something a bit more unique.

Since I was already planning to tie in some menswear elements into Beckett’s room {like the ties on the top of his hanging tent, and the belt shelves}, I decided I could simply pick up a few more inexpensive belts and use them to create drawer pulls. After purchasing the other furniture for the room, I realized that we had a lot of dark wood going into the space, which led me to paint the drawer fronts of the Hemnes dresser a soft grey in order to lighten it up and to provide contrast against the leather belt drawer pulls.

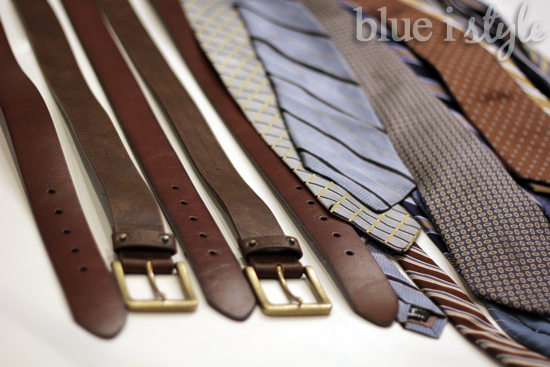
Here’s the supply list for my DIY leather belt drawer pulls:

*5 leather belts with no stitching {$6 each at WalMart}
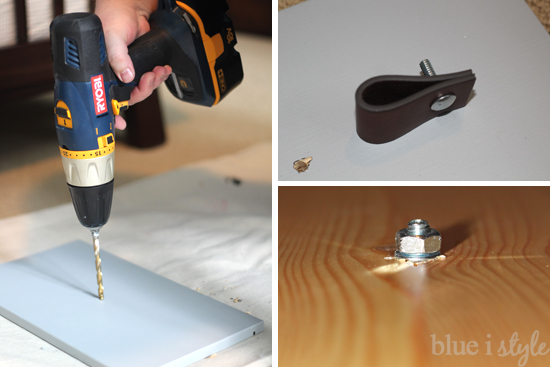
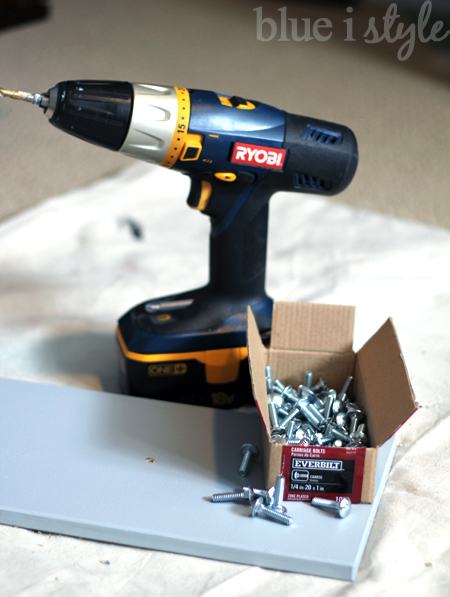
*12 1/4 inch x1 inch Everbilt Carriage Bolts {$9.56/100 at Home Depot}
*12 1/4 inch Everbilt Hex Nuts {$5.98/100 at Home Depot}
*12 1/4 inch Everbilt Lock Washers {$11.67/100 at Home Depot}

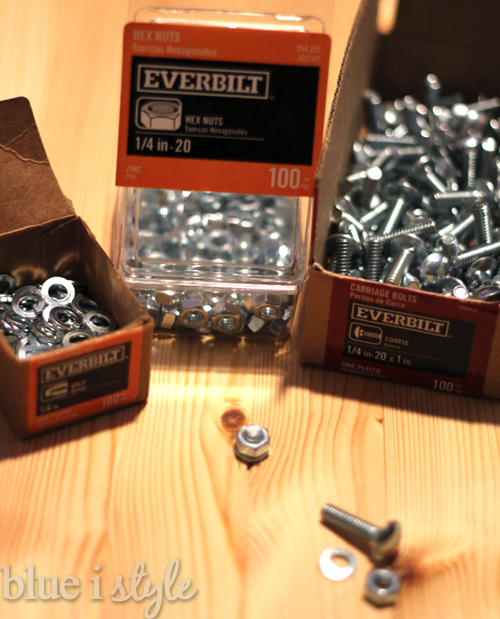
{Obviously, we ended up with a LOT of extra carriage bolts, nuts and washers…
any suggestions for other projects using this hardware is welcome!}

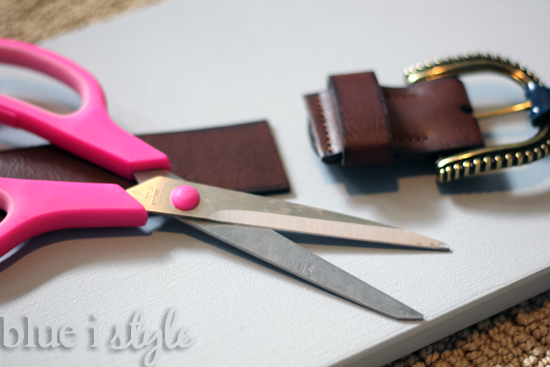
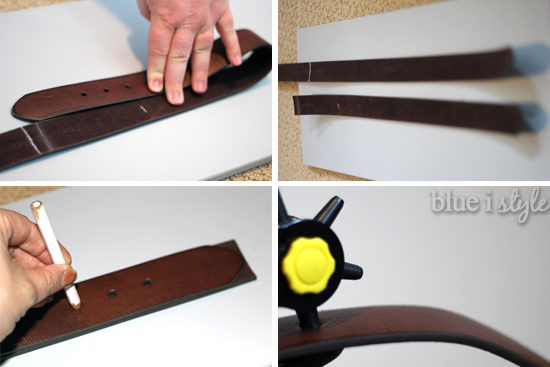
Alright, on to the tutorial. We started by cutting of the buckle end of the belts, and I was relieved at how easy it was to cut through them with just a regular pair of scissors. I mentioned above that it’s best to purchase belts with no stitching for this project, and that’s because stitching around the edges {or down the center} might come undone once the belts are cut.

For the four small drawers across the top of the dresser, I decided to create looped drawer pulls that would allow me to utilize the single hole that was predrilled in the center of each drawer {intended for the standard knobs that comes with the dresser}.
I folded over the end of one of the belts to create a loop and held it against one of a small drawer to ensure that the scale was appropriate. Once I determined the size of loop I wanted, I used a piece of chalk to mark the length of belt needed, then measured and marked three more sections of the same length. I used scissors to cut along each chalk line, leaving me with four identical length pieces of leather.

I borrowed a leather punch from my parents to create holes in the leather. My hands weren’t quite strong enough to punch through the leather, but hubby had no trouble. We determined that even the largest of the hole punch options was not quite big enough for the carriage bolts we had purchased, so hubby punched four overlapping holes {creating the appearance of a clover} which allowed the quarter inch carriage bolts fit through perfectly.

With one hole in the first strip of leather, I then looped the leather over and used a chalk pencil to mark the location of the hole on the other end of the strip and hubby punched the hole. With the holes punched in both ends of the first leather strip, I laid that strip on top of each of the other three leather strips and used it as a template for marking the hole locations.

After creating four leather loops, we were ready to install them on the small drawers. The predrilled holes in the dresser drawers was just slightly too small for the carriage bolts, so Scott used a quarter inch drill bit to enlarge the holes. We then inserted the carriage bolts and secured them on the back of each drawer with a lock washer and a hex bolt. 

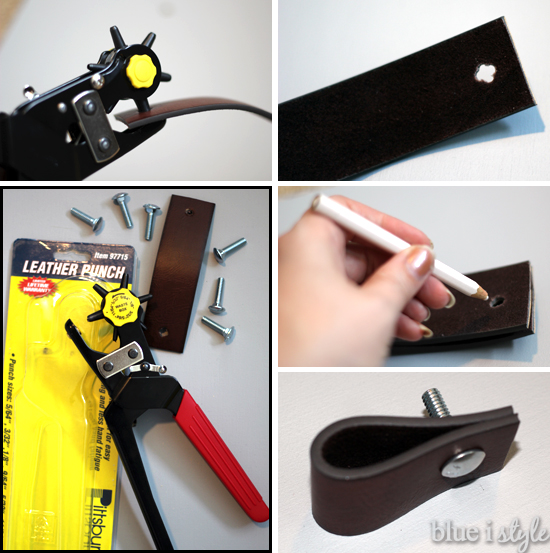
Here’s a look at the completed loop drawer pulls.

Leather Belt Drawer Pulls
The longer dresser drawers had two predrilled holes. We originally thought about using short strips of leather belt to create two separate pulls at each end of the drawers {which would have required drilling two additional holes}. This would have given the dresser a very similar look to the Arhaus inspiration dresser. But then my husband suggested that we might instead want to use only one strip of belt to create a long pull across the center of the drawer {he is full of good ideas!}. I loved this look, and it also meant that we wouldn’t need to add any additional holes in the drawers.
The decision to use one long piece of leather, rather than two short ones, on each drawer also meant that we could keep the rounded end of each belt and utilize the existing belt holes to really play up the menswear feel! 

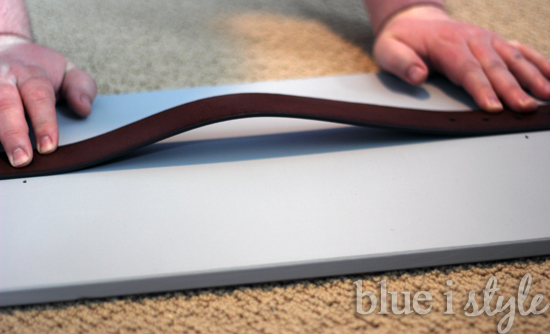
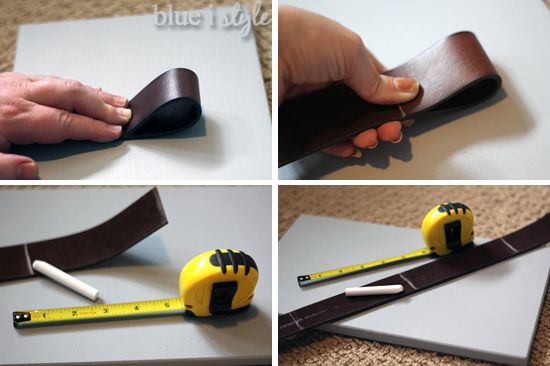
Each belt had five belt holes, so we opted to line the center hole up with one of the predrilled holes in the drawer front. My husband held the belt against the drawer while we decided how much we wanted the center of the belt to raise up off of the drawer. Once we were happy with the positioning, I used chalk to mark the approximate placement for punching the hole in the other end of the belt to line up with the other predrilled hole in the dresser drawer. I then folded the belt over on itself, lining the center belt hole up with the mark for the hole on the other end, then drew in a chalk line indicating where to cut the belt {so that the belt would be perfectly centered on the drawer}.

Once I had this first belt cut to length, I laid it out next the other three belts and marked and cut them to the same length. I then folded each of these three belts in half and used a chalk pencil to draw a dot through the third belt hole in order to mark the location for hole punching these belts.

Once again, my husband punched four slightly overlapping holes at each of the marked location so that the carriage bolts would fit through the leather, and then used his drill to enlarge the predrilled holes in the dresser drawers. We installed the long leather drawer the same way we installed the leather loops above,  using lock washers and hex bolts to secure them to the back of the drawers.

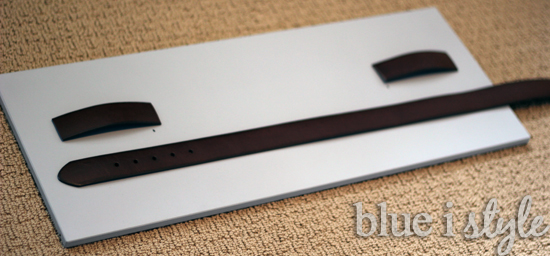
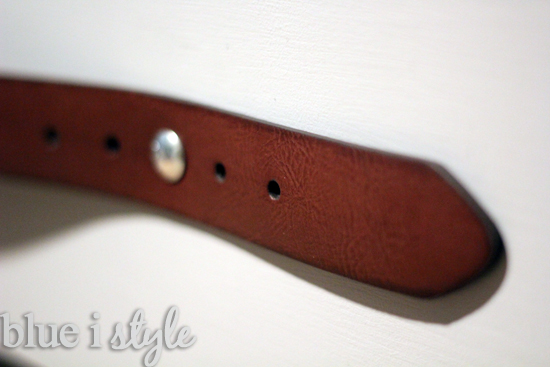
Here’s a close up to give a you a better view of how we used the existing belt holes to install the belts. We wanted the round end of each belt to point to the outter edge of the dresser – so we were careful to pay attention to this when determining which way to install the belts on the drawer fronts.

I am so glad that my husband suggested creating long leather drawer pulls, rather than simply duplicating the looking of the short leather drawer pulls of the Arhaus dresser. It gives the dresser much more of a custom look, and by maintaining the appearance of a man’s belt it helps to tie the dresser in with the other menswear inspired elements throughout the room.
Leather Belt Drawer Pulls
It seems that everyone loves a good Ikea hack, so let’s take a look at the comparison between the original Ikea Hemnes dresser and my version with the chalk painted drawers and the leather belt pulls.
Leather Belt Drawer Pulls
After completing the leather belt drawer pulls and the belt shelves {shelf tutorial coming soon}, I still had a couple of belts left over, so I even wrapped one around the lamp shade {click here for details on that project}.

Leather belt drawer pulls for less
I am so happy with how the dresser turned out, and creating the custom leather drawer pulls was much easier than I expected! Now I kinda want to add leather pulls to every cabinet and drawer in the house…

The links below include all of the other projects that went into the creation of the Vintage Preppy Little Gentleman’s Lounge:


Linked up at Remodelaholic
  • Facebook
  • Twitter

06.17.14

« Super Dad & His Super Boys
Creating an Organized Baking Drawer »

Meet Angela

Angela, the founder of Blue i Style, strongly believes that decor should be functional, organizing can be beautiful, smart DIYs help stretch your budget, and an organized and stylish home can still be practical for life with kids.

Her work has been featured in print in Better Homes & Gardens and 5280 Home magazine, and online by HGTV, the Today Show, Good Housekeeping, and more. She was also named a 2018 Stylemaker by Better Homes & Gardens.

You can reach Angela at angela@blueistyle.com

Get Email Updates!

Thanks for subscribing! Check your email a welcome message and your free organizing eBook!

Get Email Updates!

Plus a bonus free organizing eBook!

COPYRIGHT & PHOTO SHARING POLICY

All text, images, and other content that are part of this blog are the property of Blue i Style, unless otherwise noted. All material is copyright protected.

If you wish to feature one of my projects, feel free to share a single photo (no collaged images, or images with text overlays) as long as the no pin code is used to prevent my image from being pinned from your site.

All features must include credit to Blue i Style with a link back to the original content (not just to the homepage). The project steps, supply list, and/or sources may not be disclosed.

Please read my full content and photo sharing policy to ensure you comply with all guidelines. Failure to do so constitutes copyright violation.

Create At Your Own Risk

Any and all content on this website is for personal use only and created exclusively for inspiration purposes.

Creating with my suggested methods, products used, and tools is at your own risk.

Please ensure you are following proper guidelines with anything used, and you receive professional guidance when necessary.

Read my complete disclosure at: Policies & Disclosures.

Sponsorships & Affiliations

To help fund this blog, I accept some forms of advertising, sponsorships, and affiliate links.

If you buy something that I recommend, you pay the same price, but I may receive a small commission. As always, all opinions are my own.

Blue i Style is a participant in the Amazon Services LLC Associates Program, an affiliate advertising program designed to provide a means for sites to earn advertising fees by advertising and linking to amazon.com.

I use an affiliate marketing service which may automatically put links into some posts, so please assume any/all links may be affiliate links.

Read my full Disclosure Statement.

Copyright © 2025 · Dazzling Theme theme by Restored 316

  • Facebook
  • Twitter
  • Pinterest