• About
    • About Blue i Style
    • Tour Our Home
    • Free Organizing eBook
    • Blogging Resources
  • Work With Me
    • Interior Decor & Organizing Services
    • Partnerships & Collaborations
    • Blogging Resources
  • Features & Press
  • Policies & Disclosures
  • Contact

Blue i Style

Creating an Organized & Pretty, Happy Home

  • Decor
    • Tour Our Home
    • Room Makeovers & Design Plans
    • Decorating Tips & Tutorials
    • Outdoor Decor
    • One Room Challenge
  • Organizing and Cleaning
    • Organizing Tips & Tutorials
    • Organizing By Room
    • Organizing on the Go
    • Cleaning
  • DIY
    • DIY Tips & Tutorials
    • Smart Home & Safety
    • Paint Tips & Projects
    • Crafts
    • Cricut Projects
  • Kids
    • Decor & DIY for Kids
    • Organizing Kids
    • Life With Kids
  • Five Minute Projects
  • Holidays & Entertaining
    • Seasonal & Holiday Decor
    • Entertaining
    • DIY Gifts & Gift Guides
    • Facebook
    • Instagram
    • Pinterest
    • Twitter
    • YouTube

Organizing· Reader's Favorite Organizing

Brilliant Ways to Organize the Garage

  • Facebook
  • Twitter
Our garage used to be my dirty little secret. I would go out of my way to not let friends of family ever sneak a peek in there because it was so bad. SO bad. Like “no room to park two cars in a three car garage” bad!
 
Last fall we finally reclaimed our garage and I shared lots of pictures with you when we finished. Since then, I’ve gotten quite a few comments suggesting that the photos looked good because it was just a “staged” version of our garage, and that it wouldn’t look that way once we started really using it with all of our stuff.
 
 
But almost a year later, I’m proud to say that our garage still looks almost exactly the same. And that is for one reason, and one reason only…


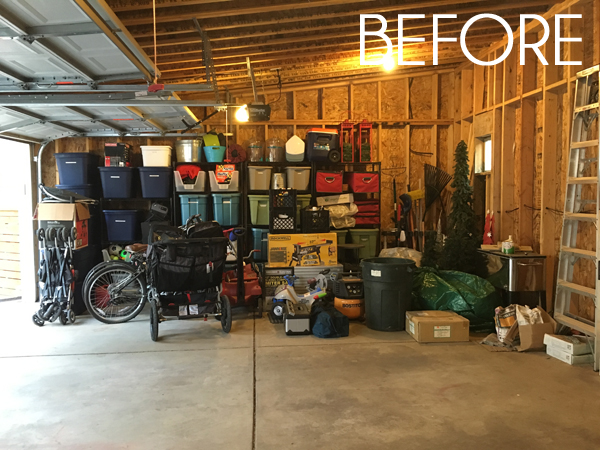
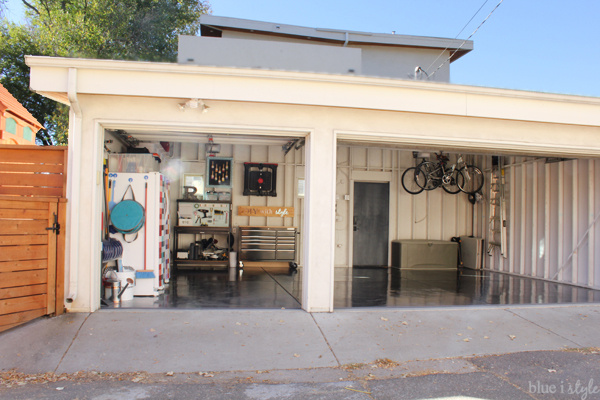
…because when I took those pretty garage photos, all of our stuff was already in there. We simply found creative ways to give everything a dedicated space, which not only makes the garage look nice, but more importantly, it makes it easy to keep it organized.

 
So today I want to show you how we did it by giving you a much more detailed tour of all the solutions we employed to make the garage an organized space with room for everything, and that’s easy to maintain. 
 
 
But, of course, we need to start at the beginning. The scary, overwhelming beginning.
 
THE ULTIMATE CHALLENGE
 
The garage needs to be the hardest working space in the whole house. We need ours to serve as a workshop for our DIY projects, hold all of our outdoor tools and toys {as well as our outdoor cushions and decor during the off-season}, bikes and sporting equipment, holiday decor, and so much more.
 
We are lucky to have a finished basement that adds a lot of living space to our house, but that means almost no extra storage space. As a result, the garage also becomes a catch all space everything else that we have no room for inside the house.
 
That’s a tall order! And until last year, our garage was not up to the task. This was the “cleaned up” version after we cleared out tons of no longer needed items last fall…
 
 
You can see that we’d made an effort to organize the space once upon a time. But a wall full of shelving units and all the plastic totes in the world weren’t going to make this space functional because it didn’t give us room for all of the other “stuff” we needed to store. And as long as the bikes, wagons, strollers, tools, and trash cans were piled in front of the shelves, getting to the semi-organized stuff on the shelves was an impossibility.
 
 
WHERE TO BEGIN?
MAKE A LIST
 
We came to the realization that we needed to start from scratch with a whole new organizational plan. Once we had cleared out everything that we no longer wanted or needed {donations, recycling, and trash – in that order}.
 
Then I made a list of everything that remained, and also made a pass through the house adding to the list anything else that I wanted to relocate to the garage. Then I got really bold, and added to the list some of our big wish list items, like an extra fridge, freezer, and rolling workbench. I figured it I was starting over, this was the time to try to find a space for those items.
 
DIVIDE & CONQUER
 
Once I had a fairly comprehensive list, I started dividing the list into categories. I then measured the garage and started to sketch out a plan that would address each category on my list.
 
I designated a zone for each type of item that we needed to store in the garage, and then began brainstorming the best ways to address each need. Here’s the final version of the plan I came up with {although a few things still changed once we started to implement the plan}:
 
Garage organization by zone
 
By breaking it down section by section, and category by category, it was a lot easier to brainstorm creative solutions.
 

The ultimate key to my plans came down to the organizing mantra I come back to time and again – use every available space! That includes the walls, floor, and ceiling, and a few more spots you might be overlooking. Let’s break it down space by space…


*This post contains some affiliate links. If you purchase something I recommend you’ll pay the same price, but I may receive a small commission, which helps me keep this blog running.
 
DITCH THE SHELF UNITS
& CLEAR THE FLOOR
 
The number one key to our success in our garage was ditching the shelf units that I bought when I first moved in. They originally seemed like a great solution, but over time their flaws became obvious. They didn’t allow us to take full advantage of the height of the garage, we ended up stacking all of the larger items in front of them.
 
I realized that no amount of organization was going to make our garage work for us until we could figure out a way to keep the floor space clear so that we weren’t climbing over bikes, trikes, wagons, and coolers in order to get to everything else.
 
The solution was to install a system of shelves and drawers on the garage wall, with enough open space below to tuck most of our larger items underneath. {Side Note: Notice that shiny, pretty metallic floor?! You can read more about that here.}
 
Garage organization tip hanging shelves hanging drawers
 
There are a lot of options out there for  inexpensive wall track shelving systems, but after looking at all of my options, I decided that I was willing to splurge a bit for a customizable system that allowed for both shelves and drawers. {Fortunately, my splurge was off-set by a 25% off sale, phew!}

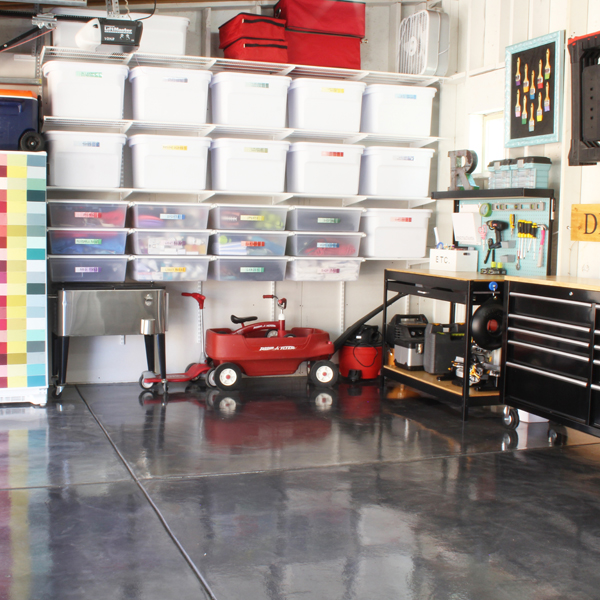
Over the years, I’ve found that bins are great for items that we use occasionally, but they become a pain to put up and down for more frequently used items. Choosing matching white plastic totes for the shelves helps keep the garage looking fresh and clean.

 
That’s why I love the drawers so, so much! They provide us much easier, eye-level access to many of the things that we use on a regular basis. Rather than the standard ventilated drawers, I opted for the translucent plastic drawers with snap on lids that keep everything inside clean and free from dust and bugs.
 
Elfa hanging drawers on garage wall labeled with paint chips
 
Regardless of whether drawers are the right option for your needs, definitely opt for adjustable hanging shelves that allow you to clear the floor space and adjust the spacing between the shelves as your future needs change.
 
So what did we put in all the bins and drawers?
  • UPPER SHELF BINS: Holiday and seasonal decor that’s only accessed a couple of times a year
  • LOWER SHELF BINS: Tarps; Moving blankets; Beverage dispensers for entertaining; Shop lights; Shop vac accessories
  • DRAWERS: Reusable shopping bags; BBQ tools; Picnic backpack & blanket; Gardening gloves & tools; Extra trash bags; Car wash tools & towels; Ropes & cords; Shop rags; Extra light bulbs; Small balls and sporting equipment
 
I added simple paint chip labels to the front of each bin and drawer to make it easy for everyone to find what they need, and to add a fun touch of color. Paint Chip Label Tutorial
 
Moving everything up onto the walls to clear the floor space provided room for us to tuck a lot of the bulky and heavy stuff underneath, including our rolling beverage cooler, wagon, trike, scooter, shop vac and air compressor.
 
Drawers on the garage wall leave room for bulky and heavy tools and toys beneath
 
Hanging the shelves and drawers on the wall also allowed us to take full advantage of the height of the garage, which allowed us to free up additional wall space for the extra fridge and freezer that we had been wanting and needing.
 
Organized garage ideas with rocksolid metallic floor
 
The white fridge and freezer were calling out for something fun, so I covered them both in more paint chips. The tutorial for that is coming soon!
 
 
OUT OF REACH OF LITTLE HANDS

We were able to take advantage of the space on top of the fridge and freezer for additional storage, including for our cooler and beverage tubs. We also used this space for all of the liquids that need to be kept out of reach of little hands, like weed and bug sprays, antifreeze, windshield wiper fluid, and cleaners.

Child-proof garage

I used large open front storage bins {similar to these} to contain all of the bottles, and to ensure that any leaks would be contained.

YARD TOOLS
 
We use to have a rolling tool organizer {like this one}, and it worked well when it was in the corner of our garage with high ceilings, but when we tried relocating it next to the fridge, the garage door creates a lower “ceiling” and it was to hard to shovels and brooms with long handles in and and out of the rolling cart.
 
We decided to instead use the open wall space to hang our yard tools, and we installed a broom and rake tool hanger with adjustable clamps that can hold handles of various diameters. We wanted to keep the clippers up high, out of reach of the kids, so we installed three garage wall hooks to keep them securely in place above the other tools.
 
Hanging the tools freed up the floor space for our frequently used items, like our bucket and watering can.
 
Garage yard tool organization hang brooms shovels rakes
 
In keeping with the theme of taking advantage of every available space, we also made use of the side of the fridge for additional tool storage. Five heavy duty magnetic hooks hold our broom, dustpan, pond skimmer, collapsible gardening trash can, and light bulb changing extension pole.


TRASH & RECYCLING
 
Trash cans always pose a storage challenge in the garage because they take up so much space. We live in a neighborhood with an alley rather than a driveway, so when we had our new backyard fence built a couple of years ago, we included a small, gated enclosure against the fence to hold our three large, city issued bins for trash, recycling, and composting.


Trash can enclosure

Moving these three large bins out of the garage and out of site, while still keeping them out of sight has been a major game changer for us.

Gated trash can enclosure
 
If you’re looking for a similar solution for hiding trash cans, take a look at these options:


!function(d,s,id){var e, p = /^http:/.test(d.location) ? ‘http’ : ‘https’;if(!d.getElementById(id)) {e = d.createElement(s);e.id = id;e.src = p + ‘://’ + ‘widgets.rewardstyle.com’ + ‘/js/shopthepost.js’;d.body.appendChild(e);}if(typeof window.__stp === ‘object’) if(d.readyState === ‘complete’) {window.__stp.init();}}(document, ‘script’, ‘shopthepost-script’);

JavaScript is currently disabled in this browser. Reactivate it to view this content.
 
 
WORKBENCH & TOOLS
 
In the front corner of the garage, we finally have a dedicated workshop space that provides enough storage for all of our tools and makes it easy to work on projects.
 
I wanted a nice, stationary workbench, but since we splurged on the wall shelving/drawer installation, I opted for a very inexpensive but functional workbench, and then made it look nicer with a few easy DIYs. We swapped out the particle board top and lower shelf on this workbench for birch plywood sheets from Home Depot {$20 each}, which I stained with Rust-Oleum Summer Oak and added two coats of polyurethane for a higher end look. I also painted the peg board using Sea Mist Pearl Metallic spray paint.
 
But let’s focus on the function…
 
Garage workbench how to store miter saw
 
Large Tools. One of our biggest challenges was finding storage space for our miter saw without filling up our work surface. That’s where this workbench is a big winner for us. That large shelf on the bottom is perfect for our saw, as well as our large toolbox, and more.
 
Garage workbench with large storage shelf
 
Extension Cords. Because the workbench frame is metal, we were able to use two more heavy duty magnetic hooks to hold extension cord roller cases. These keeps our extension cords close at hand without taking up valuable shelf space.
 
how to organize extension cords
 
 
Pegboard. The pegboard is a great solution for basic tools that we use frequently. Having these tools on display makes it easy to grab and go when I’m working on a project in the house and need to hang a few pictures or assemble a piece of furniture.
 

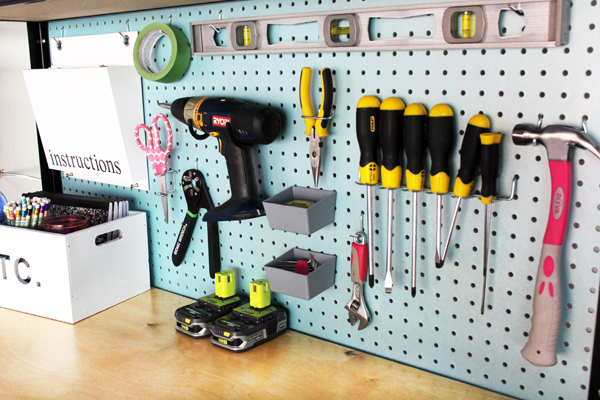
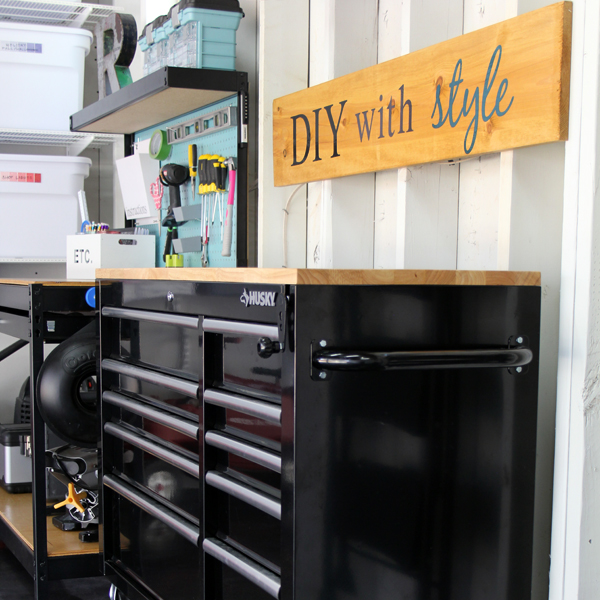
In addition to using hooks to hang tools, I added a couple of pegboard part bins for my measuring tape and allen wrenches.

Garage pegboard organization

Instruction Manuals. I’ve always kept all of our instructional manuals together in the house, but I realized that it would be much easier to keep the manuals in the garage for our tools, air compressor, and the like. I hung a white file holder on the pegboard to keep all of our garage-related manuals in the same place.

How to organized instruction manuals
 
Nails & Screws. I wanted to organize our nails, screws and other small parts and pieces in a way that I could easily carry them in the house for hanging photos and other small household projects. I used to teal craft boxes to sort and store them. If you want more details on how I organized everything in these boxes, including how I added labels to keep track of sizes, watch this quick video I made.
 
How to organize nails and screws
 
Rolling Workbench. While I love stationary workbench provides a lot of storage and function, there are times when we need more elbow room to work – especially when using our saw to cut large pieces of wood. To address this need, I purchased a rolling workbench with an adjustable height top. I love that that it can be moved out into the middle or the garage for projects. And, of course, the then drawers of varying depths are perfect for storing all of our other tools.
 
Rolling workbench in garage
 
That “DIY with Style” wood sign was a quick and easy project, and it does a great job of hiding a bunch of electric wires that run through the studs right behind the sign.
 
 
HANGING FROM THE WALLS
 
 
We still had quite a few big items that needed to be stored for easy access, so we again looked to the walls. Our fold-flat sawhorse worktables hang on the wall above the rolling workbench using two extra deep ladder hooks.
 
Hang sawhorses on garage wall
 
Because these worktables are very lightweight, it’s easy to lift them up and down when we need them for a project.
 
Sawhorse fold flat worktables are great for DIY projects in the garage
 
We also hung our step ladder and our full height ladder from the garage walls as well. The step ladder hangs from a jumbo ladder hook.
 
Hang step ladder in garage
 
We tried hanging our tall ladder using the same kind of hook, but it didn’t hold it flush enough to the wall. Instead, we ended up using a multi-use storage bracket.
 
How to hang ladders and bikes
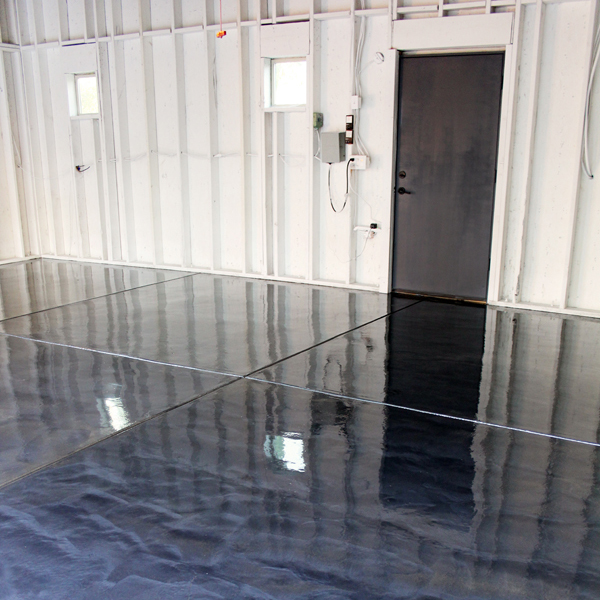
Doesn’t that metallic floor just get you every time?!
 
 
BIKE PULLEY SYSTEM
 
 
Originally we had planned to hang our bikes the opposite direction with some simple ceiling hooks, but then realized that they our SUVs were too tall to park under the bikes in that position. Instead, we ended up hanging them parallel to the front wall of the garage using a bike pulley system – and I’m so glad we did!
 
Use bike pulleys to hang bikes from the garage ceiling
 

I had been concerned about my ability to lift my bike down form the ceiling, and thanks to the pulley system, I don’t have to! Instead, I simply have to unwind the excess rope, pull to release the locking mechanism, and lower my bike.

 
Bike pulley system in garage

The wall hooks that we wind the excess rope around also provide a perfect spot to hang our bike helmets.

A bike pulley system keeps bikes out of the way in the garage. Store bike helmets
 
 
OUTDOOR CUSHION & COVER STORAGE
 
 
Last, but not least, we needed to find way to store all of our outdoor cushions, pillows, and accessories during the snowy winter months, and where store our bulky furniture covers during the summer months. I knew a deck storage box would be the ideal solution, but we didn’t have a good place for one in our small backyard.
 
We park two cars in our three car garage, and I was thrilled when the measurements revealed that we had just enough depth for a large deck storage box in front of one of the parking spaces {below the bikes}.
 
Deck storage box inside the garage


Store outdoor cushions and outdoor pillows in a deck storage box in the garage
 
We were left with just a small bit of extra space next to the deck box that turned out to be the perfect spot to tuck away our folding banquet tables that we deemed too heavy to hang on the wall, as well as our jawhorse portable work station.
 
Garage storage use every available space to organize
 
Phew… that was long! Let’s review. Here’s a quick summary of my best garage organization tips:
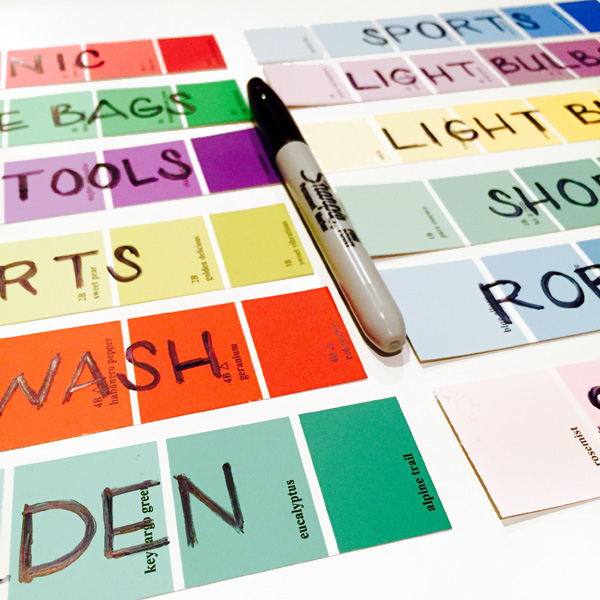
  • WHERE TO START: Make a list. Divide and conquer.
  • DITCH THE SHELF UNITS & CLEAR THE FLOOR. Opt for adjustable wall shelves and drawers with space below for larger items. This provides the flexibility to adjust as your storage needs change.
  • OUT OF REACH OF LITTLE HANDS. Create a space up high for potentially dangerous / toxic items.
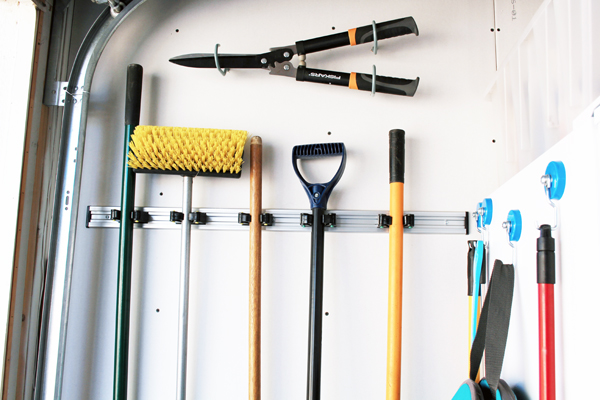
  • YARD TOOLS. Make the most of vertical space using wall hooks and heavy duty magnets.
  • TRASH & RECYCLING. Create an outdoor enclosure to keep these out of the garage.
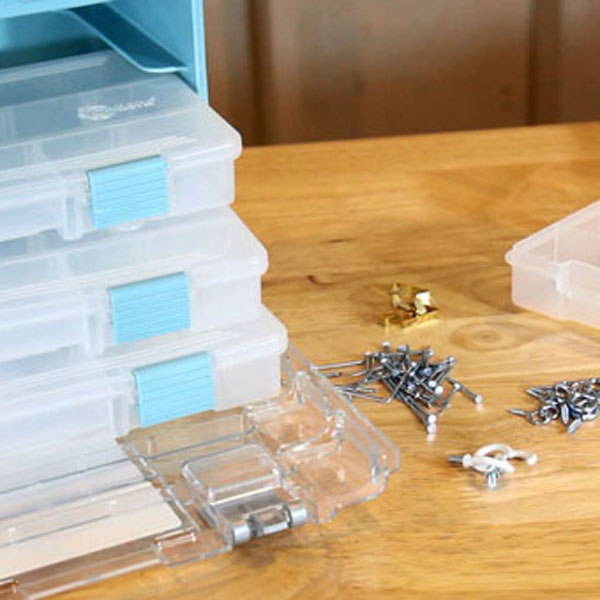
  • WORKBENCH & TOOLS. Allow space for large tools without taking up your work surface; use pegboard for your most frequently used tools; dedicate a space for instruction manuals; use small divided bins to organize nails and screws; a rolling workbench provides a flexible work space.
  • UTILIZE WALL & CEILING SPACE. Use a variety of hooks to hang yard tools, sawhorses, ladders, and bikes. Pulley systems makes it easy to hang bikes from the ceiling without the weight of lifting them down.
  • OUTDOOR CUSHION & COVER STORAGE. Create a dedicate space to store outdoor cushions/pillows during the winter, and to store furniture covers during the summer.
 
I’ll leave you with a last look at how all of the full organized garage, for perspective on how each of these organized zones fit together.
 
 
SHOP GARAGE ORGANIZATION


!function(d,s,id){var e, p = /^http:/.test(d.location) ? ‘http’ : ‘https’;if(!d.getElementById(id)) {e = d.createElement(s);e.id = id;e.src = p + ‘://’ + ‘widgets.rewardstyle.com’ + ‘/js/shopthepost.js’;d.body.appendChild(e);}if(typeof window.__stp === ‘object’) if(d.readyState === ‘complete’) {window.__stp.init();}}(document, ‘script’, ‘shopthepost-script’);

JavaScript is currently disabled in this browser. Reactivate it to view this content.
 
Be sure to pin the image below so you can find your way back to these organizing tips when you are ready to tackle your own garage!
 
How to organize a garage
 
 
Want more details on some of the other projects in the garage? Use the links below, and feel free to leave me a comment if you have a question that I haven’t answered.
 
OTHER GARAGE PROJECTS
 
How to Install Wall Mounted Shelving
Metallic Garage Floor Finish
Nails & Screw Organization
Paint Chip Labels
Framed Paint Brushes
DIY Wood Sign
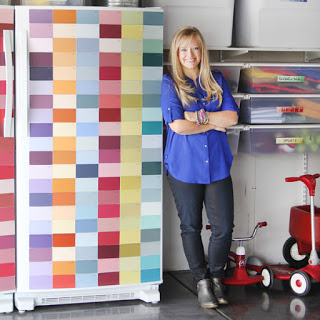
Paint Chip Fridge – Coming Soon
Better Homes & Gardens Photo Shoot


  • Facebook
  • Twitter

08.03.17

« 10 Insanely Cool Upcycle Projects
Framed Paint Brush Art »

Meet Angela

Angela, the founder of Blue i Style, strongly believes that decor should be functional, organizing can be beautiful, smart DIYs help stretch your budget, and an organized and stylish home can still be practical for life with kids.

Her work has been featured in print in Better Homes & Gardens and 5280 Home magazine, and online by HGTV, the Today Show, Good Housekeeping, and more. She was also named a 2018 Stylemaker by Better Homes & Gardens.

You can reach Angela at angela@blueistyle.com

COPYRIGHT & PHOTO SHARING POLICY

All text, images, and other content that are part of this blog are the property of Blue i Style, unless otherwise noted. All material is copyright protected.

If you wish to feature one of my projects, feel free to share a single photo (no collaged images, or images with text overlays) as long as the no pin code is used to prevent my image from being pinned from your site.

All features must include credit to Blue i Style with a link back to the original content (not just to the homepage). The project steps, supply list, and/or sources may not be disclosed.

Please read my full content and photo sharing policy to ensure you comply with all guidelines. Failure to do so constitutes copyright violation.

Create At Your Own Risk

Any and all content on this website is for personal use only and created exclusively for inspiration purposes.

Creating with my suggested methods, products used, and tools is at your own risk.

Please ensure you are following proper guidelines with anything used, and you receive professional guidance when necessary.

Read my complete disclosure at: Policies & Disclosures.

Sponsorships & Affiliations

To help fund this blog, I accept some forms of advertising, sponsorships, and affiliate links.

If you buy something that I recommend, you pay the same price, but I may receive a small commission. As always, all opinions are my own.

Blue i Style is a participant in the Amazon Services LLC Associates Program, an affiliate advertising program designed to provide a means for sites to earn advertising fees by advertising and linking to amazon.com.

I use an affiliate marketing service which may automatically put links into some posts, so please assume any/all links may be affiliate links.

Read my full Disclosure Statement.

Copyright © 2023 · Dazzling Theme theme by Restored 316

  • Facebook
  • Twitter
  • Pinterest