• About
    • About Blue i Style
    • Tour Our Home
    • Free Organizing eBook
    • Blogging Resources
  • Work With Me
    • Interior Decor & Organizing Services
    • Partnerships & Collaborations
    • Blogging Resources
  • Features & Press
  • Policies & Disclosures
  • Contact

Blue i Style

Creating an Organized & Pretty, Happy Home

  • Decor
    • Tour Our Home
    • Room Makeovers & Design Plans
    • Decorating Tips & Tutorials
    • Outdoor Decor
    • One Room Challenge
  • Organizing and Cleaning
    • Organizing Tips & Tutorials
    • Organizing By Room
    • Organizing on the Go
    • Cleaning
  • DIY
    • DIY Tips & Tutorials
    • Smart Home & Safety
    • Paint Tips & Projects
    • Crafts
    • Cricut Projects
  • Kids
    • Decor & DIY for Kids
    • Organizing Kids
    • Life With Kids
  • Five Minute Projects
  • Holidays & Entertaining
    • Seasonal & Holiday Decor
    • Entertaining
    • DIY Gifts & Gift Guides
    • Facebook
    • Instagram
    • Pinterest
    • Twitter
    • YouTube

Crafts· Gift Ideas· Holidays & Seasons

Scrabble Tile Inspired DIY Coasters

  • Facebook
  • Twitter

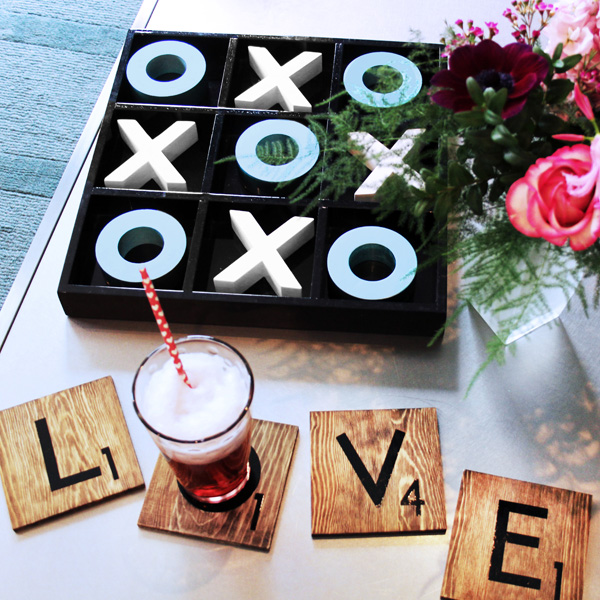
Today’s five minute project is all about spreading the love this Valentine’s season! I made these adorable Scrabble tile inspired DIY coasters for our living room, and I think they are the perfect Valentine’s gift idea or even a fantastic wedding or anniversary gift idea!


This post contains affiliate links. If you purchase something I recommend, you’ll pay the same price, but I may receive a small commission.
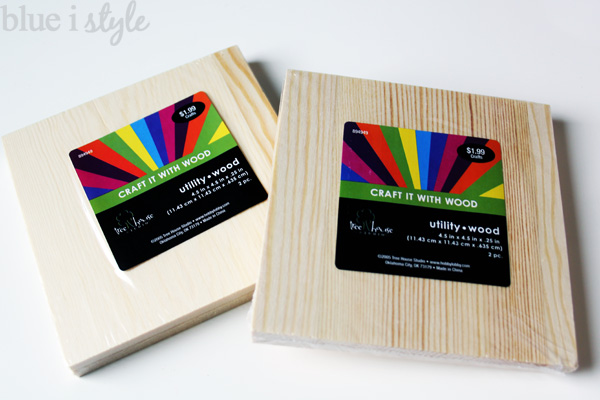

A few weeks ago, I picked up two sets of unfinished wood squares at Hobby Lobby for just $2 each. They are the perfect size for coasters, and as soon as I saw them I envisioned them as Scrabble tiles.
SUPPLY LIST
  • Craft Wood Squares
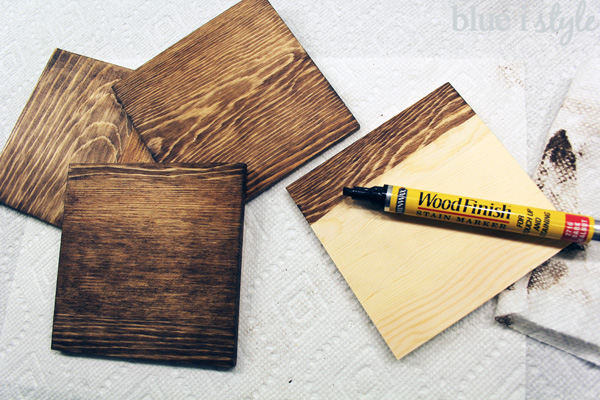
  • Wood Stain (I used a Dark Walnut Minwax Stain Marker)
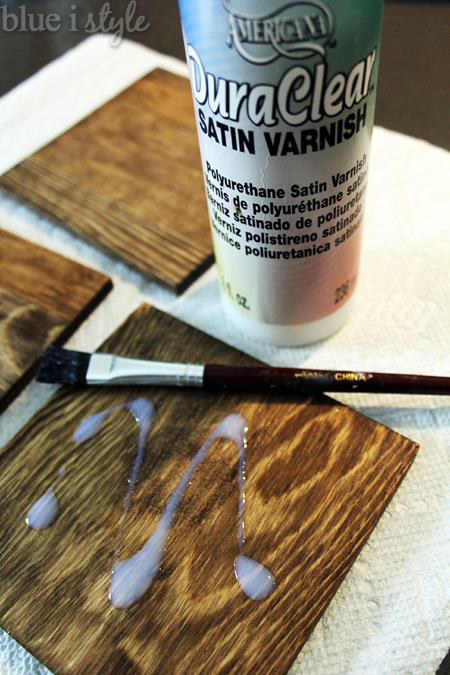
  • Satin Varnish
  • Black Permanent Adhesive Vinyl (or black letter stickers & number stickers)
  • Cricut cutting machine (optional)
  • Adhesive felt

As is often the case, I impulsively decided to start this project while the kids were eating breakfast, only to realize that I didn’t have the color of stain I wanted to use. But then I remembered that I had several Minwax Stain Marker on hand – that’s right, the very same ones I use to touch up wood furniture and baseboards. I grabbed out the Dark Walnut stain marker and quickly “colored” the coasters. This actually turned out to be really quick and easy {it took me just a couple of minutes to stain all four}, so it was a great solution and saved me a trip to the hardware store.
Best of all, the stain markers take no time at all to dry, so I was immediately able to give each square a really quick coat of sealer. I used the same satin varnish sealer from Michaels that I often use on painting projects. Since I was trying to make this project as quick as possible, I just squeezed a bit of sealer directly onto the square of wood and used a small paintbrush to spread it around.
The final step is adding the letters and numbers. I wasn’t about to paint them on since I wanted to get this project done while the kids were still eating breakfast. Instead, I used some black permanent adhesive vinyl {left over from an earlier project}, and I used my Cricut cutting machine to quickly cut the letters. This particular vinyl is permanent and outdoor rated, so I knew it could withstand any moisture on the coasters. 

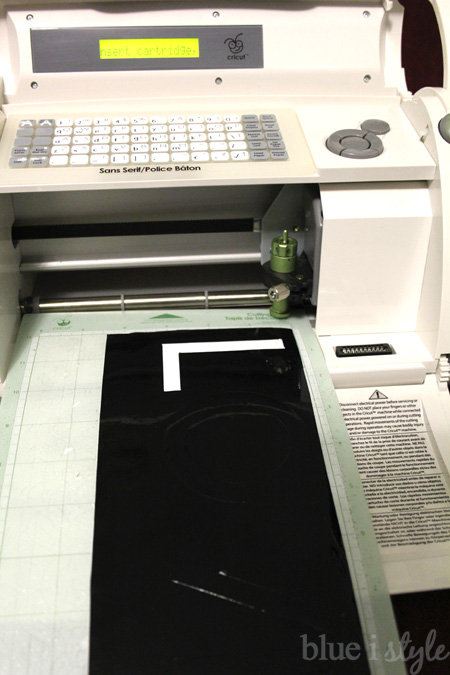
It only took me a minute or two to type in the four letters and four numbers on my Cricut and hit the cut button. And since the sealer I used dries very quickly, by the time the letters were cut, the coasters were dry and ready.

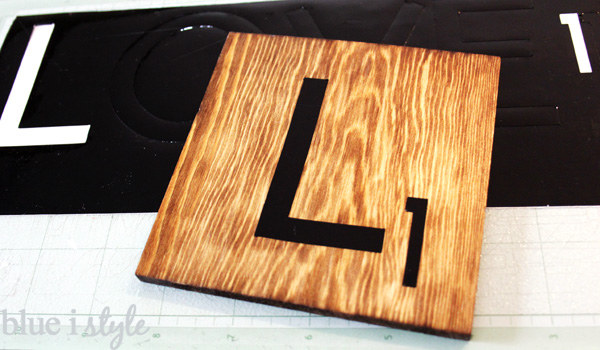
If you don’t own a Cricut, or other electronic cutting machine, you could easily purchase black letter and number stickers at a craft store. The squares are 4.5 inches across, so I made my letters 3.5 inches tall, and my numbers 1.5 inches. If you decide to use stickers or an non-outdoor vinyl, it would probably be best to seal the coasters after adding the letters, rather than before, like I did.

I added some adhesive felt to the back of each coaster to keep them from scratching any surfaces, and that’s it!

In just about five minutes {and while the kids were still eating their first bowls of cereal} I created a set of Scrabble tile inspired coasters that look so great on my coffee table that I might just leave them out year round!

DIY Coasters Valentine gifts for him

Here are some other easy DIY Valentine’s gift ideas that you can make in about five minutes:

  • Facebook
  • Twitter

01.30.15

« Valentine’s Day Decor: DIY Kate Spade Inspired Xs and Os
{news} Two Big Annoucements: The Creative Circle & The Denver Home Show »

Comments

  1. Kimm Boes says

    February 1, 2015 at 1:01 pm

    Cute and impressive! I can't believe you were able to complete an amazing craft before anyone spilled their milk! 😉 May have to give these a try.

  2. Miyomio Andme says

    February 2, 2015 at 8:03 am

    I really love it!!!! I need it so much! Thanks for sharing 😀

  3. The Crowned Goat says

    February 4, 2015 at 11:15 pm

    These are adorable! I can't believe how easy they were to make. I will definitely be sharing and making my own. Thanks so much for sharing these at our Something to Talk About Link Party. We can't wait to see what you have in store next week! CoCo

  4. Bluwatergal says

    February 7, 2015 at 1:10 am

    This is so cute! My Scrabble friends will all want these 🙂 I shared the link on my FB page too! Thanks for sharing at our Something to Talk About Link Party and hope to see you next week! Bwg ~~~

  5. Lindsay Eidahl says

    February 10, 2015 at 1:20 am

    I love these. I made similar ones that said "Nest" for our porch. Thank you for sharing on Show Me Saturday! Pinning!

  6. Kimbermac says

    February 13, 2015 at 4:01 pm

    Adorable! What cartridge did you use for the lettering?

    • blueistyle says

      February 13, 2015 at 5:38 pm

      Kimbermac, Great question – I should have put that info in the post. I believe it was the San Serif cartridge, but I'll have to double check and let you know for sure.

  7. Kimbermac says

    February 13, 2015 at 4:02 pm

    Adorable! Which cartridge did you use for the lettering?

  8. Anonymous says

    February 21, 2015 at 4:14 pm

    This is such a cute idea! I need to get a vinyl cutter, but I will certainly be trying this!

  9. Christy @ 11 Magnolia Lane says

    February 24, 2015 at 3:49 am

    Love this–I think I might just try it with our last name initial. Thanks for linking up at the Pretty Preppy Party!

  10. Emily @ Two Purple Couches says

    February 25, 2015 at 5:17 pm

    I love these!!! Stopping over from the Pretty Preppy Party 🙂

  11. Michele Alger says

    January 12, 2016 at 8:35 pm

    Thanks! These are cute, just made mine!! 😉

  12. Amy says

    February 8, 2016 at 6:20 pm

    Super cute!

Meet Angela

Angela, the founder of Blue i Style, strongly believes that decor should be functional, organizing can be beautiful, smart DIYs help stretch your budget, and an organized and stylish home can still be practical for life with kids.

Her work has been featured in print in Better Homes & Gardens and 5280 Home magazine, and online by HGTV, the Today Show, Good Housekeeping, and more. She was also named a 2018 Stylemaker by Better Homes & Gardens.

You can reach Angela at angela@blueistyle.com

COPYRIGHT & PHOTO SHARING POLICY

All text, images, and other content that are part of this blog are the property of Blue i Style, unless otherwise noted. All material is copyright protected.

If you wish to feature one of my projects, feel free to share a single photo (no collaged images, or images with text overlays) as long as the no pin code is used to prevent my image from being pinned from your site.

All features must include credit to Blue i Style with a link back to the original content (not just to the homepage). The project steps, supply list, and/or sources may not be disclosed.

Please read my full content and photo sharing policy to ensure you comply with all guidelines. Failure to do so constitutes copyright violation.

Create At Your Own Risk

Any and all content on this website is for personal use only and created exclusively for inspiration purposes.

Creating with my suggested methods, products used, and tools is at your own risk.

Please ensure you are following proper guidelines with anything used, and you receive professional guidance when necessary.

Read my complete disclosure at: Policies & Disclosures.

Sponsorships & Affiliations

To help fund this blog, I accept some forms of advertising, sponsorships, and affiliate links.

If you buy something that I recommend, you pay the same price, but I may receive a small commission. As always, all opinions are my own.

Blue i Style is a participant in the Amazon Services LLC Associates Program, an affiliate advertising program designed to provide a means for sites to earn advertising fees by advertising and linking to amazon.com.

I use an affiliate marketing service which may automatically put links into some posts, so please assume any/all links may be affiliate links.

Read my full Disclosure Statement.

Copyright © 2021 · Dazzling Theme theme by Restored 316

  • Facebook
  • Twitter
  • Pinterest