• About
    • About Blue i Style
    • Tour Our Home
    • Free Organizing eBook
    • Blogging Resources
  • Work With Me
    • Interior Decor & Organizing Services
    • Partnerships & Collaborations
    • Blogging Resources
  • Features & Press
  • Policies & Disclosures
  • Contact

Blue i Style

Creating an Organized & Pretty, Happy Home

  • Decor
    • Tour Our Home
    • Room Makeovers & Design Plans
    • Decorating Tips & Tutorials
    • Outdoor Decor
    • One Room Challenge
  • Organizing and Cleaning
    • Organizing Tips & Tutorials
    • Organizing By Room
    • Organizing on the Go
    • Cleaning
  • DIY
    • DIY Tips & Tutorials
    • Smart Home & Safety
    • Paint Tips & Projects
    • Crafts
    • Cricut Projects
  • Kids
    • Decor & DIY for Kids
    • Organizing Kids
    • Life With Kids
  • Five Minute Projects
  • Holidays & Entertaining
    • Seasonal & Holiday Decor
    • Entertaining
    • DIY Gifts & Gift Guides
    • Facebook
    • Instagram
    • Pinterest
    • Twitter
    • YouTube

Crafts· Decorating Tips & Tutorials· Five Minute Friday

How to Give Photos a Metallic Glow

  • Facebook
  • Twitter

When my blog was about one week old and had maybe two readers {you know who you are} I posted an awesome photo trick! This is one of my favorite projects, and it’s super quick and easy, so today I’m bringing it back for Five Minute Friday! Let me show you how easy it is to give your photos a shiny, metallic glow.

Give photos a metallic glow

When I graduated from law school, my mom and I took a trip to a celebratory trip Savannah, Georgia.  While there, we visited a great art gallery and I was struck by a collection of framed photos that appeared to have a metallic finish. It just so happened that the artist was at the gallery that day, and after telling him that I admired his work, he proceeded to explain his very complicated process. I don’t remember all the details now, but after we left the gallery {empty handed of course, since the work was far out of my price range}, I kept thinking about those photos and I came up with a much similar technique to achieve the same look…

Photos printed on transparency film and layer on top of silver paper. It’s as simple as that! But there a few tips you need to know, so here’s the quick three step tutorial…

STEP 1: PRINT PHOTOS ON TRANSPARENCIES
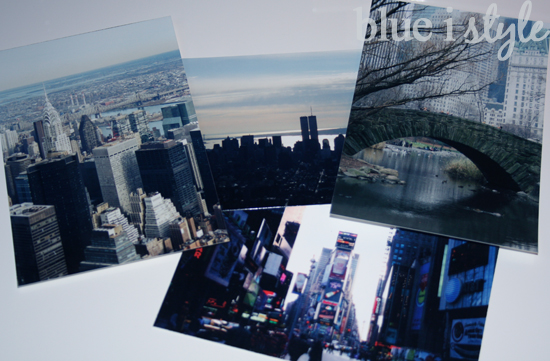
When selecting photos for this project, it’s best to choose photos with some very light areas – like the sky these New York City photos {or the buildings in the photo in the upper right hand corner}.

The photos I chose were from a trip I took in college – so they predated my digital camera {yep, dating myself again!} so I scanned them in and used Photoshop to resize them to fit my frames.
I purchased one package of 3M Multipurpose Transparency Film {for those who attended elementary school in the ‘80’s and early ’90’s – you know what I am talking about – those clear sheets used on the overhead projectors}. 

TIP FOR PURCHASING TRANSPARENCY FILM: There’s a variety of transparency film available, so be sure to get the kind made for printing, rather than just for writing on, and also ensure that you get the right kind for your printer – inkjet vs. laser {the film I bought was made for both inkjet and laser, depending on which side of the film you printed on}. On a recent trip to Office Depot I noticed that they were only selling the transparency film in quantities of 100 sheets – much more than you likely need. But you can buy smaller quantities {for considerably less cost} online.  

TIP FOR PRINTING ON TRANSPARENCY FILM: Also, make sure that when printing on transparency film you select the right “paper” type in your printer settings – my printer has a setting specific for transparency film. You may have to search online to determine the right setting for your printer.  If you don’t select the right setting, the ink may come out too wet, or the colors may be inaccurate.

Once you’ve determined the appropriate settings for your printer, print your photos directly onto the transparency film. The colors will remain vibrant, but when held up to the light you’ll be able to see right through the lighter areas. In the photo below you can see the branches of the tree outside my window showing through the transparency film.

Give photos a metallic glow

STEP 2: LAYER OVER SILVER PAPER

When I first completed this project, I used metallic silver wrapping paper – because that’s what I had on hand. I simply cut pieces of wrapping paper the same size as my photos and layered the photos on top. I was instantly pleased with the results.

Give photos a metallic glow

I quickly discovered, however, that the wrapping paper, because it was thin, wrinkled easily. In the interest of completing the project, I decided this didn’t bother me because it added some dimension to the sky in my photos {as you can see in the photo below}.

Give photos a metallic glow

When we made over our bedroom last fall, I updated my NYC photos with a few new photos I took on a more recent trip to New York, and while I was at it I swapped out the wrinkled wrapping paper with cardstock weight metallic silver scrapbook paper, I like the new smooth look this adds to the photos!

STEP 3: FRAME PHOTOS

With your transparent photos layered over silver paper, all that is left is to put the pictures in frames and decide where to display them.

TIP: Your new metallic photos will look best if displayed in a place where light shines on them.
When I first completed this project I was living in a condo downtown, and had a perfect wall for the photos directly across from a large west facing window. The photos looked especially great in the early evening when there was direct sunlight streaming through the windows and glowing off of the metallic finish of the silver paper.
Give photos a metallic glow
In our current home, the layout of our bedroom is different and the photos are no longer across from windows. But with the addition of a well placed lamp and a mirror that bounces light, the photos still maintain their gorgeous glow!
Give photos a metallic glow
Give Photos a Metallic Glow

Since, I first completed this project, many photo labs {including online photo printers like Snapfish} have started offering prints on metallic photo paper – but these photos, while vibrant, don’t seem to have quite the same “glowing” effect. 

Other companies are now offering photos printed on sheets of metal. These are gorgeous, but expensive, and can be damaged by prolonged exposure to sunlight – the very sunlight that enhances their metallic appearance. I love my simplistic alternative because it’s cheap and easy to DIY, and the photos could easily be reprinted if damaged by sunlight. And of course, you can always update your photos at any time by simply printing a new photo and layering it over the existing silver paper.

Give Photos a Metallic Glow

What do you think? If you try this technique, I’d love to see photos of your shiny, metallic photos! Email them to me, or tag Blue i Style on social media!

Let’s get social!   

Linked up with Remodelaholic

  • Facebook
  • Twitter

05.01.15

« {link party} The Creative Circle – Week 13
A Music Themed Playroom Under the Stairs »

Meet Angela

Angela, the founder of Blue i Style, strongly believes that decor should be functional, organizing can be beautiful, smart DIYs help stretch your budget, and an organized and stylish home can still be practical for life with kids.

Her work has been featured in print in Better Homes & Gardens and 5280 Home magazine, and online by HGTV, the Today Show, Good Housekeeping, and more. She was also named a 2018 Stylemaker by Better Homes & Gardens.

You can reach Angela at angela@blueistyle.com

COPYRIGHT & PHOTO SHARING POLICY

All text, images, and other content that are part of this blog are the property of Blue i Style, unless otherwise noted. All material is copyright protected.

If you wish to feature one of my projects, feel free to share a single photo (no collaged images, or images with text overlays) as long as the no pin code is used to prevent my image from being pinned from your site.

All features must include credit to Blue i Style with a link back to the original content (not just to the homepage). The project steps, supply list, and/or sources may not be disclosed.

Please read my full content and photo sharing policy to ensure you comply with all guidelines. Failure to do so constitutes copyright violation.

Create At Your Own Risk

Any and all content on this website is for personal use only and created exclusively for inspiration purposes.

Creating with my suggested methods, products used, and tools is at your own risk.

Please ensure you are following proper guidelines with anything used, and you receive professional guidance when necessary.

Read my complete disclosure at: Policies & Disclosures.

Sponsorships & Affiliations

To help fund this blog, I accept some forms of advertising, sponsorships, and affiliate links.

If you buy something that I recommend, you pay the same price, but I may receive a small commission. As always, all opinions are my own.

Blue i Style is a participant in the Amazon Services LLC Associates Program, an affiliate advertising program designed to provide a means for sites to earn advertising fees by advertising and linking to amazon.com.

I use an affiliate marketing service which may automatically put links into some posts, so please assume any/all links may be affiliate links.

Read my full Disclosure Statement.

Copyright © 2023 · Dazzling Theme theme by Restored 316

  • Facebook
  • Twitter
  • Pinterest