• About
    • About Blue i Style
    • Tour Our Home
    • Free Organizing eBook
    • Blogging Resources
  • Work With Me
    • Interior Decor & Organizing Services
    • Partnerships & Collaborations
    • Blogging Resources
  • Features & Press
  • Policies & Disclosures
  • Contact

Blue i Style

Creating an Organized & Pretty, Happy Home

  • Decor
    • Tour Our Home
    • Room Makeovers & Design Plans
    • Decorating Tips & Tutorials
    • Outdoor Decor
    • One Room Challenge
  • Organizing & Cleaning
    • Organizing Tips & Tutorials
    • Organizing By Room
    • Organizing On the Go
    • Cleaning
  • DIY
    • DIY Tips & Tutorials
    • Smart Home & Safety
    • Paint Tips & Projects
    • Crafts
    • Cricut Projects
  • Kids
    • Decor & DIY For Kids
    • Organizing Kids
    • Life With Kids
    • Projects For Kids
  • Five Minute Projects
  • Holidays & Entertaining
    • Seasonal & Holiday Decor
    • Entertaining
    • DIY Gifts & Gift Guides
    • Facebook
    • Instagram
    • Pinterest
    • Twitter
    • YouTube

Uncategorized

{DIY with style} A License Plate Map High Low Project

  • Facebook
  • Twitter
  • Pinterest

It’s been months since I shared with you the mood boards for three different room designs we were considering for Beckett’s big boy room. It was a tough choice, but we ended up deciding on the Vintage Preppy Little Man’s Lounge design concept, which will include lots of details inspired by menswear. But even though we didn’t end up choosing the Planes, Trains & Automobiles themed room concept, I do plan to incorporate a lot of details of that design plan into his Vintage Preppy room.  Just in the last few weeks we have FINALLY started making some progress on Beckett’s new room, and today I am excited to share with you a project that we completed this weekend!

DIY License Plate Map

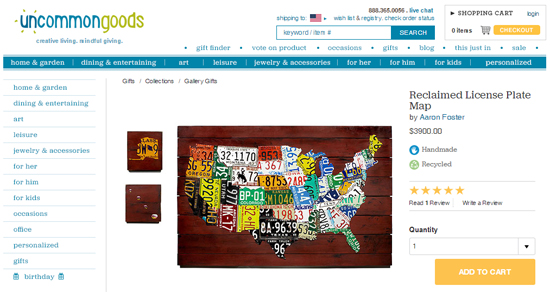
For years, I have been obsessed with the Reclaimed License Plate Map from Uncommon Goods. It is a one-of-a-kind, handmade work of art, with each state being cut from an authentic license plate and mounted on cedar background. But at $3,900, this amazing license plate map will never be within my budget.

I’ve seen a lot of less expensive versions of the license plate map, most of which have simply been printed on a stretched canvas (like this one from The Land of Nod) or on a poster (like this one from Zazzle). Neither of these would give me the look I am going for in Beckett’s room. I really want to create a vintage, collected feel in his space, and the textures are very important.

Finally I found another license plate map option that I really liked because the image is powder coated onto heavy gauge steel and cut out in the shape of the continental United States. This map comes in two sizes, and I was able to purchase the larger size (35 x 21 inches) on Amazon for $117. This was still a splurge, but since it will be the largest piece of art in Beckett’s room, I decided to go for it.

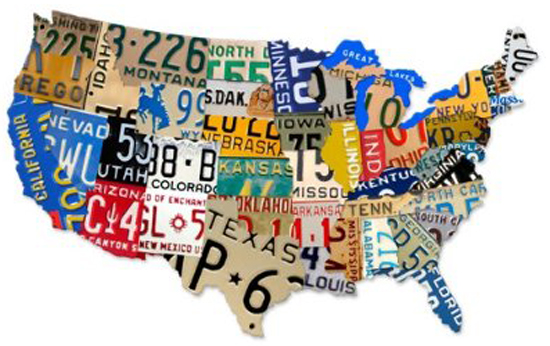
Of course, because the map is printed, it is totally flat and does not have the dimension of real license plates (although the shadows and highlights do give some appearance of dimension).

License Plate Map for Less

But I knew that I could add the texture I desired, and capture the look of the high end Uncommon Goods map, by mounting this metal map on a background of reclaimed wood. My parents happened to have a wood pallet in their garage from a delivery, and they were about to get rid of it when my mom called to ask if any wanted or needed it for any reason. I said YES, and was even able to enlist my dad’s help in turning the pallet into a background for the map.

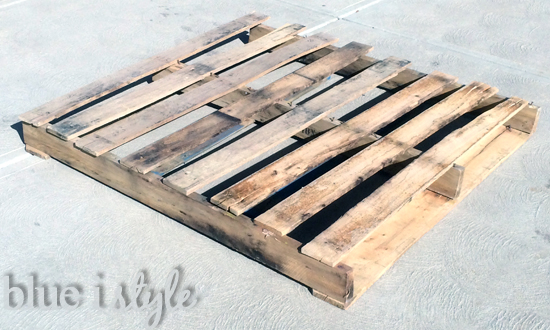
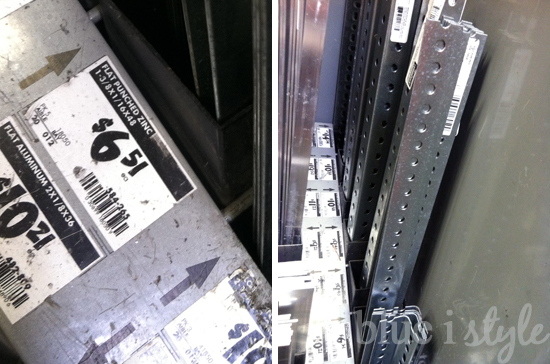
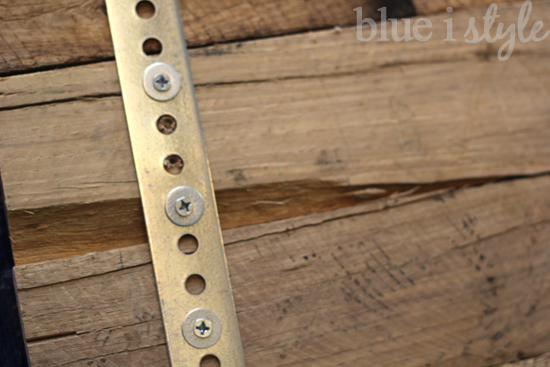
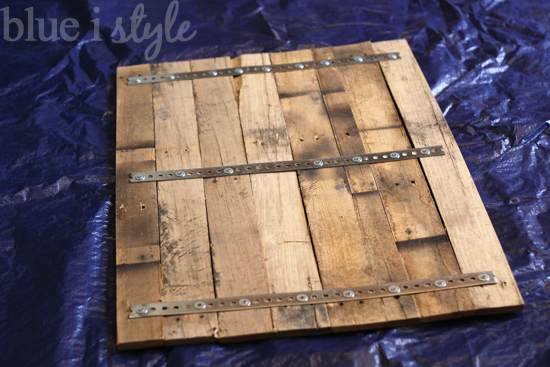
I measured the map to determine the size I wanted for the background, and my dad removed the boards from the pallet and cut them to the desired length. Our first thought was to use the extra boards to create a frame on the back to hold all of the boards together, but this would have added extra depth to the background and since the side of it will be one of the first things you see when walking into Beckett’s room, I didn’t want it to sit out further than necessary. Instead, we found some metal strapping {actually called “flat punched zinc”} at Home Depot that, combined with screws and large washers, worked perfectly!

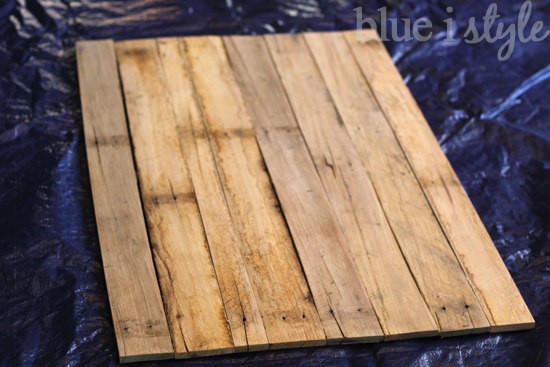
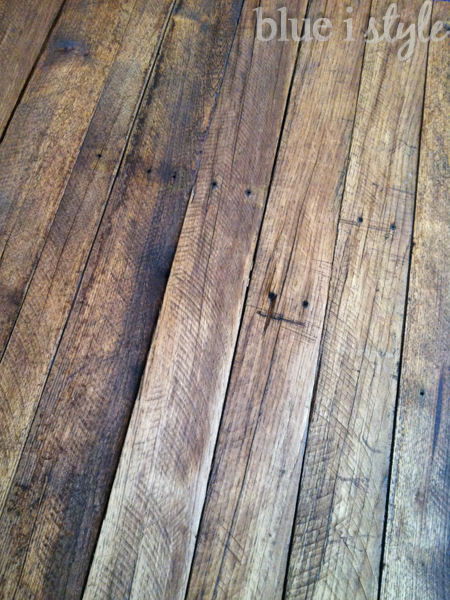
We could have made the background for the map out of new boards, but I preferred the aged look of the wood reclaimed from the pallet. Each of the boards is naturally distressed, including nail holes and cracks, but some of the boards also had large large gouges out of them, which was a little rougher than the look I was going for. As a result, the “smoother” side of each board was faced to the front, and the large nicks and gouges were placed at the back.

Fully assembled, here’s what it looked like from the back side:

I really liked the natural color variation of the boards, and I strongly considered not staining the wood at all.

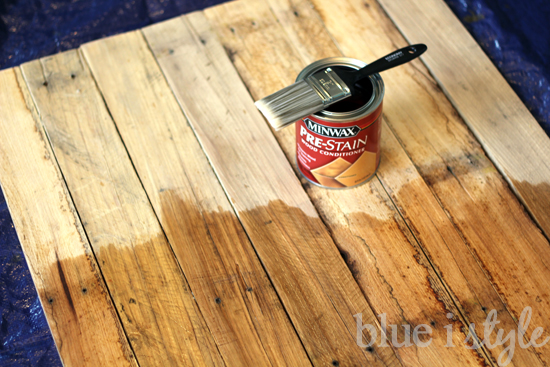
But in the end, I decided that I wanted to give the background a bit more of a finished look by adding a light coat of stain. We picked up a can of Minwax pre-stain wood conditioner (we would have bought a smaller can, but they only had one size), and a small can of Minwax stain in Special Walnut.

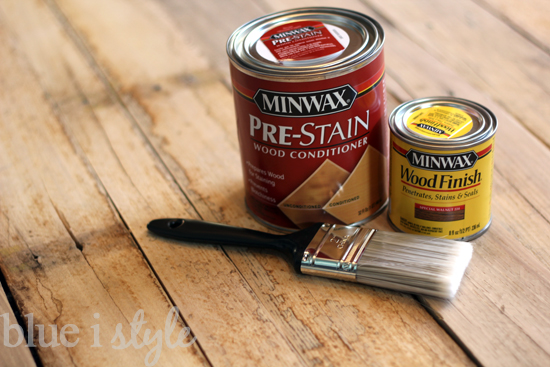
We applied one coat of the pre-stain conditioner, used a white cloth to remove the excess, and then waited the required amount of time (following the instructions on the can).

After the wood conditioner had time to dry, we applied one thin coat of the stain. I didn’t want it to be too dark, so I only waited about a minute before starting to wipe of the excess stain (rather than waiting the suggested five minutes).  In fact, I started wiping off excess stain on the first half while Scott continued to apply stain to the second half.

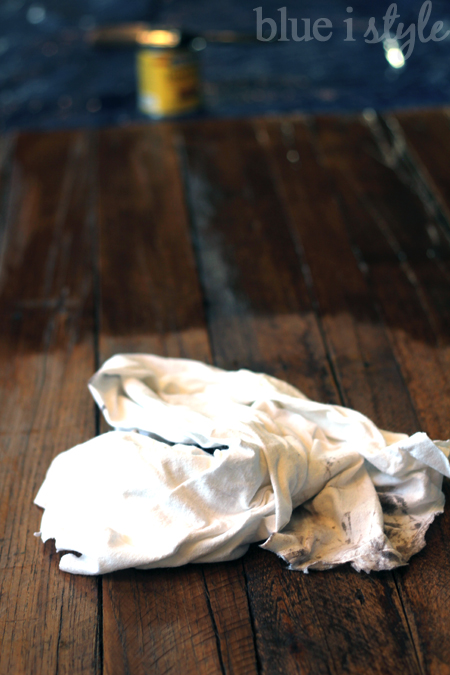
I love the way it turned out! I really like the color of stain we chose, and I love that the original, weathered character of the wood still shows through.

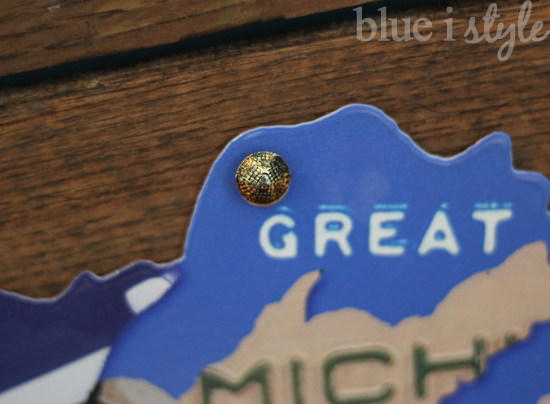
After allowing the stain to dry overnight, I was ready to mount the map on the wood background. The map came pre-drilled with holes for hanging, making it quick and easy. The rivets around the holes are gold, so I selected some decorative upholstery nails with an aged gold finish.

Just as I had hoped, the metal map hung on the reclaimed wood background provides the texture necessary to give the final product a very high end look.

License Plate Map for Less

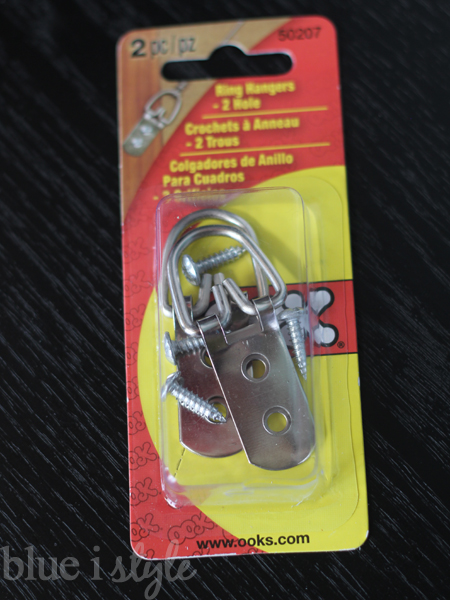
We will be painting Beckett’s room in the coming weeks, and then placing the furniture. After that, we’ll finally be ready to hang up all of the artwork, including this awesome map! In order to hang the map, we will attach these D Ring hooks to the back.

Until we are ready to hang the map, I have it leaning against a wall where we can admire the finished product!

Licence Plate Map for Less

I always love a good high low project!  It gives me a thrill to find a way to create a high end look, without the high price, and think this map is the perfect example of how that can be accomplished. Even though the metal map was not inexpensive, the wood was free and construction costs were minimal.  The entire project came in under $140, just $10 more than the canvas print version from the Land of Nod, but with a look much closer to that of the original. And compared to the $3,900 price tag of the one-of-a-kind piece from Uncommon Goods, I can confidently say that this project was worth every penny.

License Plate Map for Much Less

UPDATE! Want to see how the map looks now that it’s hanging in Beckett’s finished room?!

License Plate Map for Less

The links below include all of the other projects that went into the creation of Beckett’s Vintage Preppy Little Gentleman’s Lounge:


  • Facebook
  • Twitter
  • Pinterest

03.03.14 22 Comments

« {blogiversary} Celebrating One Year With a Top Ten Roundup
{organizing with style} Decorating On the Go with a Paint and Fabric Swatch Kit »

Comments

  1. Anonymous says

    March 4, 2014 at 5:24 pm

    Angela, I just had to say how much I absolutely love this project. I too have admired those license plate maps in many places and have always thought they were way outside of our budget. Yours is just as amazing and at such a more reasonable price. Thank you for sharing this! Simply amazing! I can't wait to see the room come together. You have such a gift for design!

    Reply
    • Angela, blue i style says

      March 4, 2014 at 7:43 pm

      Thanks so much!!

  2. Kayla @ Home Coming says

    March 10, 2014 at 2:00 pm

    I love love love this so much, you're being featured on The DIY'ers today! http://homecomingmn.blogspot.com/2014/03/the-diyers-53.html

    Reply
  3. Katie Nathey says

    March 11, 2014 at 1:01 pm

    This is awesome and I love the variation of the wood you used! Pinned 🙂

    Reply
    • Angela, blue i style says

      March 16, 2014 at 12:18 am

      Thanks, Katie!

  4. Erlene A says

    March 11, 2014 at 5:22 pm

    It looks great and you saved SO much by doing it yourself.

    Reply
    • Angela, blue i style says

      March 16, 2014 at 12:18 am

      Thanks, Erlene!

  5. Tammy Doiel says

    March 14, 2014 at 11:39 pm

    Good job on doing your homework! That will be something that you can keep forever and your son will never outgrow. I will have to remember how you did the background. Thanks for linking up with the Bloggers Brags Pinterest Party. I have pinned your post to the Bloggers Brags Pinterest Board!

    Reply
    • Angela, blue i style says

      March 16, 2014 at 12:18 am

      Thanks, Tammy

  6. Rachel Beach says

    March 15, 2014 at 11:54 pm

    Genius! I love, love, love this project. It looks amazing and you saved a ton of money.

    Reply
    • Angela, blue i style says

      March 16, 2014 at 12:17 am

      Thanks, Rachel! I am thrilled with how it turned out and I love to save money!

  7. Bre Eggert says

    March 22, 2014 at 12:46 am

    Oh my gosh, I LOVE LOVE LOVE this! I love yours more than the original! So amazing – you need to show Sabrina Soto right now! 🙂 – Bre @ Average But Inspired

    Reply
    • Angela, blue i style says

      March 22, 2014 at 6:11 am

      Thanks so much, Bre. I posted a photo of the map on Instagram a couple of weeks ago and actually got a comment from Sabrina Soto! She said she love it and totally made my day!! 🙂

  8. Elle G says

    March 24, 2014 at 3:48 am

    I LOVE this project! I've seen similar ones in the stores and have wanted to make one for a while. In fact…this is one of my favorite Pinterest Pins of the Week at my blog this week. Glad I found your blog! Elle @ Erratic Project Junkie

    Reply
  9. Lisa @ Shine Your Light says

    March 29, 2014 at 3:56 am

    I like your version better than the $3900 version! It came out great and the stained pallet boards are such a great color, so full of character! Love this project. Thanks for sharing at Best of the Nest.

    Reply
    • Angela, blue i style says

      March 29, 2014 at 4:48 am

      Thanks, Lisa!! We were thrilled with how it turned out and I just can't wait to get the rest of the room done so we can hang it up!

  10. Zelda Behr says

    March 29, 2014 at 9:48 am

    Love this such a great idea!

    Reply
  11. Jennifer @ Dimples and Tangles says

    April 2, 2014 at 3:55 am

    You DEFINITELY got the look for less. Love your version! Thanks for linking up with us at Best of the Nest!

    Reply
  12. pam {simple details} says

    April 3, 2014 at 12:08 am

    Angela, this turned out amazing – I love your clever idea to mount it on the pallet boards, it makes more of a statement! Thanks for sharing at Best of the Nest!

    Reply
  13. laura@imnotatrophywife.com says

    May 21, 2014 at 6:01 pm

    Angela- Oh my! I am having too much fun flipping through your posts and tutorials! Now I am officially stalking! laura

    Reply
  14. Improvement List says

    January 6, 2015 at 2:05 am

    I have also been a long time fan of this license plate map, but not of the price tag. Great job with this project! It looks so similar to the original.

    Reply
  15. Lorene Nance says

    June 6, 2015 at 8:02 pm

    Hi Angela,
    I emailed you about featuring this on Remodelaholic, but my emails are prone to getting caught in spam filters, so I thought I'd leave a comment as insurance 🙂 Check your spam folder and email me back because we'd love to feature you! hello@remodelaholic.com

    -Lorene

    Reply

Leave a Reply Cancel reply

Your email address will not be published. Required fields are marked *

Meet Angela

Angela founded Blue i Style, a blog dedicated to all things home, in 2013.

She strongly believes that decor should be functional, organizing can be beautiful, smart DIYs help stretch your budget, and an organized and stylish home can still be practical for life with kids.

Angela is an attorney by education, but Blue i Style allows her to pursue her real passion of helping others create organized and stylish, happy homes.

Her work has been featured in print in Better Homes & Gardens and 5280 Home magazine, and online by HGTV, the Today Show, Good Housekeeping, and more. She was also named a 2018 Stylemaker by Better Homes & Gardens.

You can reach Angela at angela@blueistyle.com

COPYRIGHT & PHOTO SHARING POLICY

All text, images, and other content that are part of this blog are the property of Blue i Style, unless otherwise noted. All material is copyright protected.

If you wish to feature one of my projects, feel free to share a single photo (no collaged images, or images with text overlays) as long as the no pin code is used to prevent my image from being pinned from your site.

All features must include credit to Blue i Style with a link back to the original content (not just to the homepage). The project steps, supply list, and/or sources may not be disclosed.

Please read my full content and photo sharing policy to ensure you comply with all guidelines. Failure to do so constitutes copyright violation.

Create At Your Own Risk

Any and all content on this website is for personal use only and created exclusively for inspiration purposes.

Creating with my suggested methods, products used, and tools is at your own risk.

Please ensure you are following proper guidelines with anything used, and you receive professional guidance when necessary.

Read my complete disclosure at: Policies & Disclosures.

Sponsorships & Affiliations

To help fund this blog, I accept some forms of advertising, sponsorships, and affiliate links.

If you buy something that I recommend, you pay the same price, but I may receive a small commission. As always, all opinions are my own.

Blue i Style is a participant in the Amazon Services LLC Associates Program, an affiliate advertising program designed to provide a means for sites to earn advertising fees by advertising and linking to amazon.com.

I use an affiliate marketing service which may automatically put links into some posts, so please assume any/all links may be affiliate links.

Read my full Disclosure Statement.

Copyright © 2019 · Dazzling Theme theme by Restored 316

  • Facebook
  • Twitter
  • Pinterest