• About
    • About Blue i Style
    • Tour Our Home
    • Free Organizing eBook
    • Blogging Resources
  • Work With Me
    • Interior Decor & Organizing Services
    • Partnerships & Collaborations
    • Blogging Resources
  • Features & Press
  • Policies & Disclosures
  • Contact

Blue i Style

Creating an Organized & Pretty, Happy Home

  • Decor
    • Tour Our Home
    • Room Makeovers & Design Plans
    • Decorating Tips & Tutorials
    • Outdoor Decor
    • One Room Challenge
  • Organizing and Cleaning
    • Organizing Tips & Tutorials
    • Organizing By Room
    • Organizing on the Go
    • Cleaning
  • DIY
    • DIY Tips & Tutorials
    • Smart Home & Safety
    • Paint Tips & Projects
    • Crafts
    • Cricut Projects
  • Kids
    • Decor & DIY for Kids
    • Organizing Kids
    • Life With Kids
  • Five Minute Projects
  • Holidays & Entertaining
    • Seasonal & Holiday Decor
    • Entertaining
    • DIY Gifts & Gift Guides
    • Facebook
    • Instagram
    • Pinterest
    • Twitter
    • YouTube

Uncategorized

{seasonal style} Reverse Those Jack O’Lanterns for Thanksgiving

  • Facebook
  • Twitter

I always enjoy finding ways to repurpose things, but if there’s one thing even better than repurposing – it’s finding a way to make one item do double duty! And that’s the story of my Peek-A-Boo Jack O’Lanterns, which are now also a part of my Thanksgiving decor!

Last year I really wanted to buy some craft pumpkins, but I just couldn’t bring myself to pay the high prices at the craft stores. I mentioned my frustration with the $25+ price tags to my mom, and earlier this fall she called to let me know that she had spotted craft pumpkins at Walmart for just $7. At that price, I was finally able to justify purchasing some, especially knowing that I would be able to use them again year after year.

I had a lot of fun carving these faux pumpkins and painting them on the inside. I loved how they looked lined up on my entry table, and when Halloween ended, I really didn’t want to pack them away! Then I realized I didn’t have to! I simply turned them around, and decorated the other side for Thanksgiving. Bam! Halloween Jack O’Lanterns that reverse for some Thanksgiving glam!

Halloween pumpkins reverse for Thanksgiving

I originally created five Jack O’Lanterns, but to spell out “THANKS” on the other side, I needed to add a sixth pumpkin, so I carved one additional face to add to next year’s Halloween decor, then flipped it around to put a letter on the other side.

I debated a long time before deciding how I wanted to write the word THANKS on the pumpkins. I thought about using decorative thumbtacks to spell it out, but I didn’t want the thumbtacks to poke through and be visible on the Jack O’Lantern side. Then I thought about simply painting the letters on, but I wanted something a bit more interesting. Finally I decided to use a simple Sharpie silhouette technique similar.

Sharpie Silhouette Thanksgiving Pumpkins

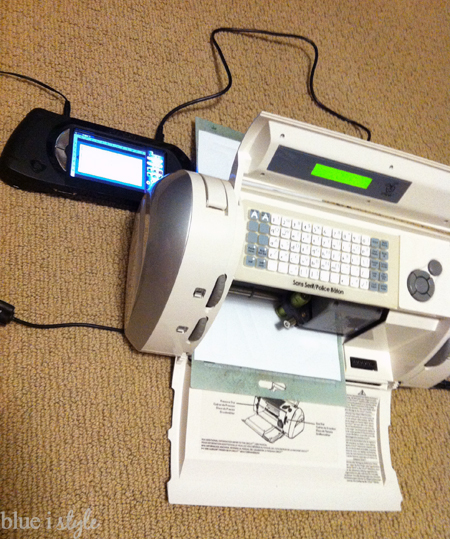
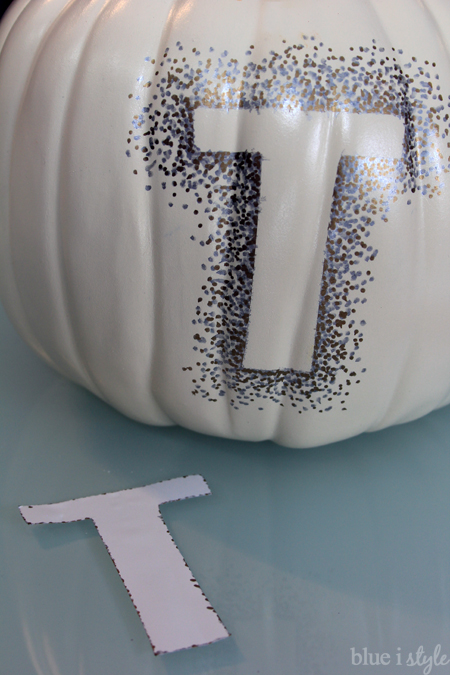
I determined the size of letters I wanted, and cut them out of some white adhesive backed vinyl using my Cricut electronic cutter.

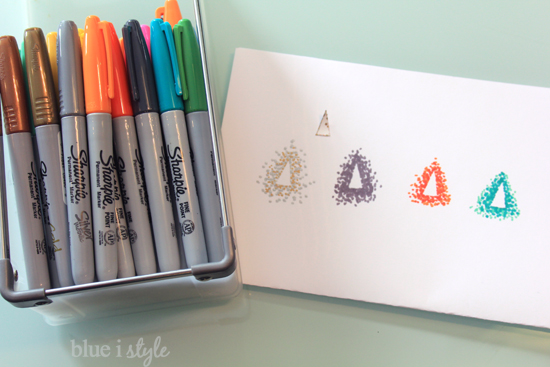
More indecisiveness ensued when it came to picking a colors for my letter silhouettes. I own Sharpies in just about every color – so I decided to test out a few options. I peeled up the center of the “A” and stuck it to a piece of paper and tried out some variations, including teal, orange, grey, and finally, the winner – gold and silver.

Earlier this fall, I created a fun, fall Tic Tac Toe game for my boys by spray painting some plastic pumpkins silver and gold, so I like the idea of coordinating my THANKS pumpkins with the Tic Tac Toe game on our coffee table.

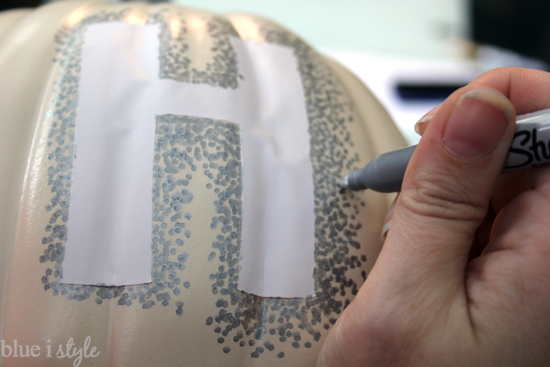
With my colors selected, I stuck each letter on the pumpkins on the opposite side as the Jack O’Lantern faces. The letters didn’t lay perfectly smooth on the curves of the pumpkins, but I was able to smooth them down with my fingers as I worked.

Then I simply used my silver Sharpie marker to make dots around the entire outline of the first letter.

Once I had the letter outlined, I continued to make more and more dots working my way out around the letter.

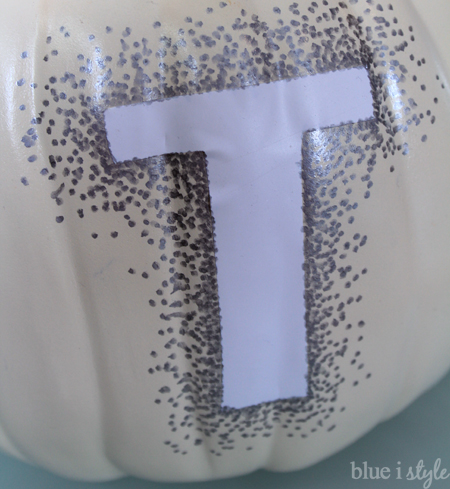
After creating all of my silver dots, I went back and added gold dots.

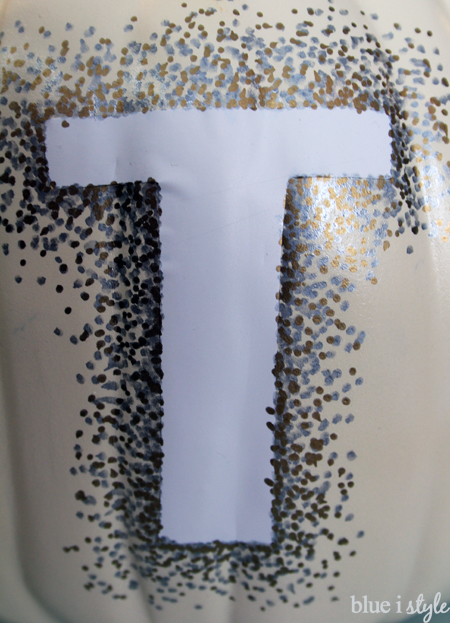
When I was done with all the dots around the letter T, I peeled off the vinyl sticker. You can see that I had a little bit of bleed through here and there, but it’s not noticeable except up very close.

I used the same process for the rest of the letters. It was actually really fun making all those dots, and each letter took me only about 5 minutes to complete.

I really love the way the metallic Sharpie dots catch the light and add a touch of glam to my new Thanksgiving pumpkins.

Sharpie Silhouette Thanksgiving Pumpkins

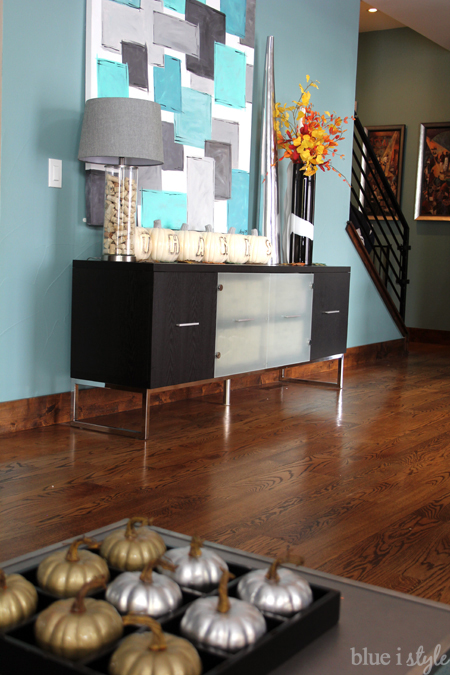
When they are all lined up on my entry table, you would never guess that there are Jack O’Lanterns on the other side!

Sharpie silhouette Thanksgiving pumpkins

Not only did I get a great deal on these craft pumpkins, but now I can use them for two holidays instead of just one. Talk about a win/win!

Sharpie Silhouette Thanksgiving Pumpkins

If you are looking for more fall inspiration, or want to pin some Halloween ideas for next year, you might be interested in these posts:

  • Facebook
  • Twitter

11.13.14

« {decorating with style} DIY Book Page Spiral Art
{five minute friday} Dress Up Your Christmas Card Display While You Wait for the Mail »

Meet Angela

Angela, the founder of Blue i Style, strongly believes that decor should be functional, organizing can be beautiful, smart DIYs help stretch your budget, and an organized and stylish home can still be practical for life with kids.

Her work has been featured in print in Better Homes & Gardens and 5280 Home magazine, and online by HGTV, the Today Show, Good Housekeeping, and more. She was also named a 2018 Stylemaker by Better Homes & Gardens.

You can reach Angela at angela@blueistyle.com

COPYRIGHT & PHOTO SHARING POLICY

All text, images, and other content that are part of this blog are the property of Blue i Style, unless otherwise noted. All material is copyright protected.

If you wish to feature one of my projects, feel free to share a single photo (no collaged images, or images with text overlays) as long as the no pin code is used to prevent my image from being pinned from your site.

All features must include credit to Blue i Style with a link back to the original content (not just to the homepage). The project steps, supply list, and/or sources may not be disclosed.

Please read my full content and photo sharing policy to ensure you comply with all guidelines. Failure to do so constitutes copyright violation.

Create At Your Own Risk

Any and all content on this website is for personal use only and created exclusively for inspiration purposes.

Creating with my suggested methods, products used, and tools is at your own risk.

Please ensure you are following proper guidelines with anything used, and you receive professional guidance when necessary.

Read my complete disclosure at: Policies & Disclosures.

Sponsorships & Affiliations

To help fund this blog, I accept some forms of advertising, sponsorships, and affiliate links.

If you buy something that I recommend, you pay the same price, but I may receive a small commission. As always, all opinions are my own.

Blue i Style is a participant in the Amazon Services LLC Associates Program, an affiliate advertising program designed to provide a means for sites to earn advertising fees by advertising and linking to amazon.com.

I use an affiliate marketing service which may automatically put links into some posts, so please assume any/all links may be affiliate links.

Read my full Disclosure Statement.

Copyright © 2023 · Dazzling Theme theme by Restored 316

  • Facebook
  • Twitter
  • Pinterest