• About
    • About Blue i Style
    • Tour Our Home
    • Free Organizing eBook
    • Blogging Resources
  • Work With Me
    • Interior Decor & Organizing Services
    • Partnerships & Collaborations
    • Blogging Resources
  • Features & Press
  • Policies & Disclosures
  • Contact

Blue i Style

Creating an Organized & Pretty, Happy Home

  • Decor
    • Tour Our Home
    • Room Makeovers & Design Plans
    • Decorating Tips & Tutorials
    • Outdoor Decor
    • One Room Challenge
  • Organizing and Cleaning
    • Organizing Tips & Tutorials
    • Organizing By Room
    • Organizing on the Go
    • Cleaning
  • DIY
    • DIY Tips & Tutorials
    • Smart Home & Safety
    • Paint Tips & Projects
    • Crafts
    • Cricut Projects
  • Kids
    • Decor & DIY for Kids
    • Organizing Kids
    • Life With Kids
  • Five Minute Projects
  • Holidays & Entertaining
    • Seasonal & Holiday Decor
    • Entertaining
    • DIY Gifts & Gift Guides
    • Facebook
    • Instagram
    • Pinterest
    • Twitter
    • YouTube

Uncategorized

{seasonal style} Modern Peek-A-Boo Pumpkins

  • Facebook
  • Twitter

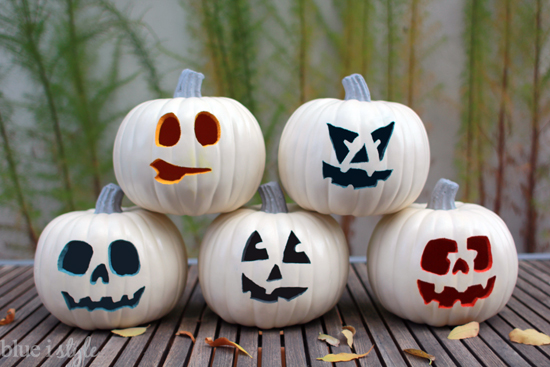
Today I want to share the easy tutorial for one of the projects that you saw in my Halloween Home Tour last Friday – my modern peek-a-boo Jack O’Lantern pumpkins!

Modern Colorful Peek A Boo Pumpkins
If you’ve been out shopping recently, you’ve probably noticed that these craft carving pumpkins are sold just about everywhere – from your local craft stores, to Home Depot, to Walmart – but the prices vary widely. I originally looked at some white craft pumpkins at Michaels and Hobby Lobby, but I just couldn’t justify the $25+ price tag. Then I got a call from my mom letting me know she had spotted these at Walmart for just $7 each. That was much more in my price range!
I already knew that I wanted to paint the inside of the pumpkins and leave the outside white, but first I needed to carve the pumpkin faces. I was planning to draw them by hand, but then I discovered a free font called Punkinhead and realized I could use it to make quick and easy stencils.

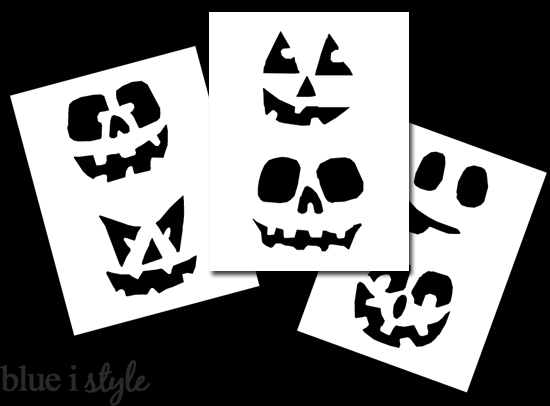
With the Punkinhead font, each letter is represented as a different Jack O’Lantern face. I selected a few of my favorites, then printed them out two to a page at a good size for the craft pumpkins.

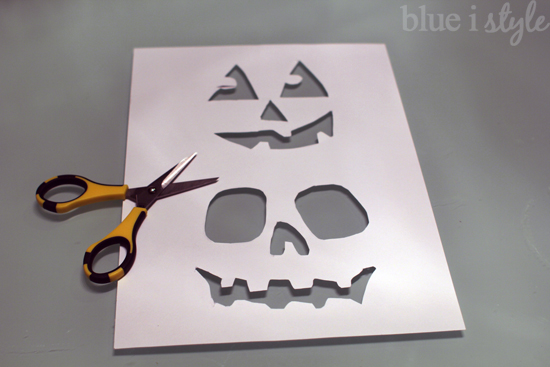
To create stencils, I simply cut out the black faces using a pair of small, sharp tipped scissors.

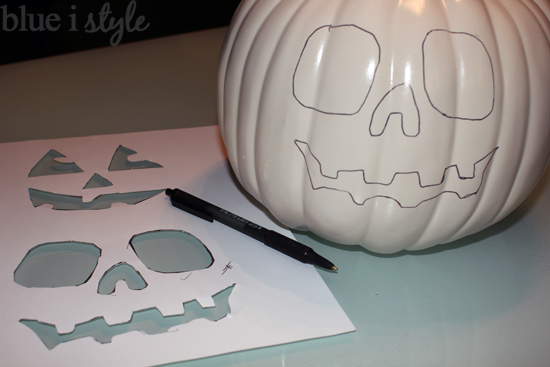
I then traced one face on to each craft pumpkin.

To carve the craft pumpkins, I used the same set of knives/saws that I would use to carve a real pumpkin.

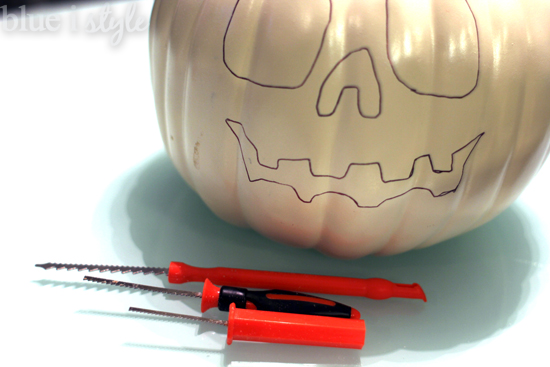
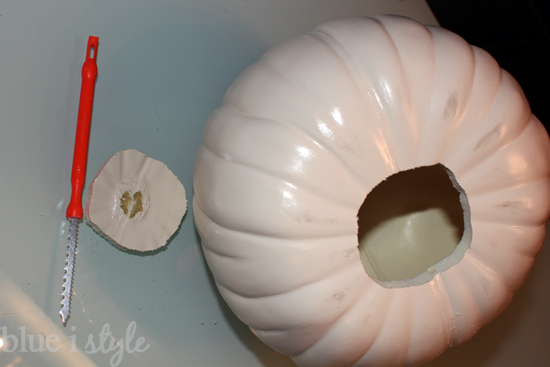
The craft pumpkins are made of a thick foam that is fairly easy to cut, but it makes a big mess. When I was done – there wasn’t an inch of my kitchen table or floor that wasn’t covered in bits of foam. After carving each face, I also cut out a rough circle from the bottom of each pumpkin in order to have easier access for painting the inside of the pumpkins.

I could have instead cut the top each pumpkin {the way you would with a real pumpkin} but I opted to cut a whole in the bottom in order to make it less visible. I have a plan to also use these same pumpkins in my Thanksgiving decor, so I thought they would look nicer this way.

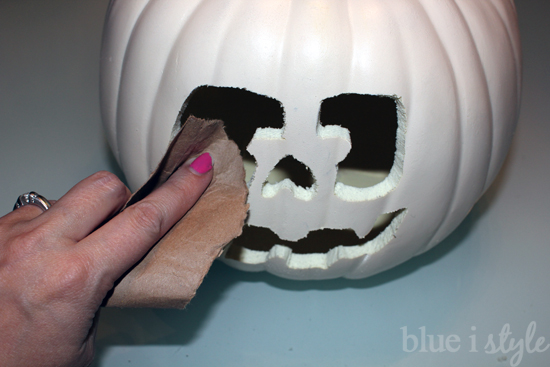
The last step before painting was to sand down all of the rough edges. I used a torn piece of a brown paper bag {which acts like a fine grit sandpaper}. I couldn’t get the edges completely smooth – but they were smooth enough for my purposes.

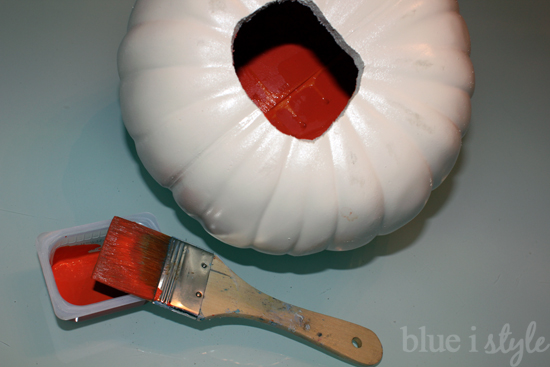
I then began painting the inside of each pumpkin. To match the colors of our living room – I painted the pumpkins orange, yellow, teal {two shades} and grey. I began by using a medium sized brush which fit well through the hole in the bottom of the pumpkins, and painted as much as I could access.

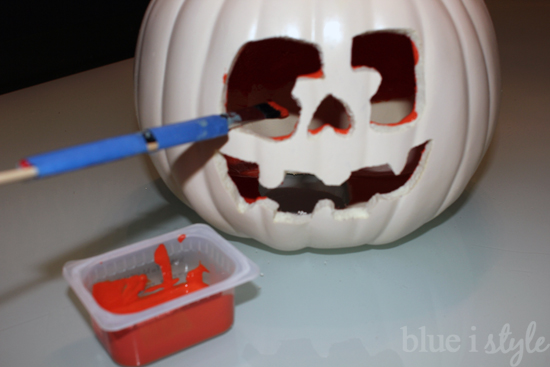
I then used a much smaller paint brush to reach through the eyes, nose and mouth to finish painting the inside of each pumpkin. I quickly discovered, however, that the handle on my brush wasn’t long enough to allow me to reach to the far side of the pumpkins, so I used blue painters tape to attach a disposable wood skewer – creating a handle extension that did the trick.

In addition to painting the inside of each pumpkin, I also painted each carved edge. In the process, I accidentally got some of the paint on the front of the pumpkin, but a baby wet wipe easily wiped it away. The key is to wipe up any excess acrylic paint quickly before it begins to dry.

Once all of the pumpkins were painted, I lined them up on my entry table and stepped back to admire them.
Modern Colorful Peek A Boo Pumpkins

I originally wanted to light them on the inside with flameless {battery-operated} tea lights, but because the lights cast such a yellow/orange glow, they really messed with the two teal colored pumpkins, making them look a dirty brown. I am now on the look at for some white LED tea lights {and as of yet I’m not sure if such a thing exists}.

But even without candles or lights inside, the colors of the pumpkins stand out and modern, bold statement! 
I can safely say that these pumpkins are my new favorites among all of my Halloween decor, and in a few weeks I’ll working on another project to make these exact same pumpkins a part of my Thanskgiving decor. UPDATE: See how these pumpkins reverse for Thanksgiving.
Modern Colorful Jack O'Lanterns
Looking for even more seasonal inspiration?! You might be interested in these fall and Halloween projects:
  • Facebook
  • Twitter

10.22.14

« {seasonal style} Halloween Home Tour
{one room challenge} Week 4: Knock Off Art & TV Gallery Wall Inspiration »

Meet Angela

Angela, the founder of Blue i Style, strongly believes that decor should be functional, organizing can be beautiful, smart DIYs help stretch your budget, and an organized and stylish home can still be practical for life with kids.

Her work has been featured in print in Better Homes & Gardens and 5280 Home magazine, and online by HGTV, the Today Show, Good Housekeeping, and more. She was also named a 2018 Stylemaker by Better Homes & Gardens.

You can reach Angela at angela@blueistyle.com

Get Email Updates!

Thanks for subscribing! Check your email a welcome message and your free organizing eBook!

Get Email Updates!

Plus a bonus free organizing eBook!

COPYRIGHT & PHOTO SHARING POLICY

All text, images, and other content that are part of this blog are the property of Blue i Style, unless otherwise noted. All material is copyright protected.

If you wish to feature one of my projects, feel free to share a single photo (no collaged images, or images with text overlays) as long as the no pin code is used to prevent my image from being pinned from your site.

All features must include credit to Blue i Style with a link back to the original content (not just to the homepage). The project steps, supply list, and/or sources may not be disclosed.

Please read my full content and photo sharing policy to ensure you comply with all guidelines. Failure to do so constitutes copyright violation.

Create At Your Own Risk

Any and all content on this website is for personal use only and created exclusively for inspiration purposes.

Creating with my suggested methods, products used, and tools is at your own risk.

Please ensure you are following proper guidelines with anything used, and you receive professional guidance when necessary.

Read my complete disclosure at: Policies & Disclosures.

Sponsorships & Affiliations

To help fund this blog, I accept some forms of advertising, sponsorships, and affiliate links.

If you buy something that I recommend, you pay the same price, but I may receive a small commission. As always, all opinions are my own.

Blue i Style is a participant in the Amazon Services LLC Associates Program, an affiliate advertising program designed to provide a means for sites to earn advertising fees by advertising and linking to amazon.com.

I use an affiliate marketing service which may automatically put links into some posts, so please assume any/all links may be affiliate links.

Read my full Disclosure Statement.

Copyright © 2025 · Dazzling Theme theme by Restored 316

  • Facebook
  • Twitter
  • Pinterest