• About
    • About Blue i Style
    • Tour Our Home
    • Free Organizing eBook
    • Blogging Resources
  • Work With Me
    • Interior Decor & Organizing Services
    • Partnerships & Collaborations
    • Blogging Resources
  • Features & Press
  • Policies & Disclosures
  • Contact

Blue i Style

Creating an Organized & Pretty, Happy Home

  • Decor
    • Tour Our Home
    • Room Makeovers & Design Plans
    • Decorating Tips & Tutorials
    • Outdoor Decor
    • One Room Challenge
  • Organizing and Cleaning
    • Organizing Tips & Tutorials
    • Organizing By Room
    • Organizing on the Go
    • Cleaning
  • DIY
    • DIY Tips & Tutorials
    • Smart Home & Safety
    • Paint Tips & Projects
    • Crafts
    • Cricut Projects
  • Kids
    • Decor & DIY for Kids
    • Organizing Kids
    • Life With Kids
  • Five Minute Projects
  • Holidays & Entertaining
    • Seasonal & Holiday Decor
    • Entertaining
    • DIY Gifts & Gift Guides
    • Facebook
    • Instagram
    • Pinterest
    • Twitter
    • YouTube

Crafts· Decorating Tips & Tutorials

Sophisticated Superhero Framed Art

  • Facebook
  • Twitter
Thank you guys for all of the love and sweet comments on our recent makeover of the boys’ bathroom! I am super passionate about finding ways to balance my love of modern style with mom-life, and I’m always striving to create kid spaces that can grow with them and won’t need to be completely redecorated again next year.
All of these factors were at play when the boys asked for a superhero themed bathroom. I loved the challenge of giving them exactly what they wanted while also making it fit in with the rest of our home {especially since the bathroom is visible from the stairs} and making sure it was a space that they could still love five or more years from now.

If you’ve ever looked for superhero decor, you know that much of it falls into one of two categories – bright and over the top, or dark and a bit too mature for young kids. I couldn’t find anything just right for our needs – modern and sophisticated, not too little kid-ish, but not too scary either.
When I find myself in this kind of design dilemma I always come to the same conclusion – it’s easier to go the DIY route and make exactly what I want! And that’s exactly what I did with the simple DIY superhero art for the bathroom. I’ve gotten quite a few questions from readers about that art, so I wanted to give you the quick tutorial today to show you how easy it was to make using on of my go-to DIY tools, the Cricut!
In the interest of full disclosure, I have to let you know that this post is sponsored by Cricut and contains so affiliate links {if you buy something I recommend I may receive a small commission}, but since I’ve been talking about my Cricut DIY projects for as I’ve been blogging, I know you guys are aware that my love for Cricut runs true and deep! Here are some of my other favorite Cricut design and decor projects:
Ok, back to the tutorial superhero art! I came up with the idea to keep the art modern and sleek by simply placing simple metallic superhero logos on black backgrounds with contrasting white frames. Of course, I didn’t want to have to cut the logos by hand, and that’s where the Cricut comes in.
SUPPLY LIST
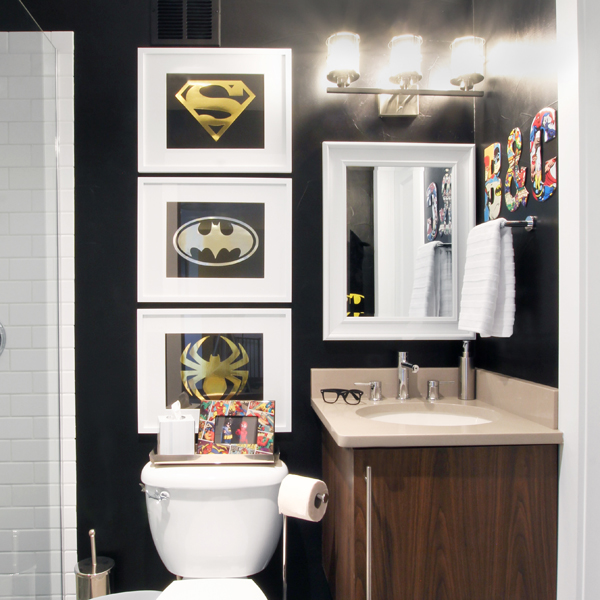
  • 16″ x 20″ White Picture Frames
  • White Mattes with 11″ x 14″ openings
  • 16″ x 20″ Black Acid Free Art Boards {also called conservation board}
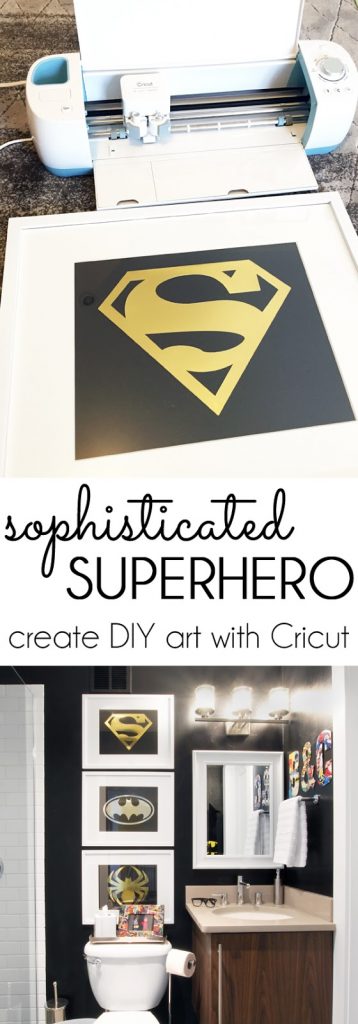
  • Cricut Adhesive Foil Stainless {gold and silver, or sampler pack}
  • Cricut Explore Air
  • 12″ x 24″ Cricut Cutting Mat
  • Weeding Tool
A few months back I made a project using metallic adhesive foil, and it worked so well that I realized it would be the perfect medium for this project because I could cut the superhero logos and just stick them directly on to the black art boards.
One of the questions I get asked most often about the Cricut is whether it will be easy for you to learn the Cricut Design Space software to create my own custom projects? And the answer is a resounding YES! The software is so user-friendly and intuitive, and once you’ve made your first custom project you’ll have confidence that you can do anything. How do I know… because that was me asking the same question just a few months ago, and after dragging my feet and being nervous to make my first custom project, I know can’t stop planning what I’m going to make next.
I’m actually not going to walk you through the process for creating a custom cut project using Cricut Design Space in this post because I did a really detailed tutorial back in January with step by step screenshots.
I purchased clipart versions of the superhero logos that I wanted to use {Superman, Spiderman, and Batman}, and then loaded the images in to the Design Space software. From there, the process of turning them into cut files is exactly the same as I outlined in this post {just skip past the project photos and go to the second half of the post for the Design Space tutorial.}
Once I had the cut files created, I affixed the adhesive foil to my Cricut mat. I set the knob on the machine to “other,” and then in the software I chose “adhesive foil” as my material to ensure that the cutting pressure would be perfect for my material.
After cutting each logo, I used my weeding tool to remove the negative pieces of the designs.

I would normally use vinyl transfer tape to perfectly position my foil or vinyl designs on the final product, but in this case I was placing the logos on art boards with a paper-like surface. I’ve learned the hard way in the past that transfer tape won’t come off of paper easily, so I needed to find a different method to position the adhesive foil logos on the black art boards.

My main concern was getting the logos perfectly centered, so I decided to remove the adhesive backing and lay the first logo face down {foil side down} on the frame glass centered within the matte opening.

With the adhesive side up {not yet stuck to anything} I was able to adjust the positioning until the logo was centered and straight. Then I was simply placed the black art board face down into the frame, pressing down to adhere the adhesive foil to the board in just the right spot.
And that’s it! I put the frame backer board in place, secured it, and flipped the frame over to admire my new sophisticated super hero art!
This art could not have been easier to create, but hanging together, the three superhero logos make quite a statement!
Head over to the full bathroom post to see all of the other details of the sophisticated superhero makeover!

This is a sponsored conversation written by me on behalf of Cricut. The opinions and text are all mine.


var ts=document.getElementById(‘ti-pixel-tracker’); var axel = Math.random() + “”; var num = axel * 1000000000000000000; var ti=document.createElement(“img”); ti.style.display=”none”; ti.src=”https://tracking.tapinfluence.com/trk/vMJJw/QR1cw/p.png?p=V5gD1″ + String.fromCharCode(38) + “i=tThdX” + String.fromCharCode(38) + “ord=”+ num + String.fromCharCode(38) + “s=” + encodeURIComponent(document.referrer); ts.parentNode.replaceChild(ti,ts); JSON.stringify({“program_id”:”f7ee073c-33fa-11e7-9b88-22000a66c666″,”post_id”:”8a356e42-3413-11e7-8fe5-22000a66c666″});

  • Facebook
  • Twitter

06.08.17

« 10 Outdoor Projects to Inspire Your Summer Decor
Home Made Smarter »

Meet Angela

Angela, the founder of Blue i Style, strongly believes that decor should be functional, organizing can be beautiful, smart DIYs help stretch your budget, and an organized and stylish home can still be practical for life with kids.

Her work has been featured in print in Better Homes & Gardens and 5280 Home magazine, and online by HGTV, the Today Show, Good Housekeeping, and more. She was also named a 2018 Stylemaker by Better Homes & Gardens.

You can reach Angela at angela@blueistyle.com

Get Email Updates!

Thanks for subscribing! Check your email a welcome message and your free organizing eBook!

Get Email Updates!

Plus a bonus free organizing eBook!

COPYRIGHT & PHOTO SHARING POLICY

All text, images, and other content that are part of this blog are the property of Blue i Style, unless otherwise noted. All material is copyright protected.

If you wish to feature one of my projects, feel free to share a single photo (no collaged images, or images with text overlays) as long as the no pin code is used to prevent my image from being pinned from your site.

All features must include credit to Blue i Style with a link back to the original content (not just to the homepage). The project steps, supply list, and/or sources may not be disclosed.

Please read my full content and photo sharing policy to ensure you comply with all guidelines. Failure to do so constitutes copyright violation.

Create At Your Own Risk

Any and all content on this website is for personal use only and created exclusively for inspiration purposes.

Creating with my suggested methods, products used, and tools is at your own risk.

Please ensure you are following proper guidelines with anything used, and you receive professional guidance when necessary.

Read my complete disclosure at: Policies & Disclosures.

Sponsorships & Affiliations

To help fund this blog, I accept some forms of advertising, sponsorships, and affiliate links.

If you buy something that I recommend, you pay the same price, but I may receive a small commission. As always, all opinions are my own.

Blue i Style is a participant in the Amazon Services LLC Associates Program, an affiliate advertising program designed to provide a means for sites to earn advertising fees by advertising and linking to amazon.com.

I use an affiliate marketing service which may automatically put links into some posts, so please assume any/all links may be affiliate links.

Read my full Disclosure Statement.

Copyright © 2025 · Dazzling Theme theme by Restored 316

  • Facebook
  • Twitter
  • Pinterest