• About
    • About Blue i Style
    • Tour Our Home
    • Free Organizing eBook
    • Blogging Resources
  • Work With Me
    • Interior Decor & Organizing Services
    • Partnerships & Collaborations
    • Blogging Resources
  • Features & Press
  • Policies & Disclosures
  • Contact

Blue i Style

Creating an Organized & Pretty, Happy Home

  • Decor
    • Tour Our Home
    • Room Makeovers & Design Plans
    • Decorating Tips & Tutorials
    • Outdoor Decor
    • One Room Challenge
  • Organizing and Cleaning
    • Organizing Tips & Tutorials
    • Organizing By Room
    • Organizing on the Go
    • Cleaning
  • DIY
    • DIY Tips & Tutorials
    • Smart Home & Safety
    • Paint Tips & Projects
    • Crafts
    • Cricut Projects
  • Kids
    • Decor & DIY for Kids
    • Organizing Kids
    • Life With Kids
  • Five Minute Projects
  • Holidays & Entertaining
    • Seasonal & Holiday Decor
    • Entertaining
    • DIY Gifts & Gift Guides
    • Facebook
    • Instagram
    • Pinterest
    • Twitter
    • YouTube

Crafts· Entertaining

How to Make a Tissue Paper Tassel Garland

  • Facebook
  • Twitter

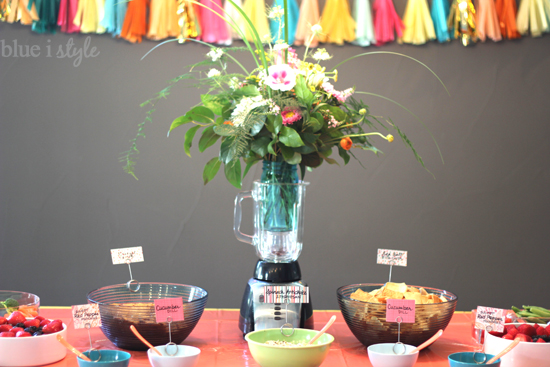
Tissue paper tassels are all the rage right now! And it’s no wonder why – since they are so dang cute and all!

How to Make a Tissue Paper Garland

I recently made about 60 tissue paper tassels to decorate for the Stock the Kitchen wedding shower that I hosted for my sister-in-law, and while it took a bit longer than I anticipated {about 2.5 hours with my mom and I working together}, the process of making each tassel is quite easy and I learned some tricks along the way to make it even easier.
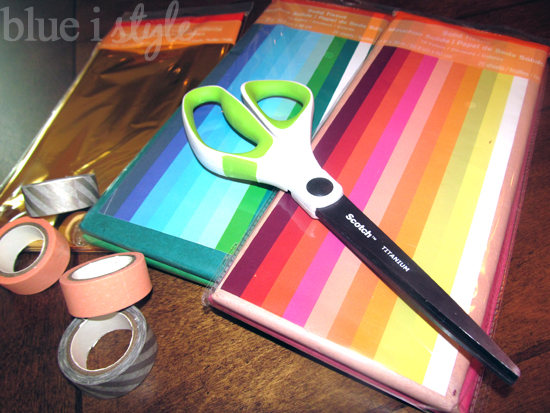
SUPPLIES

Tissue paper in your choice of colors {1 sheet = 2 tassels}
Scissors {alternatively, a rotary cutter speeds up the process}
Decorative washi tape {or clear tape}
String, ribbon or yarn {not pictured}
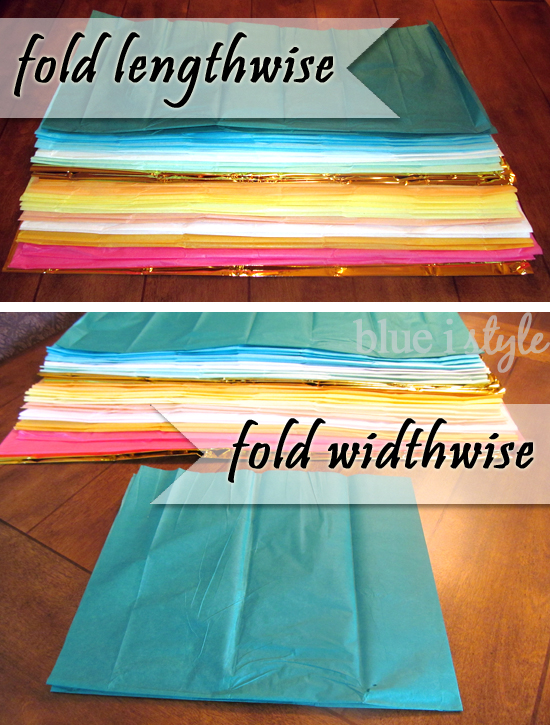
FOLD

Begin by folding each individual sheet of tissue paper in half lengthwise, and then fold each again widthwise. Rather than making one tassel at a time, I created a bit of an assembly line {my mom was helping me} by folding all of the tissue paper before moving on to the next step.

CUT

After folding the tissue paper, begin cutting strips to create a fringe. Cut toward the initial fold line, leave about 1 inch uncut at the fold line. The width of each fringe cut does not need to be exactly the same, so you don’t need to measure or be too precise, but the finished tassel will look nicer in the fringed strips are similar in width.

I began cutting the fringe using a regular pair of scissors. After about 10 tassels {and when we realized that it was going to take hours to make all 60}, my mom suggested that we try using her rotary cutter, which made much quicker work of the fringe cutting!

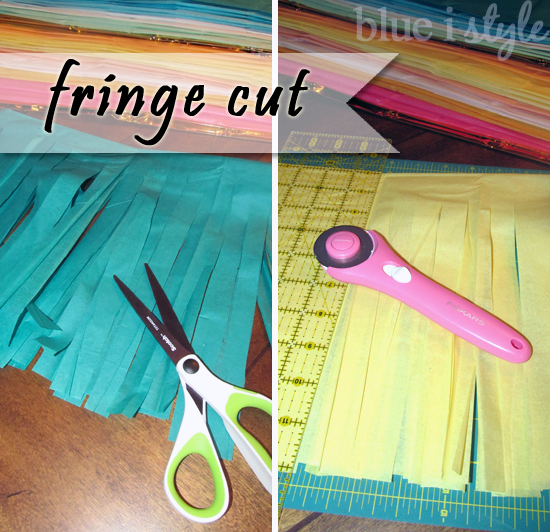
Word of warning – don’t ever use fabric scissors or rotary blades for paper! The paper will dull them quickly and they will no longer work well on fabric! My mom sews a lot, and once a rotary blade eventually becomes too dull for cutting fabric, she retires it to paper-cutter status. But don’t cut paper with a blade that you intend to use for fabric again!

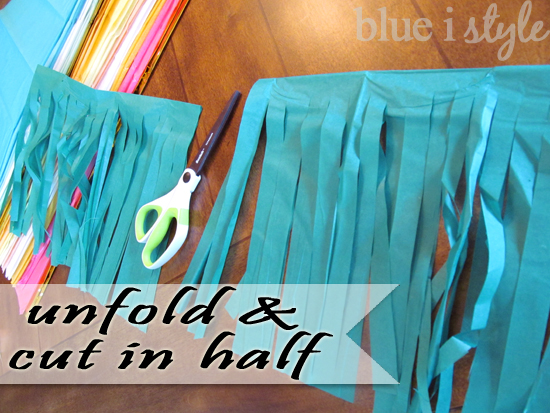
Once all of the strips are cut, unfold the second fold that you created in the paper {the widthwise fold}, and then cut the tissue paper in half. This will leave you with two separate fringe cut sheets for making two tassels.
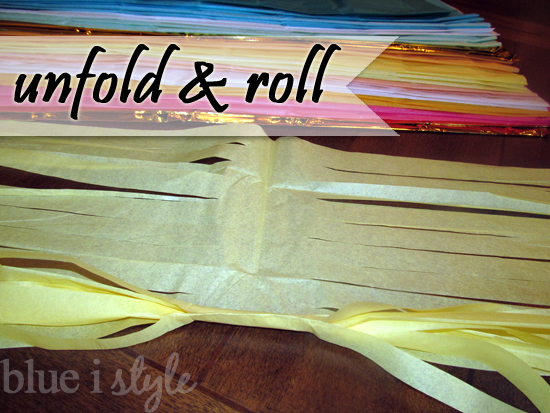
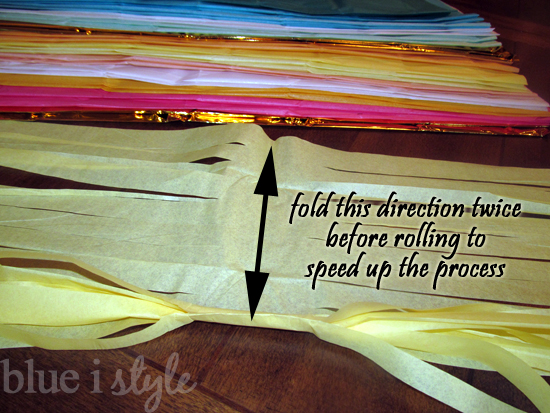
ROLL

After cutting the fringed tissue paper in half, unfold it again, and roll it tightly down the middle crease.

It’s easy for the fringe to get tangled up as you roll, so it’s helpful to roll slowly, untangling as you go.
I also discovered that the rolling process can be made quicker and easier by folding the fringed tissue paper in half twice before rolling – this simply reduces the length that you have to roll, but does not change the end appearance of the tassels. I failed to take any pictures after making this discovery, but hopefully this clarifies the directions of the folds.
TWIST


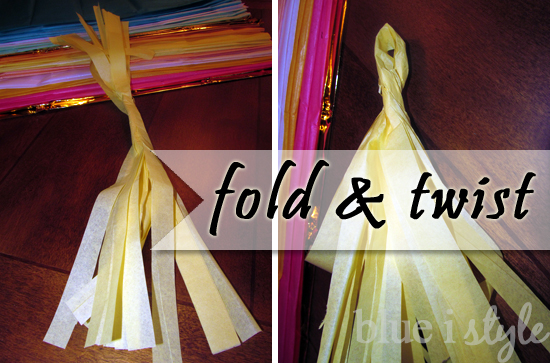
After you have finished rolling each tassel, fold them in half and twist to create the loop that you’ll use to hang the tassels.
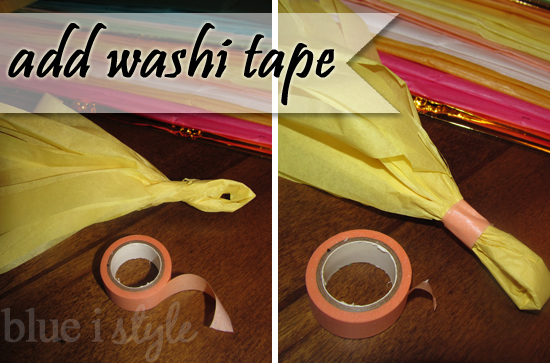
TAPE

To prevent the tassels from coming untwisted, I suggest wrapping some decorative washi tape tightly around the twisted part of the tassel about three or four times.

And just for fun, here’s what a pile of 60 completed tassels looks like…

HANG

Finally, once your tassels are created, you are ready to string them up and hang them. I chose to use yarn to hang my tassels, but string or a thin ribbon would work just as well.

How to Make a Tissue Paper Garland
I tied the ends of the yarn to clear 3M Command hooks that I stuck to the wall.
How to Make a Tissue Paper Garland
I used this tissue paper tassel garland to decorate for the Stock the Kitchen wedding shower that I hosted for my sister-in-law.
There are many more photos of the tassels, as well as the other decorations, in the full wedding shower post.
For those who are visual, like me, {or if you want to pin these instructions for later} here’s one final look at all the steps involved in making tissue paper tassels.
How to Make a Tissue Paper Garland
Have fun making your tissue paper tassels! I recommend watching something good on Netflix while you work on this project!

Are you looking for more entertaining ideas? You might be interested in these posts!

  • Facebook
  • Twitter

08.27.14

« {organizing with style} 19 Genius Paint Storage Soltuions
{five minute friday} Framed Dish Towel Kitchen Art »

Meet Angela

Angela, the founder of Blue i Style, strongly believes that decor should be functional, organizing can be beautiful, smart DIYs help stretch your budget, and an organized and stylish home can still be practical for life with kids.

Her work has been featured in print in Better Homes & Gardens and 5280 Home magazine, and online by HGTV, the Today Show, Good Housekeeping, and more. She was also named a 2018 Stylemaker by Better Homes & Gardens.

You can reach Angela at angela@blueistyle.com

Get Email Updates!

Thanks for subscribing! Check your email a welcome message and your free organizing eBook!

Get Email Updates!

Plus a bonus free organizing eBook!

COPYRIGHT & PHOTO SHARING POLICY

All text, images, and other content that are part of this blog are the property of Blue i Style, unless otherwise noted. All material is copyright protected.

If you wish to feature one of my projects, feel free to share a single photo (no collaged images, or images with text overlays) as long as the no pin code is used to prevent my image from being pinned from your site.

All features must include credit to Blue i Style with a link back to the original content (not just to the homepage). The project steps, supply list, and/or sources may not be disclosed.

Please read my full content and photo sharing policy to ensure you comply with all guidelines. Failure to do so constitutes copyright violation.

Create At Your Own Risk

Any and all content on this website is for personal use only and created exclusively for inspiration purposes.

Creating with my suggested methods, products used, and tools is at your own risk.

Please ensure you are following proper guidelines with anything used, and you receive professional guidance when necessary.

Read my complete disclosure at: Policies & Disclosures.

Sponsorships & Affiliations

To help fund this blog, I accept some forms of advertising, sponsorships, and affiliate links.

If you buy something that I recommend, you pay the same price, but I may receive a small commission. As always, all opinions are my own.

Blue i Style is a participant in the Amazon Services LLC Associates Program, an affiliate advertising program designed to provide a means for sites to earn advertising fees by advertising and linking to amazon.com.

I use an affiliate marketing service which may automatically put links into some posts, so please assume any/all links may be affiliate links.

Read my full Disclosure Statement.

Copyright © 2025 · Dazzling Theme theme by Restored 316

  • Facebook
  • Twitter
  • Pinterest