If there is one thing that I have learned in all of our travels – especially our international travels – it’s that it is inevitable that something will go wrong on any trip. It might be a lost bag, it might be a reservation snafu, it might be a technology failure. But it’s bound to be something.
I’ve also learned, however, that a little bit of planning and preparation in advance can ensure that whatever challenge arises can be more easily dealt with and you can be back to enjoying your vacation with much less stress! That’s where my organized travel binders and my free printable planning pages come in…
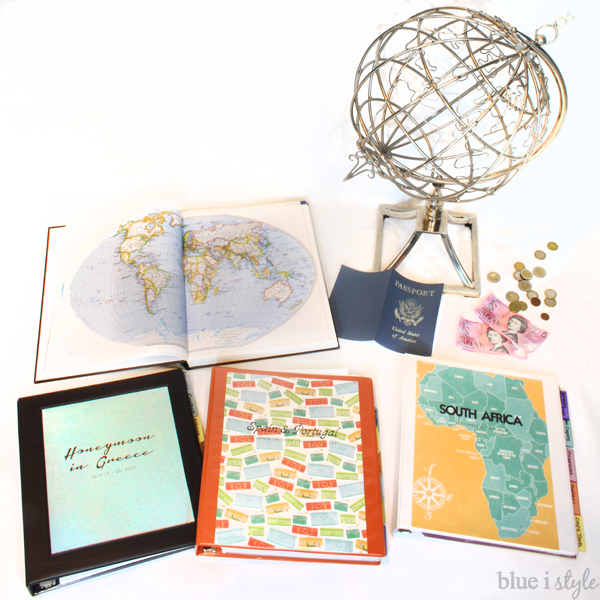
- Overview of Organized Travel Binder Contents
- Itinerary
- Phone Number List
- Document Copies
- General Travel Tips
- Financial
- Destination Specific Info
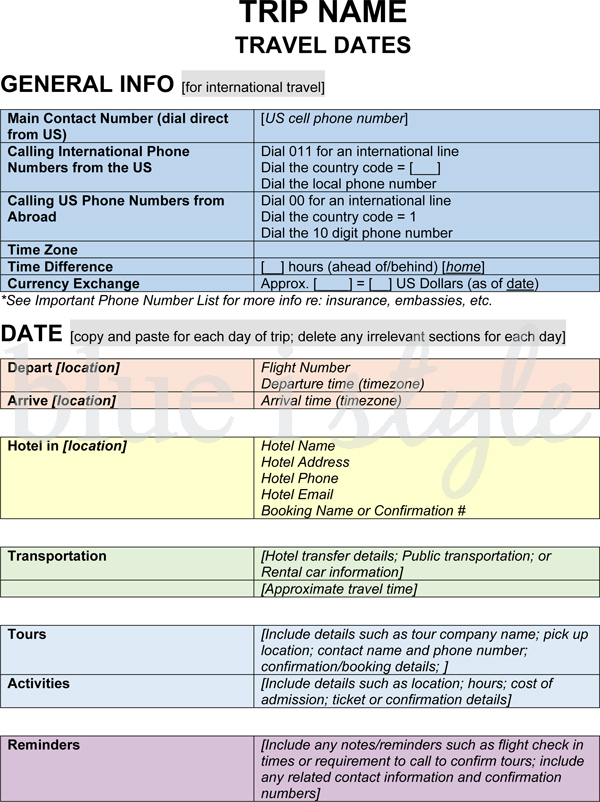
ITINERARY
- Primary phone number (usually a cell phone) where you can be reached.
- Instructions for calling the destination country from the US {this is helpful if your flight gets cancelled and you need to call to change a reservation, or if someone at home needs to reach you at a hotel}
- Instructions for calling the US from the destination country.
- Time Difference – If you are making an international call, you’ll need to know the time difference, so I always include the time zone and how many hours it is ahead of or behind home.
- Exchange rate – I update right before we leave on the trip
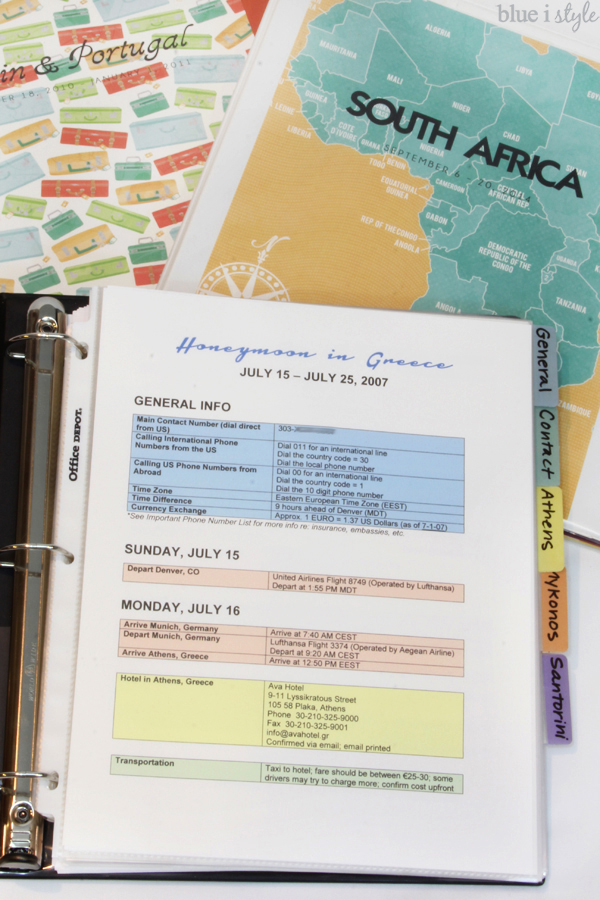
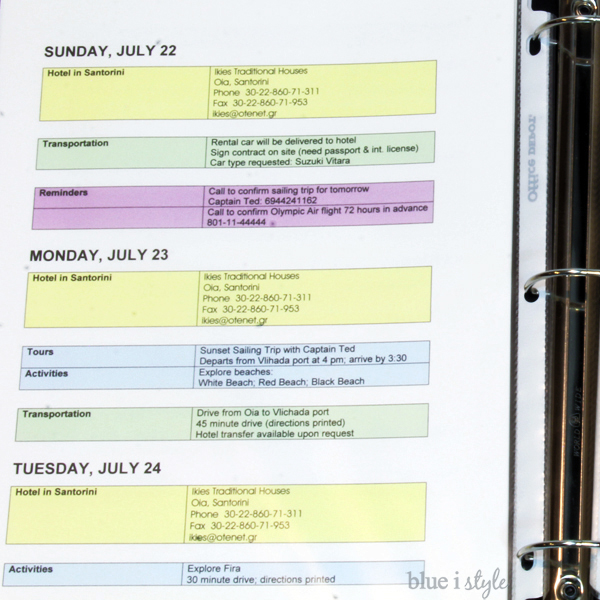
Below the “General Info” is a section for each day of the trip. I always include both the day of the week and the date, because it can be become hard to keep track of the date when you are traveling.
My itinerary template includes five sections for each day. I copy and paste these five sections for each day of the trip, and then as our travel plans come together, I delete any unused sections under each date.
- FLIGHTS/TRAVEL:
- Airline Name(s)
- Fight Numbers
- Arrival and Departure Times {noting time zones}
- HOTELS:
- Hotel Name
- Address
- Phone/Fax
- Email Address
- Confirmation Number or Confirmation Details {I only list this on the day of check in}
- I copy and paste the hotel info for each day of our stay. This might seem like overkill, but if someone back home needs to reach you in an emergency {something always on my mind when I traveling without my kids}, it’s much easier for them to have all of your info in one spot for each day.
- TRANSPORTATION: This is where I add notes about:
- Hotel Transfers {whom to look for; will they have a board with our name, etc.}
- Rental Car Pick Ups {rental company name; reservation number; car type}
- Taxi Notes {I always research the expected rate from airport to hotel in advance, as you may get overcharged as a tourist if you don’t know the reasonable rate and confirm it up front}
- Any Public Transportation Info {which train to take, etc}
- TOURS & ACTIVITIES: In this section include:
- Tours:
- Tour Company Name
- Departure & Return Times
- Location or Pick Up/Transfer Info
- Contact Info (including a day of cell number for the guide, if available}
- Confirmation Number or Booking Details
- Activities (such as sights, monuments, museums, etc.)
- Destination Address
- Hours of Operation
- Admission Cost
- REMINDERS: This is the section were I make reminder notes to myself, such as:
- Check in for a flight 24 hours ahead
- Call to confirm a flight in advance {especially important on very small airlines}
- Call to confirm a tour/activities {often required for activities that are weather dependent}
The REMINDERS section is one of the most important when we travel! When you are busy enjoying your trip, it’s easy to lose track of the days, and even easier to get so busy having fun to that you forget things like checking in for flights. This might mean you wind up not sitting by your travel companion on your flight home, or it could be much worse… like not getting on a flight altogether.
This is one of those things I’ve learned through experience! Even in the age of technology, some small airlines – like those that provide flights between islands – still require that you call to confirm your flight in advance {usually 48 or 72 hours ahead of the departure time}. Failure to do so can result in your seat being given away to someone else.
Here are my anecdotes – feel free to skip to the next photo if you don’t want to hear my travel stories. 😉
I never believed that an airline would really give your seat away if you didn’t call to confirm… until it happened to my friends! In college, I studied abroad in Australia, and some friends and I stopped in Fiji for a week on our way back the US. The small island-to-island airline we were booked on required that you call to confirm. I did, but two of my friends did not. When we arrived at the airstrip a couple of days later, we learned that one of their seats had been given away. The next flight to the big island wasn’t for two more days, so he miss his flight back the US and had to deal with trying to rescheduling international flights from an island with limited phone service and no internet access.
After that, I’ve always been even more vigilant about calling to confirm flights, and that has paid off. On our honeymoon in Greece, we called to confirm our flight from the island of Santorini back to Athens. To our dismay, the airline insisted we did not have a reservation, even when we gave them the confirmation number. The airline requested that we drive to the airport {on the other side of the island} to show them the confirmation, and then finally managed to get us seats on the flight. Dealing with it was a hassle, but had my itinerary not remind me to call to confirm, or had I not had a print out of the confirmation, we wouldn’t have made it on that flight back to Athens three days later, and during the high season in the Greek Islands, finding a hotel for an extra night would have been nearly impossible.
Ok, enough stories… back to the travel binder!
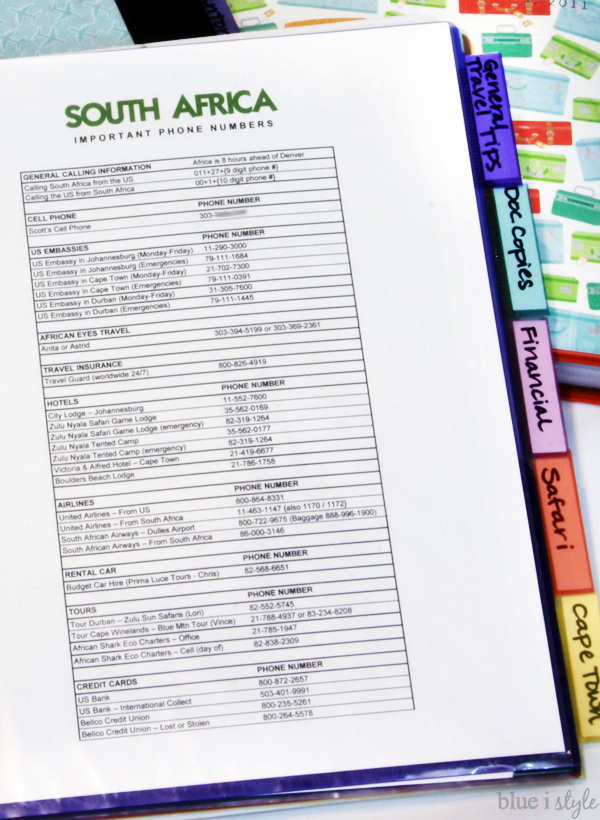
LIST OF IMPORTANT PHONE NUMBERS
After the itinerary for our trip is complete, I always put together a list of important phone numbers. Download the editable phone list template as a Word document.
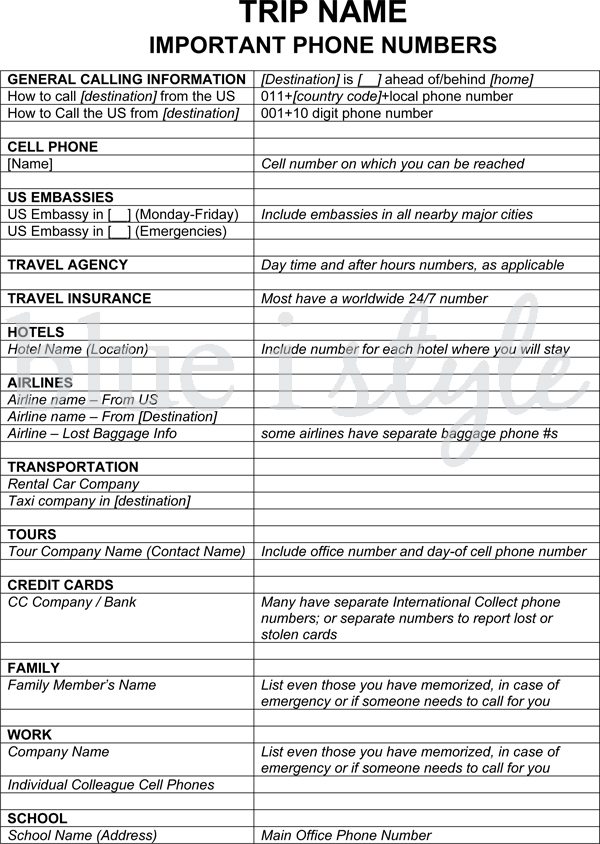
On this phone list, I include every number we might need while traveling, as well as numbers that friends and family back home might need in order to assist us, or in case of an emergency. You can read all of the notes in the template above, but I’ll highlight a few important points:
- US EMBASSIES: If you passport were lost or stolen while you are traveling abroad {or if you were the victim of another crime}, you would have to contact the nearest US Embassy or Consulate for assistance. Most embassies have a daytime phone number, as well as an after hours emergency number, so be sure to note both.
- In the event that your passport needed to be replaced, you would also need copies of several documents, including a copy of your drivers license and your passport. I always travel with a copy in my binder and leave a copy, a copy in my email {or Google Drive}, and a copy at home with a family member who could fax it to me. Here is a full list of requirements from the Department of State.
- AIRLINES: Many airlines have different numbers to call for reservation changes, and for baggage. If you miss a flight or lose your luggage while traveling, it can save a lot of time and hassle to have each of these numbers at your finger tips {otherwise you may find yourself on hold and being passed around endlessly – trust me on this one!}
- CREDIT CARDS: If your wallet were lost or stolen, you would need to have all of the numbers on hand to quickly call and report it / cancel cards. All of the relevant numbers are listed on the back of your cards, but that doesn’t do any good if you don’t have your cards, so save the hassle by adding these numbers to you phone list.
- In order to report your cards stolen, you may also need to know your account numbers, therefore it’s a good idea to make a copy of each card that you are traveling with and leave the copies with a family member. I don’t recommend putting these copies in your binder, or emailing them to yourself, since this risks the info getting into the wrong hands.
- Also be sure to inform your banks and credit card companies of your travel plans before you leave. Failing to inform banks/credit card companies of planned use abroad can result in fraud concerns, and if the bank cannot immediately reach you, they may freeze your account, rendering your card unusable for a period of time.
- Check with your financial institutions regarding foreign transaction fees. The fees can vary widely, so make an educated determination of which cards you want to use abroad so that you won’t be surprised by the fees when you return
- FAMILY / WORK / SCHOOL: It’s always good to list numbers for all of the people you might need to reach if you were to be delayed or in case of an emergency. Don’t rely on having these numbers programmed into your phone, because phones can be very unreliable when traveling abroad. Include even those numbers you have memorized, as it’s easy to forget a number when a stressful situation arises, or someone else back home might need to call for you if you get stuck somewhere.
Now that I’ve walked you through my free printable planning pages, let’s talk about the other sections of an organized travel binder.
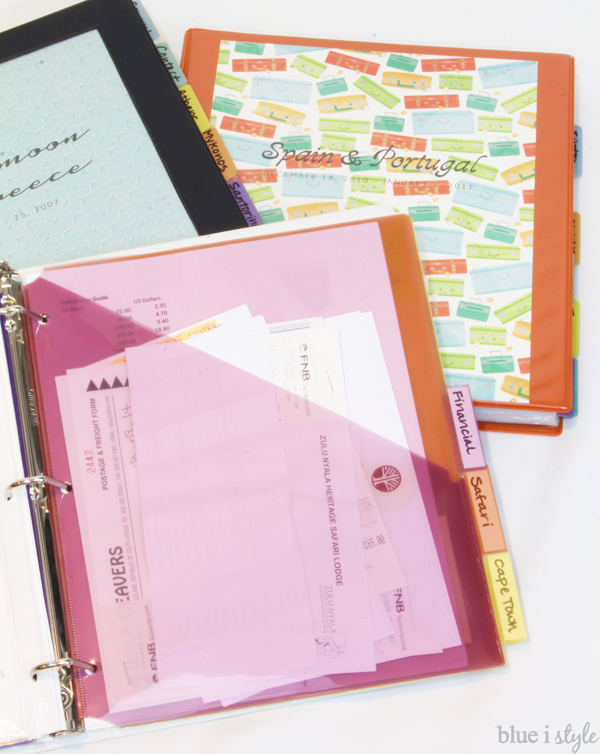
I’ve used different tabs to organize my binders over time, but I now typically include a tab for DOCUMENT COPIES, GENERAL TRAVEL TIPS, and then a tab for each major destination. I sometimes also include a FINANCIAL TAB, as I’ll explain below.
DOCUMENT COPIES
- I’m not including any photos of this section of my binders, since the documents contain personal information, but documents you should include here are:
- Print outs of flight confirmations
- Copies of your passport and drivers license
- Copies of any travel insurance documents
- Any other documents you might need to make the trip run smoothly
- As noted above, I DO NOT include copies of credit cards in this section, but you should leave a copy with someone at home in case they are stolen and need to be reported
- I do not include print outs of hotel and tour confirmations or maps in this section. I instead put those documents behind the tab for each city/town, which I find makes it faster to find what you need throughout the trip.
- This is a good place in the binder to put any general info that you might want to reference quickly while traveling, such as:
- Instructions from your cell phone carrier about how to get your phone working when you arrive {this may require international codes; etc}. If you arrive and your phone isn’t working, finding this info online won’t be an option.
- Tipping customs {who to tip, when, and how much}
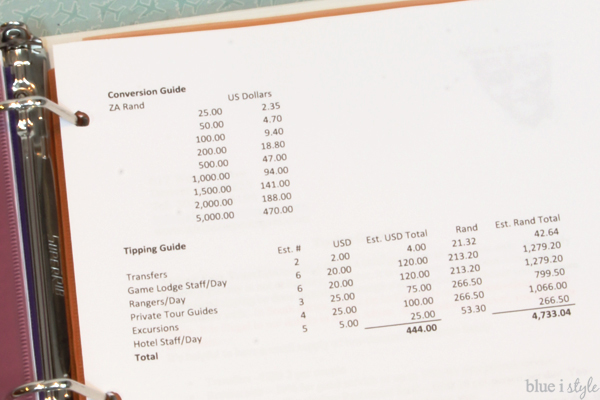
- A conversion cheat sheet {I make my own based on the exchange rate at the time}
- Basic questions/phrases if you are traveling to a place where you don’t speak the language
- Guidelines for appropriate attire {important if you’ll be visiting small villages or religious sites}
- In order to receive your VAT refund, you typically have to identify yourself as a tourist when paying for goods and request a special tax invoice from shop owners. You then fill out a form at the airport and provide your tax invoices prior to departure.
- The amount of your potential refund can add up quickly when you are traveling and purchasing goods and gifts, so you don’t want to miss out by failing to keep receipts organized! This is why, for our trip to South Africa, I included a dedicated financial section with information about which purchases qualified for refund, and pocket to keep all of the eligible receipts/tax invoices in one place. This made it very fast and easy to fill out the form and have our refund processed at the airport before flying home to the US.
- I put document copies relevant to each location behind these tabs, such as hotel confirmations, documentation for rental cars being picked up in this location, tour bookings, etc.

- Maps & Driving Directions:
- When we travel, we love to explore at our own pace, so we often end up renting a car to drive from town to town. Any time we will be driving abroad, we always rent a GPS for that country {either from the rental car company, or from a third party if necessary}. But while a GPS makes driving in an unfamiliar country much less stressful, it’s also not fool proof. Like all other technology, GPS isn’t reliable all the time, and the last thing you want is to be lost between destinations in a country where you don’t speak the language enough to get directions.
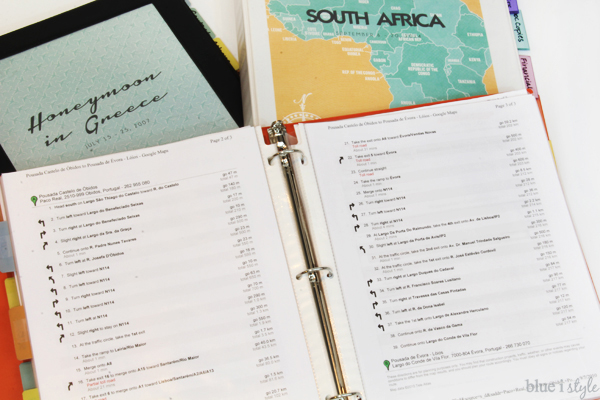
- I always put an overview map from each Point A to Point B in my travel binder. Having this map provides a good check against the GPS. Before setting out to drive to a new town, we always zoom out on the GPS and ensure that the route looks somewhat similar to our printed map to make sure we are headed in the right direction.
- We’ve discovered that often the American spellings for towns are different than the local spellings {Fira vs. Thira for the main town on the island of Santorini, Greece, for example}. There are often also towns with similar spellings. This can cause confusion when you are inputting the destination into your GPS, so checking against a printed map makes sure you don’t waste time driving in the wrong direction {this is another “trust me” moment”}.

- I also like to print out the turn by turn directions from Google maps, and include those in the binder as well. I only reference these directions if we run into trouble getting where we need to go via GPS, but it seems that at least once a trip I need to refer to these directions, and when I do, having them is a life saver!
- DESTINATION TRAVEL TIPS:
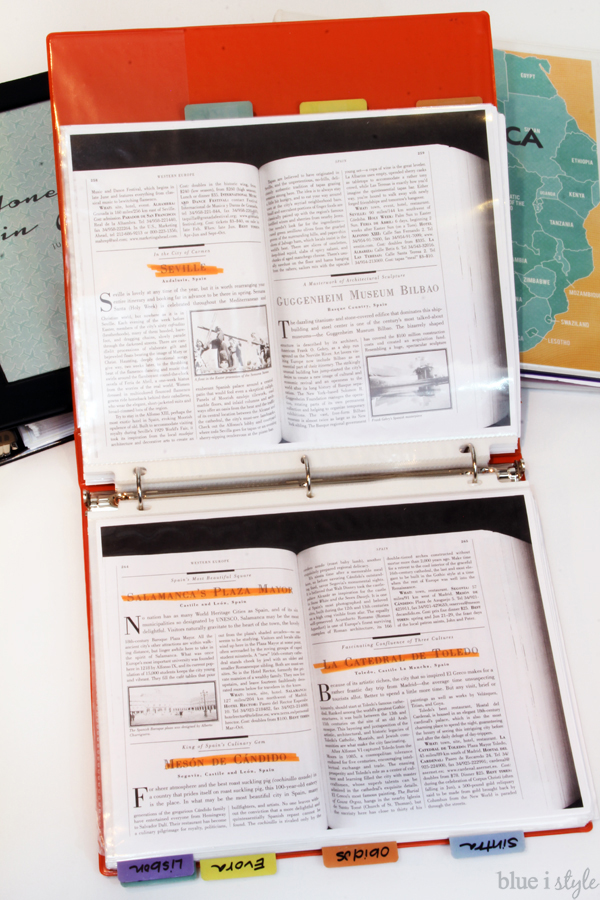
- We like to visit a lot of small towns when we travel {to get more of a local feel}, and I often end up consulting more than one travel guide in order to find complete info on each place we are visiting. Rather than having to carry multiple bulky books with me, I simply make copies of the few relevant pages and put them in the binder behind the tabs for those destinations.
- I do the same with destination specific travel tips that I’ve found from online review sites or recommendations from friends. I copy and paste the info into a single document and put it in the binder behind the tab for the city/town.
- INFO TO BRING HOME: In addition to filling your binder with all of the info you may need while traveling, you’ll also want to be able to easily add to the binder throughout the trip. The easiest way to do this is to put a bunch of clear plastic sleeves at the back of the binder, and then move the sleeves to the appropriate sections as you fill them up.
- Invoices & Receipts: Make sure to hold on to the invoices and receipts from hotels, rental cars, tours, etc., so that you can compare them to your credit card statement after you return home. More than once we have discovered that we were overcharged {or double charged}, and it’s much easier to resolve this if you have the documents on hand.
- I always like to pick up brochures and post cards from each place we visit. They help me remember the trip, come in handy to recall names of places if you decide create a photo book, and make it easier to give recommendations to friends later on. Putting all of the brochures from each destination in a clear plastic sleeve in the binder keeps them from cluttering up your purse or luggage, and makes it easier to find them again when you need them {even if it’s years later}.
IF YOU HAVEN’T ALREADY – DOWNLOAD THE FREE PRINTABLE PLANNING PAGES! Make sure to also pin the image below so that you can easily find your way back to this post for all of these tips when you’re ready to put together your organized travel binder!

- Paper copies of documents are your best friend because technology failures are inevitable/unavoidable when traveling abroad.
- Always keep a copy of your itinerary, phone list, passport, and drivers license in your email {or on the cloud} and also leave a copy with someone at home.
- Leave a copy of your credit cards with someone trusted at home {but don’t carry copies with you or keep them in your email for security reasons}.
- Print your name, address, phone number, email, and a local number where you can be reach at your destination {like a hotel}, and put it inside each suitcases near the top. In the event that your luggage is lost or damaged, this can help the airline trace it back to you even if the outside luggage tag is torn off.
- Research international data usage costs with your cell phone carrier before you leave. Outbound and inbound calls may be very different prices, so it can be beneficial to make callback arrangements with those at home to save money. Your cell provider can also give you tips regarding which settings to change while abroad to eliminate unnecessary data usage, which can add up to big savings. Also remember that Facetime and Skype are free if you have a WiFi connection, which can save money over making standard phone call.
- Research requirements for confirming flights on small airlines. Failure to confirm the required time in advance {sometimes by phone} can result in your seat being given to someone else.
- Some small airlines, ferries, etc., have luggage weight limits much lower than those for international fights. Research these weight limits in advance, and plan accordingly. If you will be returning to the same city later in the trip, consider asking the hotel to store some of your luggage and pack into a smaller bag for your side excursions.
- Research the luggage capacity of your rental car. Most rental cars abroad are smaller than we are accustomed to in the US. A typically four passenger car in Europe, for example, is unlikely to have luggage space for four large suitcases. Pack accordingly, or make arrangements to store luggage at a hotel if you’ll be returning to that city later.
- Research tipping customs/recommendations in advance and estimate how much cash you’ll need for tipping tour guides, etc. In some locations, it’s not easy to get to an ATM for more cash, so be prepared and have tipping money set aside.
- Renting a GPS is highly recommended, but having paper maps and printed directions as a backup can be a life saver!